

Please Critique my Deermount (Pics)
 01-28-2005 | 07:55 AM
#1
Thread Starter
Nontypical Buck
Joined: Feb 2003
Posts: 4,139
Likes: 0
From: Rural Kansas... Where Life is Good
 Please Critique my Deermount (Pics)
About a week ago I finished a deer mount that I did for my brother. This is my 3rd deer mount I've done, so I am still a beginner. I haven't had any training or watch any videos, and have obtained almost all of my information on taxidermy from taxidermy.net. Taxidermy is just a hobby for me, and I would appreciate if you take the time to look at the pictures I took, and explain some major flaws or introduce some new techniques that would help me with my next mount which I will be starting here pretty soon. I have a fun time doing taxidermy and am always trying to improve.
The biggest problem I ran into during the mounting process was that that face of the form was too small. It seemed I had excess skin everywhere. Also after looking at different reference photos and other mounts, I'm not real please on how the nose turned out. Something just doesn't look right. Another problem I saw was that I should have built up around the back-side of the antlers with more clay before I put the hide on.
Thanks for your time, it's much appreciated.
The link to the pictures is here, by clicking on where it says "Taxidermy".
http://community.webshots.com/user/kansashunter
Or here is a direct link:
http://community.webshots.com/album/261390222VwxrfX
The biggest problem I ran into during the mounting process was that that face of the form was too small. It seemed I had excess skin everywhere. Also after looking at different reference photos and other mounts, I'm not real please on how the nose turned out. Something just doesn't look right. Another problem I saw was that I should have built up around the back-side of the antlers with more clay before I put the hide on.
Thanks for your time, it's much appreciated.
The link to the pictures is here, by clicking on where it says "Taxidermy".
http://community.webshots.com/user/kansashunter
Or here is a direct link:
http://community.webshots.com/album/261390222VwxrfX

 01-28-2005 | 06:39 PM
#5
Typical Buck
Joined: Feb 2003
Posts: 649
Likes: 0
From: Almost Heaven WV
RE: Please Critique my Deermount (Pics)
OK, here goes....I'll be to the point.
You've obviously learned something from somewhere or someone because one does not just set a pair of eyes like that on their 3rd deer .
Apoxie around the eyes is built well. Cant comment on eye placement as I cannot see the pupils..
pic115-1, The brisket is offset to the deer's right side, center it....
pic117-1, Face is indeed short...poor form selection. needs a longer nose. Lips are not tucked as the white hair should be under on the flat part of the lip form...
pic118-1, ear line wavey, should be neat and graceful. Ear buts under-built and not uniform.
pic119, lips not tucked well, again lines should be graceful. Nose hair, white, should be turned within the nostrils. My best prediction is that the nostrils were not fleshed properly and the hide is quite thick here. Thin the facial details better.
pic120, I like this eye from the side view, it is anatomically correct if it dries this way. I would suggest that those long guard hairs under the eye should lay down below the eye and out towards the camera shot...There are several out of place...
pic121-1, again the nose, white hairs within nostril, skin crooked, most likely needs thinning, hairline going on top of nose up form to between eyes is off center. Deer's right eye looks fine, left eye is in too far. Most likely caused byu thick hide around eyes, thin better.. "Double chin" appearance where the neck meets the jaws is evident of too small a face. Need to have a smooth transition here...
122-1, Earbuts improperly formed, unbalanced...glue or clay in hair of seam...antlers most definitely set too high...the skin will most likely pull away form the bases...
123-1, again that hair pattern on top of the nose up to the eyes is off centered.
Overall, looks a heck of a lot better than my third one ever did...
I'm curious though:
Did you use hide nails? The cardboard that you have pinned to the neck details while drying should be pinned to the form permanently....I put mine about every quarter inch....You shouldn't need that much pinning...
What type of hyde paste did you use?...How did you prep the form? How was the hide treated?
Get rid of the clothes pins on the ears and "taxi" that skin every day several times while drying to ensure thin fine lines....
Use your reference for facial details, earbuts etc...check kill photos for antler tilt..
Keep checkin in with Taxidermy.net, They're a good bunch of guys with a wealth of fine knowledge....hit the search feature there often, there's tons and tons......
... Hope I didn't prod too hard....
Luck
You've obviously learned something from somewhere or someone because one does not just set a pair of eyes like that on their 3rd deer .
Apoxie around the eyes is built well. Cant comment on eye placement as I cannot see the pupils..
pic115-1, The brisket is offset to the deer's right side, center it....
pic117-1, Face is indeed short...poor form selection. needs a longer nose. Lips are not tucked as the white hair should be under on the flat part of the lip form...
pic118-1, ear line wavey, should be neat and graceful. Ear buts under-built and not uniform.
pic119, lips not tucked well, again lines should be graceful. Nose hair, white, should be turned within the nostrils. My best prediction is that the nostrils were not fleshed properly and the hide is quite thick here. Thin the facial details better.
pic120, I like this eye from the side view, it is anatomically correct if it dries this way. I would suggest that those long guard hairs under the eye should lay down below the eye and out towards the camera shot...There are several out of place...
pic121-1, again the nose, white hairs within nostril, skin crooked, most likely needs thinning, hairline going on top of nose up form to between eyes is off center. Deer's right eye looks fine, left eye is in too far. Most likely caused byu thick hide around eyes, thin better.. "Double chin" appearance where the neck meets the jaws is evident of too small a face. Need to have a smooth transition here...
122-1, Earbuts improperly formed, unbalanced...glue or clay in hair of seam...antlers most definitely set too high...the skin will most likely pull away form the bases...
123-1, again that hair pattern on top of the nose up to the eyes is off centered.
Overall, looks a heck of a lot better than my third one ever did...
I'm curious though:
Did you use hide nails? The cardboard that you have pinned to the neck details while drying should be pinned to the form permanently....I put mine about every quarter inch....You shouldn't need that much pinning...
What type of hyde paste did you use?...How did you prep the form? How was the hide treated?
Get rid of the clothes pins on the ears and "taxi" that skin every day several times while drying to ensure thin fine lines....
Use your reference for facial details, earbuts etc...check kill photos for antler tilt..
Keep checkin in with Taxidermy.net, They're a good bunch of guys with a wealth of fine knowledge....hit the search feature there often, there's tons and tons......
...
Hope I didn't prod too hard....Luck
01-28-2005 | 07:25 PM
#6
Joined: Dec 2004
Posts: 324
Likes: 0
From: La Grange, TX
RE: Please Critique my Deermount (Pics)
Cyclone did a good job.
On the antler set. I always measure from the back of the eye to the burr and from the back centerline of the eye up the burr. I call it length and height on my eye/burr measurement. If you then measure from tip of nose to front of each burr and end of each main beam it'll go back on exactly right.
Then if you put a small roll of clay under the burr and put epoxy hide paste there you can then push that roll of clay and glue up to the burr after its mounted and there is very little chance that the hide will ever pull down.
Eye set is really good as mentioned.
And I'll second the fact the ears and butts need work and balance.
And I'll third and fourth the fact that you have to keep after the deer each day after its mounted, sometimes for a week or so to keep things nice and pretty. That grooming is just whats needed to help perfect the mount.
I actually use cardboard wax backed strips with pins to keep the details in place with pins till the glue is dry and then pull it all. I refuse to leave anything nailed in. Seems like no matter, later on they will rust somehow or another. Maybe unless you had aluminum somehow.
You are well on the track and better than my 3rd deer for sure.
Best, Jeff
On the antler set. I always measure from the back of the eye to the burr and from the back centerline of the eye up the burr. I call it length and height on my eye/burr measurement. If you then measure from tip of nose to front of each burr and end of each main beam it'll go back on exactly right.
Then if you put a small roll of clay under the burr and put epoxy hide paste there you can then push that roll of clay and glue up to the burr after its mounted and there is very little chance that the hide will ever pull down.
Eye set is really good as mentioned.
And I'll second the fact the ears and butts need work and balance.
And I'll third and fourth the fact that you have to keep after the deer each day after its mounted, sometimes for a week or so to keep things nice and pretty. That grooming is just whats needed to help perfect the mount.
I actually use cardboard wax backed strips with pins to keep the details in place with pins till the glue is dry and then pull it all. I refuse to leave anything nailed in. Seems like no matter, later on they will rust somehow or another. Maybe unless you had aluminum somehow.
You are well on the track and better than my 3rd deer for sure.
Best, Jeff
01-31-2005 | 11:10 AM
#7
Thread Starter
Nontypical Buck
Joined: Feb 2003
Posts: 4,139
Likes: 0
From: Rural Kansas... Where Life is Good
RE: Please Critique my Deermount (Pics)
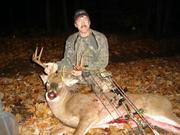
Thanks guys for the tips. I really appreciate your help, and tips. I really want to improve for my next deer mount which is a nice 26" wide droptine buck(pic below), which I hope to start here in a month or so. BTW, I used Epply ears and a McKenzie form. I took all of the pins and carding off the mannakin once it was dried. I used Killer-glue hide paste, sanded the form with 50 grit sandpaper prior to mounting, and shaved the skin around the eyes and tear ducts prior to rehydration with Relax-R. Also, the claywork, apoxie sculpt, and mache work was all actually done by my girlfriend. She wanted to do it, so I let her. She's never mounted a deer before, but with some reference photos, she did a good job, for the 1st time. She's into that type of stuff. She helped a lot, and made a lot of the processes a whole lot easier. Thanks again for the critiques.