


How to tie in nocksets and a D-loop
 07-02-2007 | 11:06 PM
#1
Thread Starter
Giant Nontypical
Joined: Feb 2003
Posts: 7,051
Likes: 0
From: Jackson, Missouri
I finally decided to document the process of how I tie in nocksets and my D-loop as I set up another of my bows. I offer a quick disclaimer: This is not THE way to set up your nocksets and loop; there are at least six different documented ways to tie in a loop and where to place your nocksets. Noted archery expert Larry Wise wrote recently, though, that he's seen approximately 75% of tournament archers use either the method I'm going to demonstrate below, or he's seen archers just use one nockset below the nock. Although at first glance you would think that having equal-length nocksets above and below the nock would yield the most-uniform pull (or the absence of any nocksets and just using the D-loop's knots), having a longer knot length below the knot allows the release to pull directly behind the arrow nock -- as you'll see at the end.
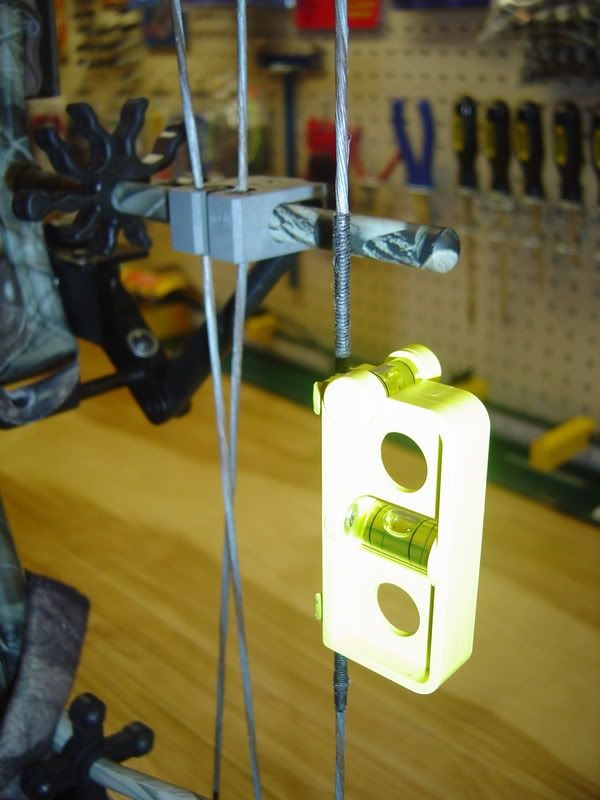
First things first, though... I affix my bow in my vise and snap a level on to make sure it's not leaning or canted any way. I want it to be exactly plumb and square as I'll soon be locating where my first nockset needs to go.
Next, I gather my materials: Some BCY nock point tying thread, and some waxed dental floss.
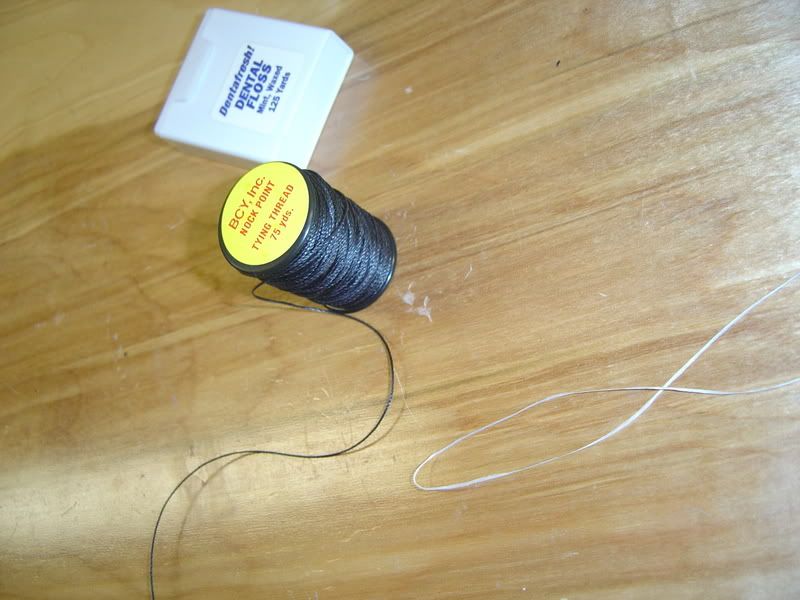
Cut off about ten inches of dental floss, as well as about a foot of nock-tying thread; it's way more thread than you'll use for the actual knot, but this stuff is extremely cheap -- and you'll appreciate the long tag ends which you'll be able to grab as we tighten the nock set later on.
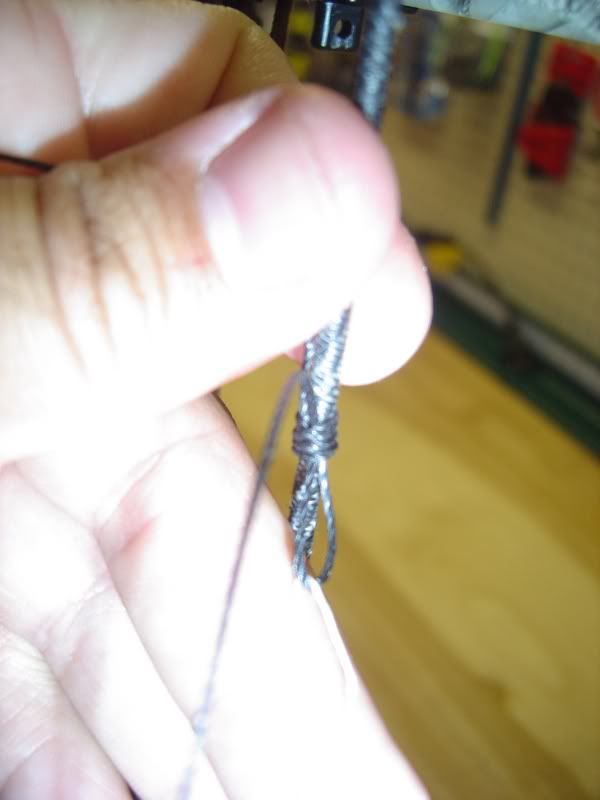
The first thing we want to do is to take our looped dental floss and lay it alongside your bow string's center serving. Then, take your nock thread and lay it alongside the floss, leaving at least six inches above your hand as a tag end.
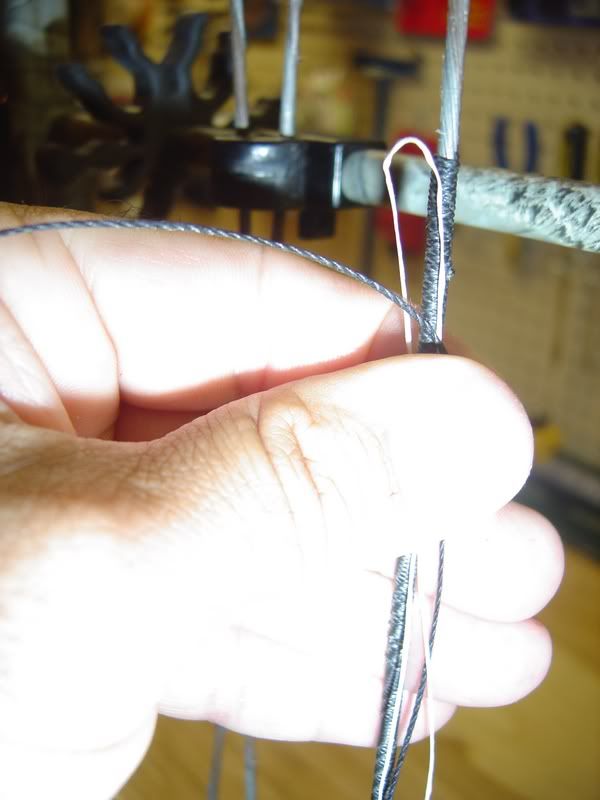
You'll see in the next pic below that I've wrapped the knot tying thread back on top of itself three times. Notice that I made my first wrap at the bottom, and then started working the wraps UP towards the top. One more wrap, and this one is nearly completed; my top nockset consists of four wraps.
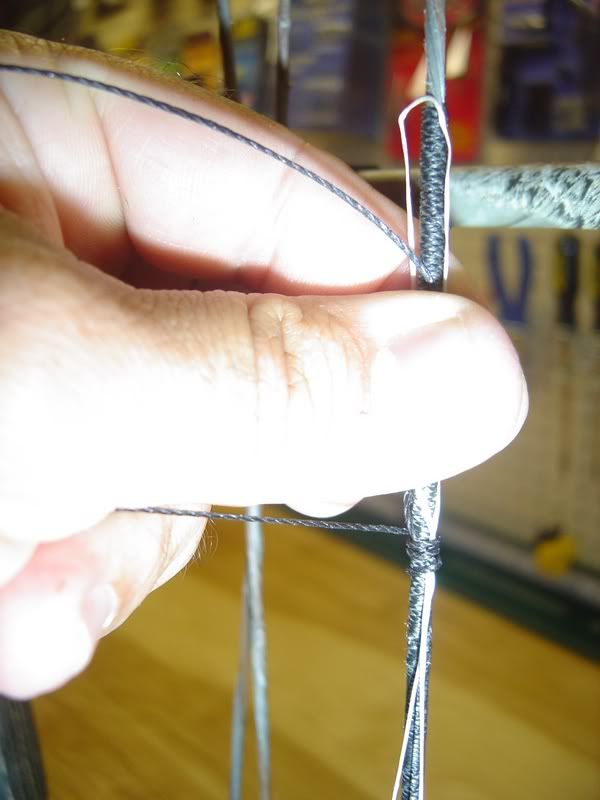
After completing the last wrap, I stick the tag end with which I've been wrapping with through the loop created by the dental floss and pull that end back under the wraps.
Once pulled all the way through, your first nockset should look like this:
You can snug it up against the center serving to keep it from slipping down, but be cautious to not tighten it too much at this point; we need to locate exactly where we want it first. The beautiful thing about this is you can slide this nockset up and down until you get it exactly where you want it before tightening it down.
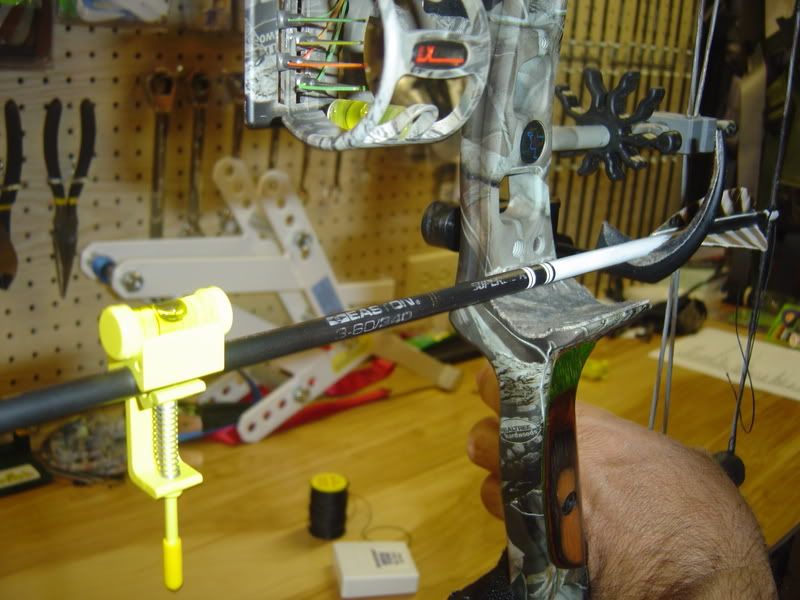
For my BowTechs, I've discovered that a good starting point is to set them up so that the arrow is perfectly level and square to the bowstring. In this pic, you'll see where I've unhooked the turnbuckle sleeve off my Muzzy Zero Effect so that I can position the arrow in its raised state. Ensuring that the arrow shaft passes squarely through the berger holes, I adjust the location of where the nock snaps onto the serving until my level bubble is perfectly centered between the lines.
Slide the nockset to where it makes firm contact with the arrow nock, ensuring you don't move the arrow in the process. Remove the arrow and grab both tag ends and pull hard, cinching down the nockset to stay. This is where you'll appreciate the extra-long tag ends; I usually have enough to wrap over my hands and can pull on them as hard as I can.
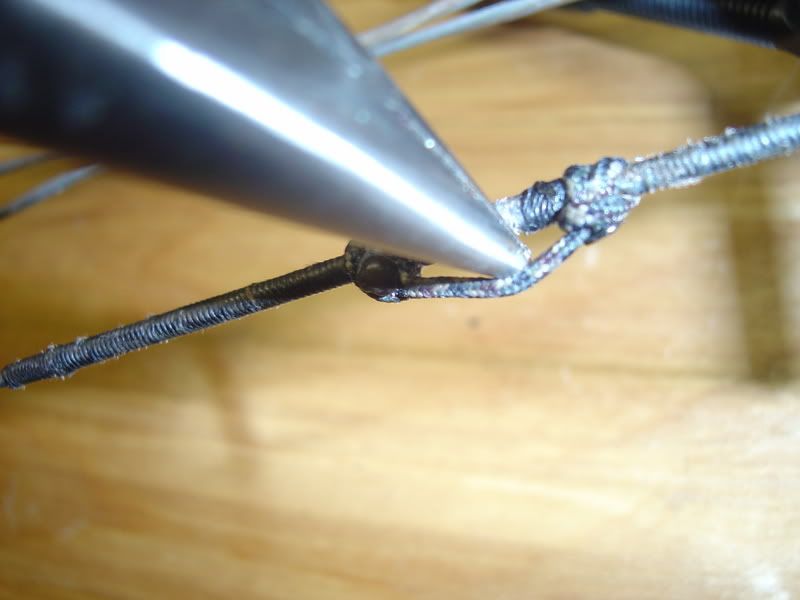
Snip the tag ends off with a sharp knife or razor, leaving about an 1/8 of an inch. I take my bow out of the vise so I can lay it down horizontally on my work bench, and then light the tag ends with a lighter. Watch them burn carefully, and just as they reach the nockset, simultaneously extinguish the mini-fire and push them up into body of the nockset.
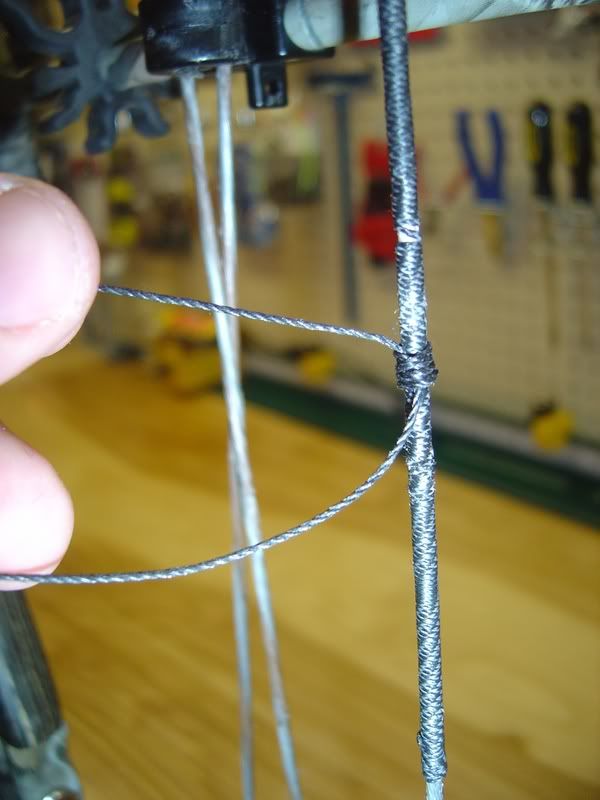
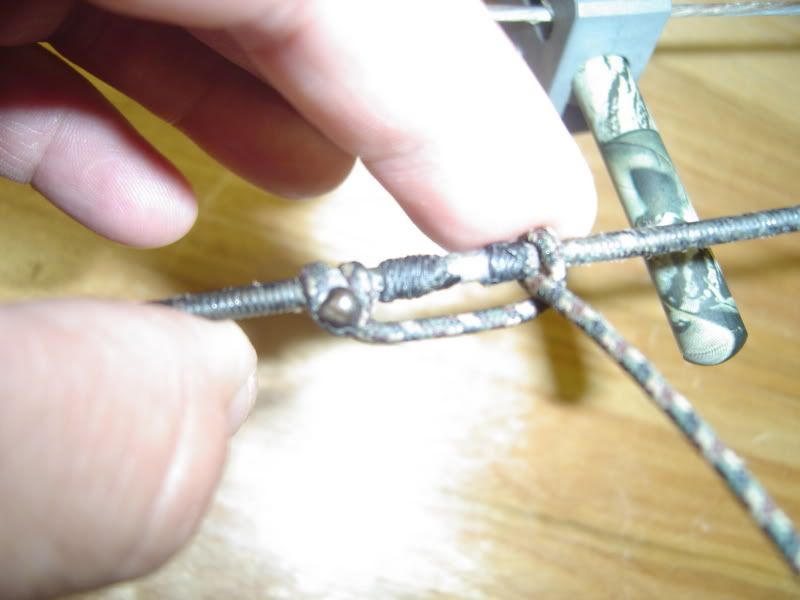
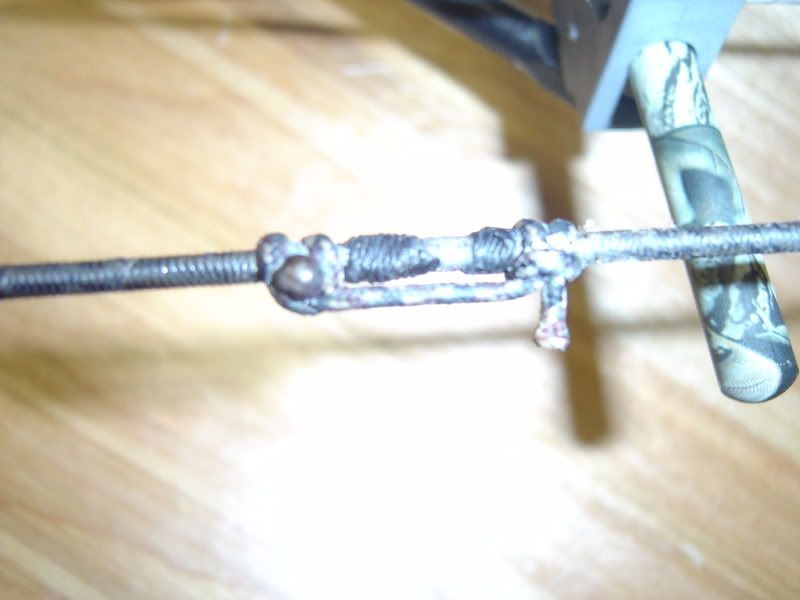
Here's my top nockset in place and completed, and my bottom one has just been slid into place and is ready to be tightened. Note here that I've wrapped my bottom nockset EIGHT times as opposed to the four used to complete the top; I've found this combination will allow my release to pull directly behind my arrow nock, as you'll see in the last pic.
Key takeaways to make this process quick and easy: Don't be stingy with your nock-tying thread; the stuff is extremely cheap, comes on 75-yard rolls, and the more you use the easier it is to grab the tag ends and pull after you make your knot. Also, remember when wrapping around the serving and the dental floss to wrap UP and back onto the knot tying thread itself -- that way, when you insert the tag end into the dental floss, you'll actually pull that tag under its own wrappings, which is what makes this knot so neat and precise.
The D-loop
I'm now going to give away my biggest secret when it comes to tying D-loops: Don't pre-cut a specific length of material. I see guys all the time say they cut five inches of material to start with, or some other length. I start with the complete length that comes in a package. That way, I can start working from one end, have the rest of the rope to pull with to tighten down my knots, and after I'm through I just cut off the whole excess. I waste NOTHING when I make my D-loops, and am able to really crank down on my knots when I'm tying them.
First, you have to mushroom out one of the ends by tamping down the rope until it flares out...

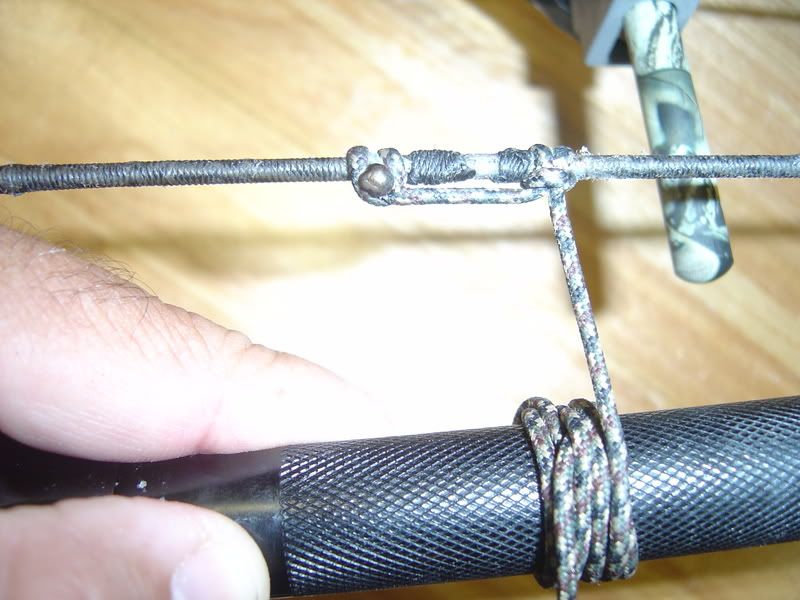
Take your lighter and melt that flared-out end until it becomes a ball. Most people will tell you not to allow that mushroomed-out part to actually catch fire (to avoid the fibers becoming brittle), but to hold the flame just far enough away so that the fibers melt without lighting. I give the ball 30 seconds or so to cool, and I don't flatten it against the side of the cigarette lighter. Next, I form a loop with the rope and place it under my bowstring like this:
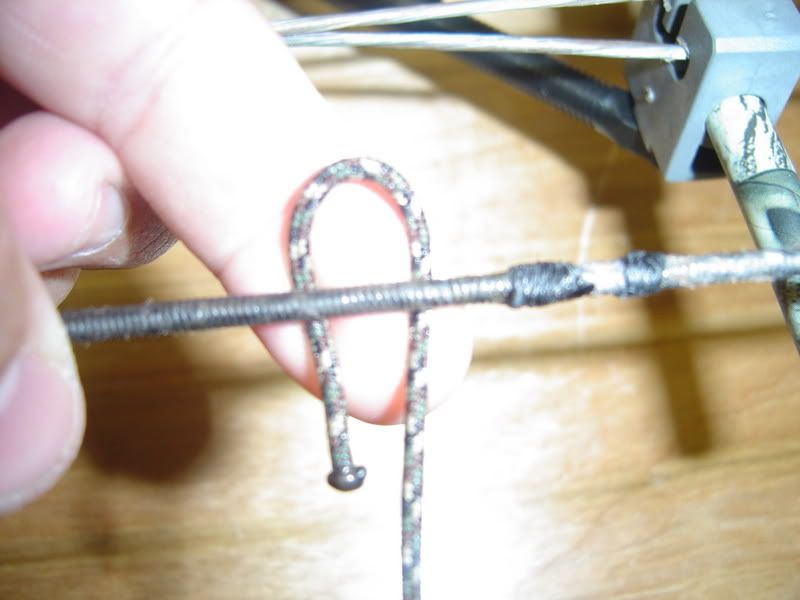
Then, I simply push the melted ball over the string and under the loop, and also feed the long tag end over the bow string and under the loop as well:
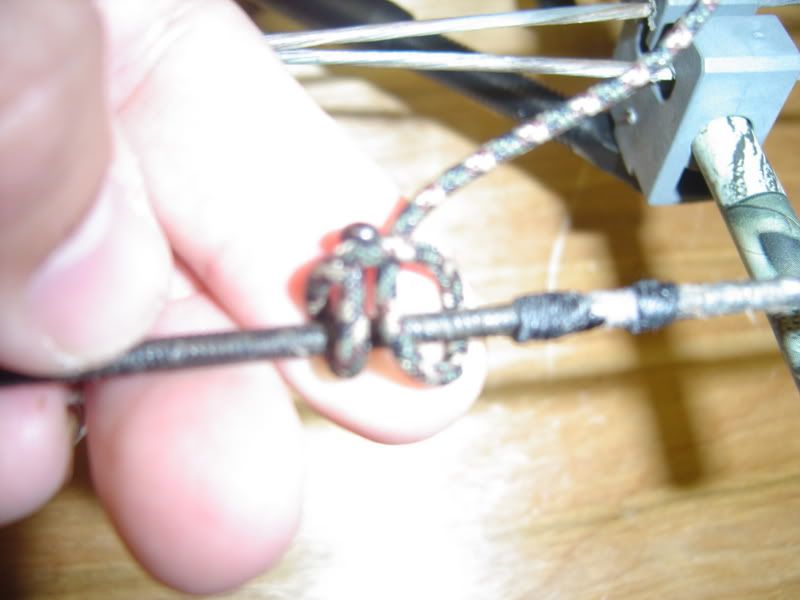
Snug up the overhand cinch knot you just created, and rotate it around so that the long tag end is coming off the back of your bow string.
D-loop secret #2: I grab a Mini Mag kept under my workbench, and roll the long tag end around and around the barrel of the flashlight. This allows me to grab it with the tag end emerging between my two middle fingers. While holding the bow string in one hand, I pull as hard as I'm capable of for at least five seconds. This REALLY snugs up this bottom knot! Some people even prefer to wax the rope material, allowing the knot to tighten that much more.
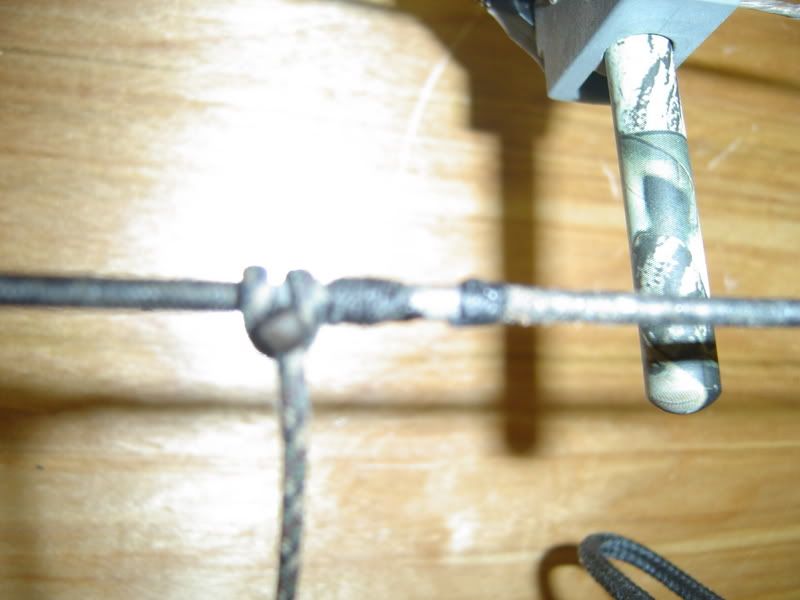
D-loop secret # 3... at least if you're like me and fond of shooting the smallest loop you can get your release in without hitting the arrow nock. With today's "shorty" releases and forward-trigger designs, loop shooters don't have to give up any draw length when combined with this technique! Lay your rope alongside the string and as you make the beginning of your first knot, pull it snug. That's right, don't pre-form a loop. Also, take note to cross your rope over and begin your second knot so that the length of rope passes by the bowstring on the opposite side that it did for the first knot. This will help to prevent the knot from rotating around the bowstring through repeated use. Notice the long tag end coming out of the first knot and what is actually going to form the loop is coming from the bottom of the bowstring; therefore, I cross the bowstring when beginning the second knot OVER the bowstring.
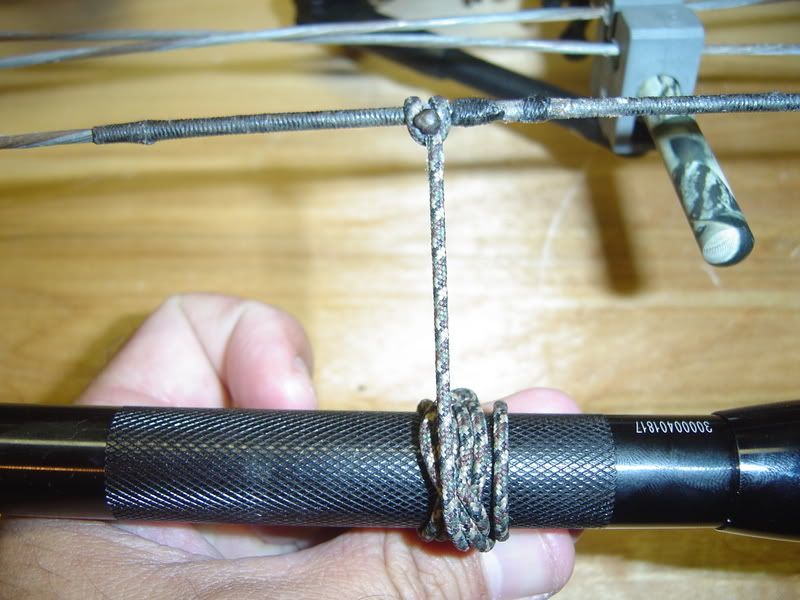
Complete the knot, and again wrap the excess rope material around the Mini Mag... pull until you can't pull any harder.
Cut off the excess rope material, leaving about 1/8 of an inch to flare out so that you can burn it into a ball. I will actually let the ball melt into the knot just barely sometimes to help lock it in. Take care to not allow the fire to melt the actual knot itself and destroy its integrity.
Now you can insert a pair of pliers into the knot, and pull with all your might. This will help cinch the knots down even further, but more importantly will allow you to get your arrow nock into the loop as you draw for the first time with your new loop.
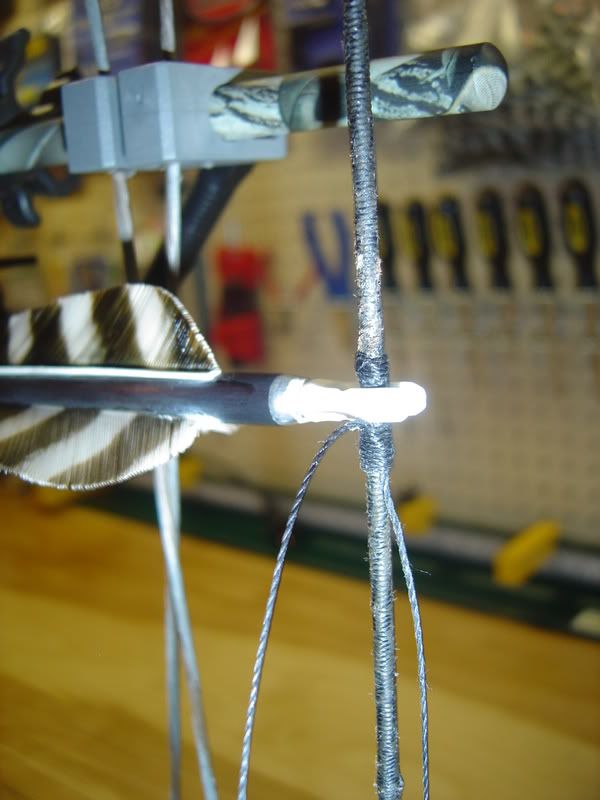
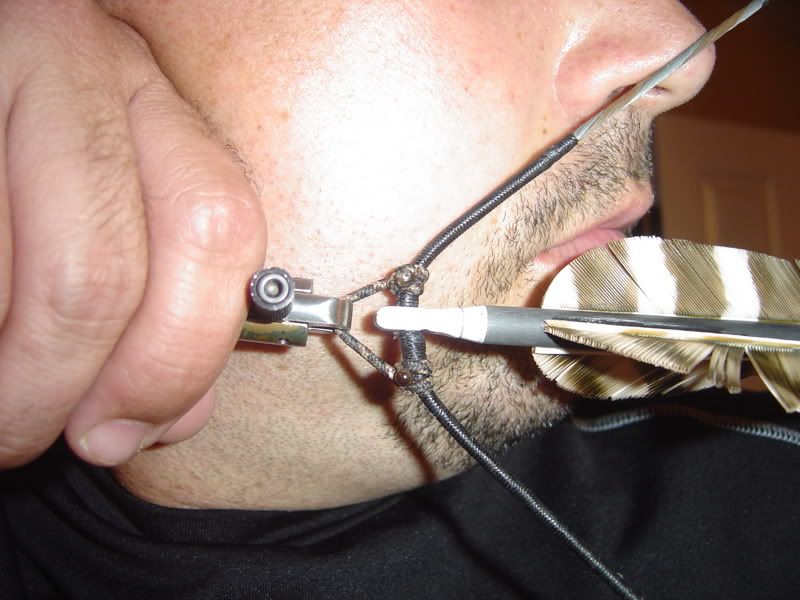
Here's how the finished product looks; note that my release head is directly behind the arrow nock. I had to keep my index finger behind the trigger to show the loop and nocksets, but when I lay it over on the other side and prepare to shoot, I don't feel as though I've given up any draw length, and I feel extremely confident that I'm hooked up as about as perfectly as I can be for that once-in-a-lifetime shot!
First things first, though... I affix my bow in my vise and snap a level on to make sure it's not leaning or canted any way. I want it to be exactly plumb and square as I'll soon be locating where my first nockset needs to go.
Next, I gather my materials: Some BCY nock point tying thread, and some waxed dental floss.
Cut off about ten inches of dental floss, as well as about a foot of nock-tying thread; it's way more thread than you'll use for the actual knot, but this stuff is extremely cheap -- and you'll appreciate the long tag ends which you'll be able to grab as we tighten the nock set later on.
The first thing we want to do is to take our looped dental floss and lay it alongside your bow string's center serving. Then, take your nock thread and lay it alongside the floss, leaving at least six inches above your hand as a tag end.
You'll see in the next pic below that I've wrapped the knot tying thread back on top of itself three times. Notice that I made my first wrap at the bottom, and then started working the wraps UP towards the top. One more wrap, and this one is nearly completed; my top nockset consists of four wraps.
After completing the last wrap, I stick the tag end with which I've been wrapping with through the loop created by the dental floss and pull that end back under the wraps.
Once pulled all the way through, your first nockset should look like this:
You can snug it up against the center serving to keep it from slipping down, but be cautious to not tighten it too much at this point; we need to locate exactly where we want it first. The beautiful thing about this is you can slide this nockset up and down until you get it exactly where you want it before tightening it down.
For my BowTechs, I've discovered that a good starting point is to set them up so that the arrow is perfectly level and square to the bowstring. In this pic, you'll see where I've unhooked the turnbuckle sleeve off my Muzzy Zero Effect so that I can position the arrow in its raised state. Ensuring that the arrow shaft passes squarely through the berger holes, I adjust the location of where the nock snaps onto the serving until my level bubble is perfectly centered between the lines.
Slide the nockset to where it makes firm contact with the arrow nock, ensuring you don't move the arrow in the process. Remove the arrow and grab both tag ends and pull hard, cinching down the nockset to stay. This is where you'll appreciate the extra-long tag ends; I usually have enough to wrap over my hands and can pull on them as hard as I can.
Snip the tag ends off with a sharp knife or razor, leaving about an 1/8 of an inch. I take my bow out of the vise so I can lay it down horizontally on my work bench, and then light the tag ends with a lighter. Watch them burn carefully, and just as they reach the nockset, simultaneously extinguish the mini-fire and push them up into body of the nockset.
Here's my top nockset in place and completed, and my bottom one has just been slid into place and is ready to be tightened. Note here that I've wrapped my bottom nockset EIGHT times as opposed to the four used to complete the top; I've found this combination will allow my release to pull directly behind my arrow nock, as you'll see in the last pic.
Key takeaways to make this process quick and easy: Don't be stingy with your nock-tying thread; the stuff is extremely cheap, comes on 75-yard rolls, and the more you use the easier it is to grab the tag ends and pull after you make your knot. Also, remember when wrapping around the serving and the dental floss to wrap UP and back onto the knot tying thread itself -- that way, when you insert the tag end into the dental floss, you'll actually pull that tag under its own wrappings, which is what makes this knot so neat and precise.
The D-loop
I'm now going to give away my biggest secret when it comes to tying D-loops: Don't pre-cut a specific length of material. I see guys all the time say they cut five inches of material to start with, or some other length. I start with the complete length that comes in a package. That way, I can start working from one end, have the rest of the rope to pull with to tighten down my knots, and after I'm through I just cut off the whole excess. I waste NOTHING when I make my D-loops, and am able to really crank down on my knots when I'm tying them.
First, you have to mushroom out one of the ends by tamping down the rope until it flares out...
Take your lighter and melt that flared-out end until it becomes a ball. Most people will tell you not to allow that mushroomed-out part to actually catch fire (to avoid the fibers becoming brittle), but to hold the flame just far enough away so that the fibers melt without lighting. I give the ball 30 seconds or so to cool, and I don't flatten it against the side of the cigarette lighter. Next, I form a loop with the rope and place it under my bowstring like this:
Then, I simply push the melted ball over the string and under the loop, and also feed the long tag end over the bow string and under the loop as well:
Snug up the overhand cinch knot you just created, and rotate it around so that the long tag end is coming off the back of your bow string.
D-loop secret #2: I grab a Mini Mag kept under my workbench, and roll the long tag end around and around the barrel of the flashlight. This allows me to grab it with the tag end emerging between my two middle fingers. While holding the bow string in one hand, I pull as hard as I'm capable of for at least five seconds. This REALLY snugs up this bottom knot! Some people even prefer to wax the rope material, allowing the knot to tighten that much more.
D-loop secret # 3... at least if you're like me and fond of shooting the smallest loop you can get your release in without hitting the arrow nock. With today's "shorty" releases and forward-trigger designs, loop shooters don't have to give up any draw length when combined with this technique! Lay your rope alongside the string and as you make the beginning of your first knot, pull it snug. That's right, don't pre-form a loop. Also, take note to cross your rope over and begin your second knot so that the length of rope passes by the bowstring on the opposite side that it did for the first knot. This will help to prevent the knot from rotating around the bowstring through repeated use. Notice the long tag end coming out of the first knot and what is actually going to form the loop is coming from the bottom of the bowstring; therefore, I cross the bowstring when beginning the second knot OVER the bowstring.
Complete the knot, and again wrap the excess rope material around the Mini Mag... pull until you can't pull any harder.
Cut off the excess rope material, leaving about 1/8 of an inch to flare out so that you can burn it into a ball. I will actually let the ball melt into the knot just barely sometimes to help lock it in. Take care to not allow the fire to melt the actual knot itself and destroy its integrity.
Now you can insert a pair of pliers into the knot, and pull with all your might. This will help cinch the knots down even further, but more importantly will allow you to get your arrow nock into the loop as you draw for the first time with your new loop.
Here's how the finished product looks; note that my release head is directly behind the arrow nock. I had to keep my index finger behind the trigger to show the loop and nocksets, but when I lay it over on the other side and prepare to shoot, I don't feel as though I've given up any draw length, and I feel extremely confident that I'm hooked up as about as perfectly as I can be for that once-in-a-lifetime shot!
Last edited by Greg / MO; 09-02-2009 at 06:46 PM.
 07-02-2007 | 11:30 PM
#2
Site Bouncer
Joined: Dec 2004
Posts: 4,099
Likes: 0
From: Illinois
Very nice Greg, thanks for the time and effort you put into this.
I tie mine almost the exact same way. The only thing I do different is I use the half knot method to tie on the nock sets and I burn my loop off of the string then install. It's a little harder to tie the second knot on the loop but I know there is no damage to the string or knot from my trying to melt it on the string. I can also get a perfect melted ball endby holding the loop material in my hand and spinning it while I melt the end.
Great work, this should bepinned.

 nice post...