


Reviving an Abused Revolver (Kinda pic heavy?)
 10-12-2014 | 08:15 PM
#1
Thread Starter
Nontypical Buck
Joined: Oct 2009
Posts: 3,938
Likes: 3
From: Kansas
Although it’s not a particularly large project – the work would fit in a single weekend – I’ve been working here and there on this little revolver for a couple years. Now that it’s finished, I thought I’d share the tale. As to be expected from my posts, it’s a long story, but for those interested in following along, I aim to illustrate not only a cautionary tale for used gun buyers, as well as how some DIY elbow-grease can right the ship when things tick out of time, even without involving a gunsmith.
What this is NOT:
The Revolver:

My Mother-in-Law bought this revolver at a gunshow in 2011. It’s a Taurus 85, 5 shot 38spcl, produced in the late 60’s or early 70’s (best estimates). My Mother-in-Law had kept it a secret, wanting to surprise my wife and me by striking out on her own to get a carry piece and learn how to shoot it. She finally revealed her purchase in dire straits almost a year later after she’d been to the range a few times as well as a handgun class and the revolver “wasn’t shooting well,” so she wanted my help making it more accurate, or help selling it.
The Range:
We hauled out to the backyard range and my Mother-In-Law demonstrated that she had difficulty even hitting a 24”x24” target at 7yrds. My wife, frustrated that “no gun is THAT inaccurate,” took the revolver from her mother and put 5rnds into a group that fit under her thumb at 12 o’clock to the bullseye. Taking relief in that it actually shoots quite well, of course it was still a problem that my Mother-in-Law couldn’t coax it to do so.
Naturally, the answer was more practice and proper instruction – which, unfortunately, she had not gotten at her handgun class. After a bit of dry firing and a few loaded cylinders, she was printing 3-4” slow-fire groups on the page.
The Revelation:
Up to that point, we’d fired around 50-60rnds of the “cheap gunshow reman ammo” that she had picked up from the vendor that sold her the revolver. She had 2 or 3 misfires out of that bunch, which we dismissed since she was shooting ‘rot gut’ ammo.
Realizing that she had only been firing Single Action, I made the suggestion that since it’s her defensive pistol, she needs to spend a lot of time practicing Double Action fire with it. That’s when the wheels came off…
With the ‘gunshow ammo’ it misfired almost every round when fired DA, literally 4 or 5 out of each cylinder would misfire on the first DA trigger pull, and many of them would not fire even striking them 3 or 4 times. We offered for her to try some of our Rem UMC Ball to try, which proved to be better, but still 2 or 3 out of every 5 shots loaded would misfire on the first trigger pull in DA mode.
Unacceptable for any firearm, let alone a defensive weapon… To the workbench…
The Problem(s):
Upon inspection, I found problems all over:
I have joked a few times with my wife that the REAL “problem” is that it shoots so well. If it grouped like a scattergun, I’d have given up on it and thrown it in the scrap pile, but since it shoots so sweet, I just couldn’t let myself give up on it.
The Warranty:
As mentioned in the opening, I don’t want this to be misconstrued as a slight on Taurus’s Products or their Customer Service. Their service was actually quite good and their reps were very friendly and knowledgeable. At the end of the day, it was my choice to NOT take their warranty offer and not any fault of theirs.
I called Taurus to set up a return and repairs per their Lifetime Warranty. This revolver predates their current records system, so that was a bit of a challenge at first, but they did agree that the warranty would apply. Unfortunately, their warranty policy, considering its age and particular problems (needing a new extractor – which meant new cylinder), was to offer a discount on a REPLACEMENT revolver, rather than repair the old girl. The Replacement Discount described to me was fair, totaling ~$150 towards a new 85 plus shipping, basically half price.
I own a couple new production 85’s, and I find this older version to be superior quality overall, and the old grips on this that my Mother-in-law likes so much don’t fit new 85’s, as such getting new grips would just cost MORE on the new Taurus. Overall, we decided that we’d rather fix this revolver at our own cost, rather than exchanging it on warranty towards a new one.
The Resurrection:
Timing:
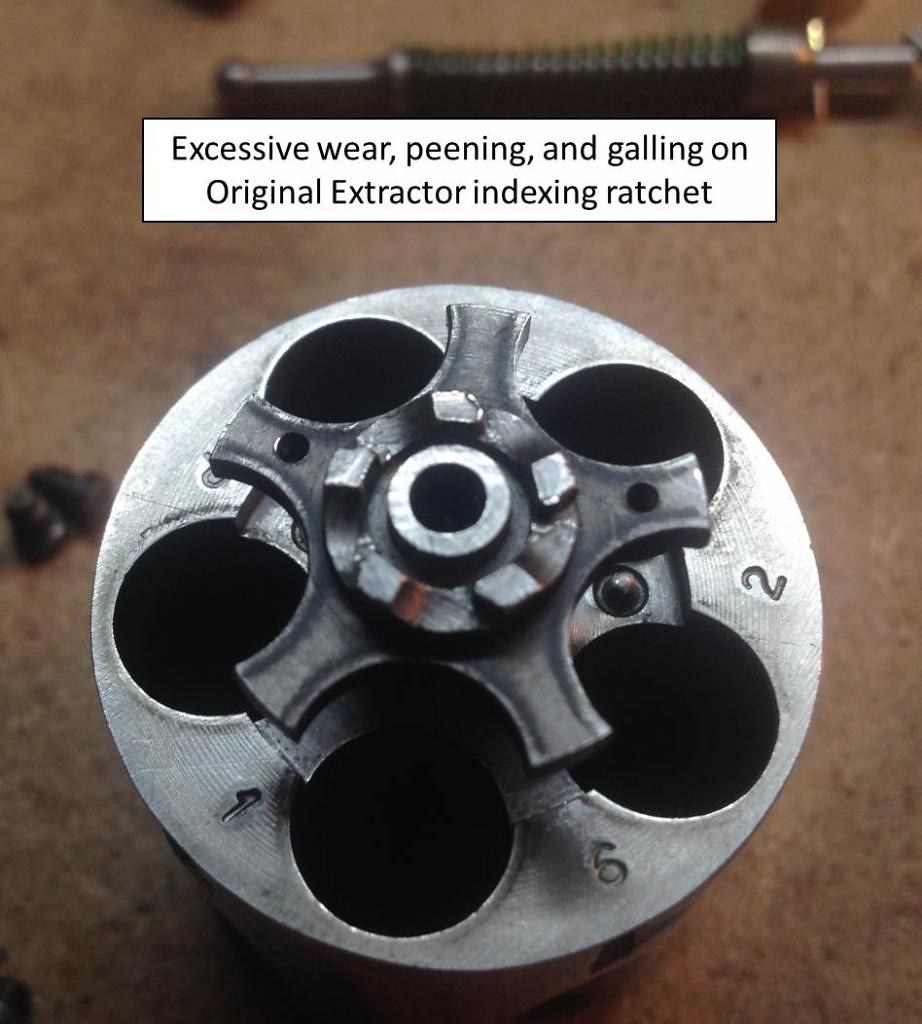
I started with the timing issues – this revolver was late at both ends. It started rotating late and it locked late – AFTER the DA break and the SA sear engagement. Nothing else I could do to this revolver would matter unless I could correct the timing and make it safe to fire. The pawl was obviously worn, and the extractor ratchet was an absolute mess; ripped and peened like crazy.
Since it is easier to find replacement pawls than cylinders/extractors, I started with the pawl. Taurus sent me two replacement pawls for different eras of 85 production, but neither fit. One was pretty close in profile, but about 1/8” short, so I had a local weld shop drop a bead on the tip to build it up, and I reprofiled it by hand. That helped the cylinder start rolling a bit earlier ($13 from Taurus for the pawl, 6pk of Bud Light for the welder’s time). Note: I chose not to temper-harden this part such that it will not be as prone to gall the cylinder indexing ratchet. I’ll tolerate a faster rate of wear on the pawl, a part that’s easily replaced for under $20, rather than have it chew up the extractor, a part that’s expensive and difficult to replace.
I also noticed that the pawl was disengaging earlier than it should have been, so I was losing stroke on the extractor. There’s a ramp in the rear of the frame and a pin on the pawl that rides the ramp to disengage itself as it rises past the lock up position. This disengagement was happening too early – it should be timed such that the pawl extracts AFTER the ratchet teeth clear the pawl’s window in the recoil plate. By reprofiling the ramp at the rear of the frame slightly, I gained a few more degrees of rotation before the ratchet cleared the window and lost contact.
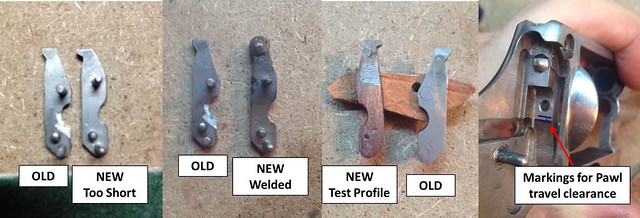
The longer pawl and altered frame ramp was enough to fix the SA timing completely, as well as fix the DA issue for 3 out of 5 chambers, but the other two teeth were so damaged that they still were not locking in time. Unfortunately, the only way to remedy the indexing ratchet was to replace the entire cylinder. I emailed my “ideal” cylinder dimensions to Numrich (gunpartscorp.com), and within a few days I had a replacement cylinder – extractor included ($83 to Numrich for take-off cylinder). Test fit proved that the new cylinder actually had less B/C gap and less endshake than the original, and just as sweet of headspace. And luckily for me, as rough as the replacement extractor ratchet looked, its timing was actually a bit too FAST, such that it would wedge the pawl against the frame window when the cylinder locked up and cause the trigger to stick. It was just a brief hang on 3 chambers, but one chamber would lock up tight and prevent the trigger from resetting. With only a few quick strokes of the file, I had it timed perfectly on all 5 chambers.
SO AT LEAST NOW IT IS SAFE!
Spring kit:
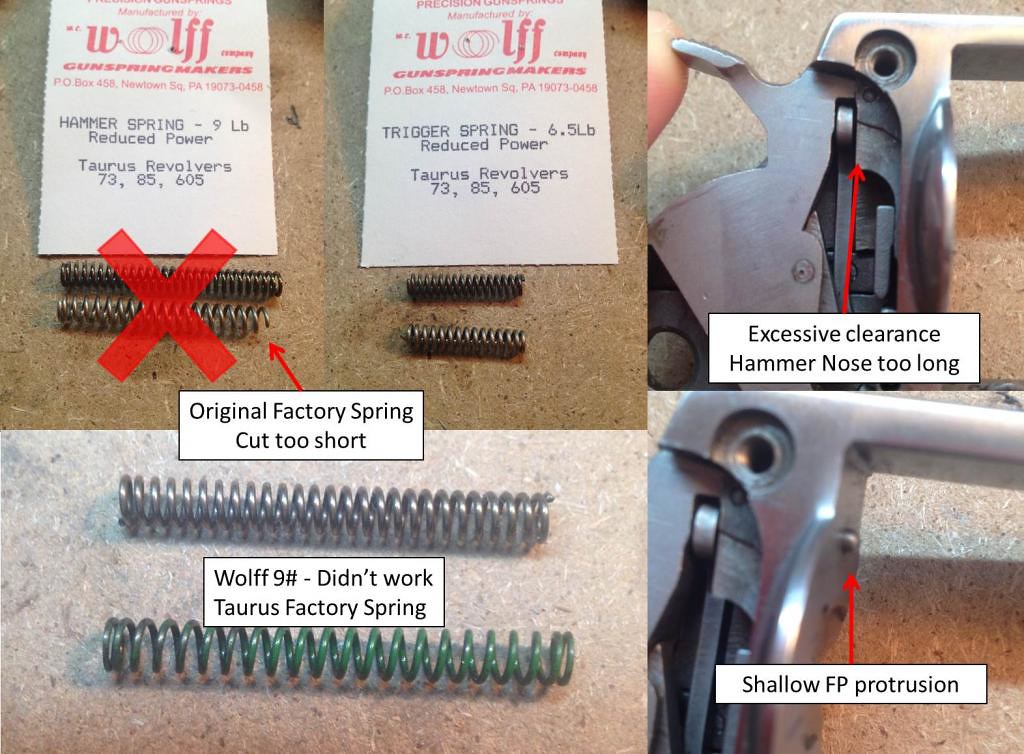
It was obvious that one of the former owners had cut coils off of the factory mainspring to lighten the action, but they had cut too much, such that it was causing inconsistent ignition from light strikes. This is NOT the proper technique to tune a two spring revolver action. As mentioned above, this bobbed mainspring was causing the revolver to misfire about 5% of the time when fired SA, and around 50%, up to 80-90% of the time depending upon ammunition when fired DA.
When I started this project (mid to late 2012ish), Taurus said the mainspring was a factory fit only part. Numrich didn’t have take-off springs in stock, so I tried out a Wolff Reduced Power Spring kit. The lighter trigger spring made it an absolute joy in SA. The reduced power Wolff mainspring was heavier than the cut factory spring and it was 100% reliable in SA mode with ANY ammo as well as 100% reliable with all of the factory ammo we tested in DA mode. Unfortunately, it still didn’t have enough power to produce 100% reliability with her ‘cheap gunshow reman ammo” when shooting DA, so I wasn’t satisfied to rely upon it as a defensive piece. With no other options, I kept an eye on ebay and Numrich for take-off springs, and we reserved this revolver to be simply a range play plinker.
I caught a break in early 2014. I tried one more time on a whim and finally managed to sweet talk one of the Taurus reps into going around the “factory install only” policy on the mainspring. With the new full length factory spring in place, even the ‘cheap stuff’ fires 100% reliably ($8 Wolff Spring Kit from Midway, $8 for 3 pack of mainsprings from Taurus).
In the meantime, I also remedied the short firing pin protrusion. I determined the maximum protrusion possible by measuring it with the transfer bar pressed forward against the frame with a screwdriver. Compared to the protrusion when pressed by the hammer, there was over 0.015” extra pin protrusion to be gained! I honed down and polished the nose of the hammer to maximize the protrusion of the firing pin without creating a “pinch” on the transfer bar against the frame. (The nose should be the exact height that just lets the hammer nose rest on the frame at a height that presses the transfer bar against the firing pin without ‘pinching’ the transfer bar or firing pin on their forward stops).
I reassembled and took a few hundred rounds of different ammo to the range, 100% reliable with all makes, even fired DA.
So now it’s SAFE AND RELIABLE!!!
Internal Polish and Shims:
Now that this old girl was marching to the beat and firing on all cylinders, I gave it a proper once over on the inside to make her sing. I was ordering a gaggle of action shims from Lance at Triggershims.com for other revolvers, so I picked up a set of S&W J-frame shims on the same order (same pin OD’s as the Taurus 85). I polished out all of the non-shimmed bearing surfaces inside for the pawl, transfer bar, and cylinder bolt, and while I had the rouge handy, I threw a high luster polish on the trigger, hammer, and crane latch slider ($8 triggershims.com + elbow grease). I also gave it a bit of buff all over with the fine white rouge to take out some dull spots and scratches, and put a bit of shine on it.

Forcing Cone, Chambers, and Throats:
Since I know my MIL will be shooting quite a bit of lead out of this old girl, especially at low pressure, I reamed and lapped an 11degree forcing cone. I also reamed the cylinder throats to 0.358", and honed the chambers with 400 and 800grit flex hones just for good measure.
So now it's SAFE, RELIABLE, RUNS GOOD, AND LOOKS GOOD!!!
Sight paint:
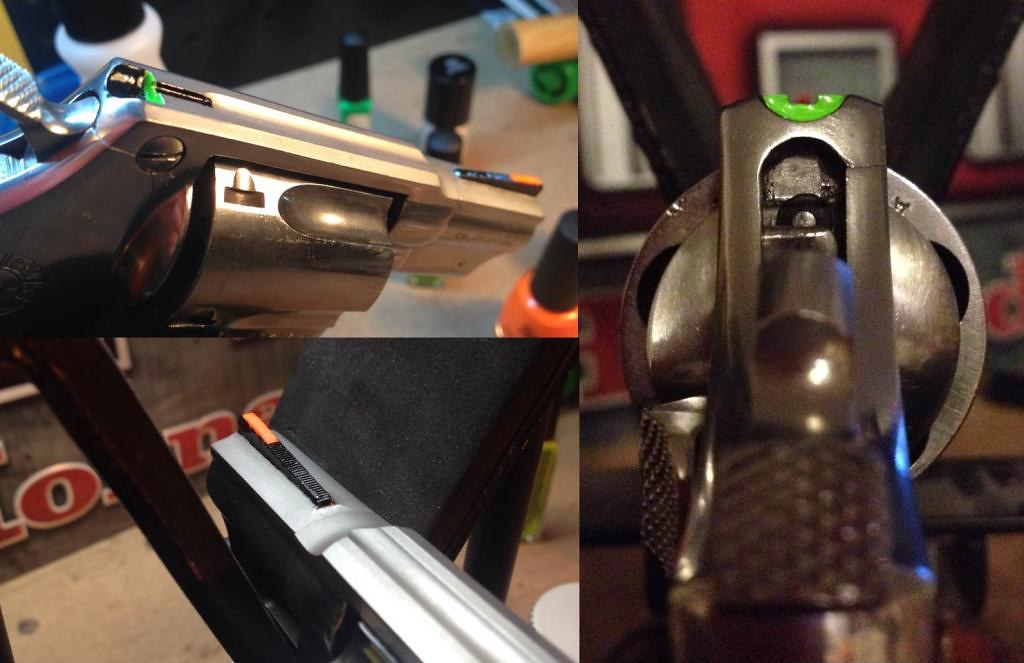
To help with her daytime shooting, I also threw on some sight paint for contrast. The topstrap of this revolver is bead blasted to reduce glare, but the sights were still really washed out. I tried a few different color combinations, and we ultimately settled upon lime green in the rear with a blaze orange front. I blacked out part of the topstrap groove and the rear cutout of the rear sight also. Ain't real pretty, but it's a much needed improvement to the former grey on grey sight picture.
The Food Supply:
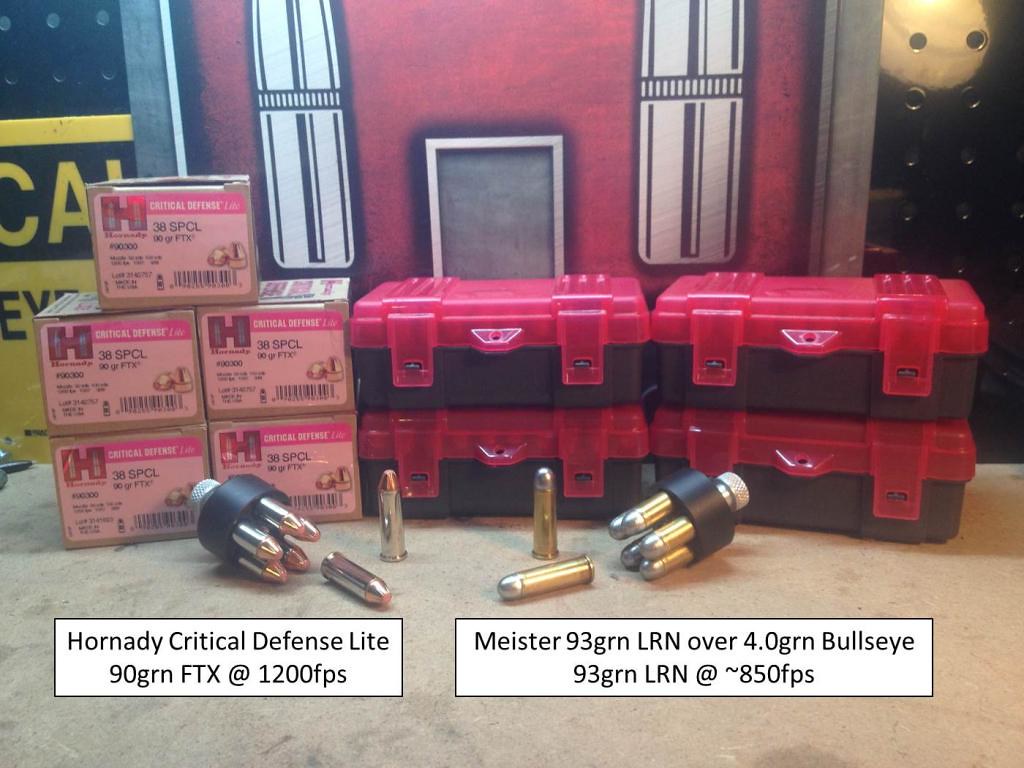
During the interim of this project, I purchased a Ruger LCR-38 for my MIL to carry. Even though she easily manages full house 38spcl loads out of the all-steel Taurus, the lightweight LCR isn’t quite so well behaved. I talked to Hornady a bit about their 90grn Critical Defense Lite load and decided to give some a try – a 90grn FTX spec’d at 1200fps from a 4”, touting more energy than any of their other 38spcl loadings, but with lighter recoil. These fit the bill for her tolerance and her SD needs, but at just under $1 per round, they’re not a high volume practice solution. For practice, I stoked 4grn of Bullseye under a Meister 93grn LRN seated just over the lube groove with a moderate roll crimp from a Lee FCD. Based on Lyman’s data for a 90grn Linotype, I expect these would pull 825-850fps out of a 4”, but they’d likely be considerably slower from these snubby wheelguns. These pet loads have noticeably less recoil even than the Hornady CD Lite loads, making them a very pleasurable practice load, even from the lightweight LCR in my MIL’s hands. The recoil in the heavier Taurus 85 feels lighter in hand than a 22lr Ruger Mark II.
The Result:
I know a lot of folks would (and several did, during this project) call me foolish for spending so much time, money, and energy to rebuild a Taurus revolver, but beauty is in the eye of the beholder and this revolver shoots great, just needs a little adjustment to even out her idle. I have about $150 (shipping included) plus consumables into fixing this revolver with the shims, springs, pawl, and new cylinder, but she purrs like a kitten, and best of all, the Mother-in-Law is happy to be back shooting it.
What this is NOT:
- This is NOT a gunsmithing guide. If I blow myself up, that’s my problem. I assume no liability for injuries or damages that might occur should anyone try to use the info herein to modify their own firearms.
- This is NOT a knock on Taurus Revolvers. This is a story about the revival of a sweet shooting, 50yr old, little revolver that had been SEVERELY ABUSED before it came into my hands.
- This is NOT a knock on Taurus Customer Service. As detailed below, Taurus made a very fair offer to act on their Lifetime warranty by replacing the weapon. I chose NOT to exercise that option.
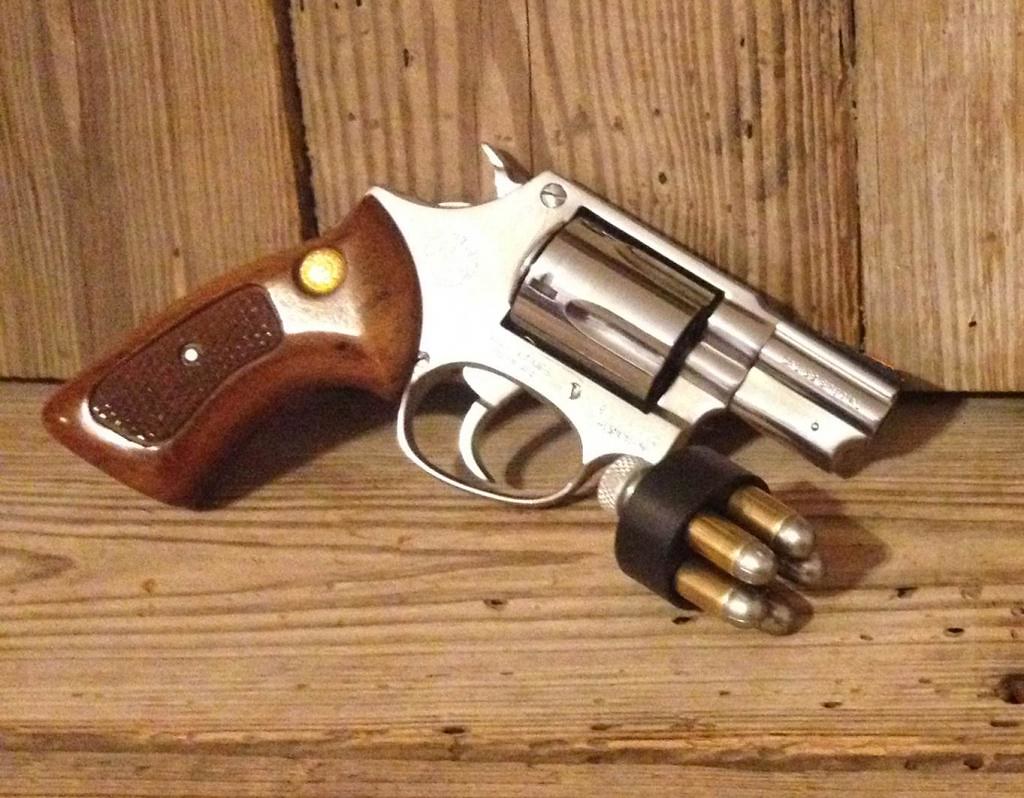
The Revolver:
My Mother-in-Law bought this revolver at a gunshow in 2011. It’s a Taurus 85, 5 shot 38spcl, produced in the late 60’s or early 70’s (best estimates). My Mother-in-Law had kept it a secret, wanting to surprise my wife and me by striking out on her own to get a carry piece and learn how to shoot it. She finally revealed her purchase in dire straits almost a year later after she’d been to the range a few times as well as a handgun class and the revolver “wasn’t shooting well,” so she wanted my help making it more accurate, or help selling it.
The Range:
We hauled out to the backyard range and my Mother-In-Law demonstrated that she had difficulty even hitting a 24”x24” target at 7yrds. My wife, frustrated that “no gun is THAT inaccurate,” took the revolver from her mother and put 5rnds into a group that fit under her thumb at 12 o’clock to the bullseye. Taking relief in that it actually shoots quite well, of course it was still a problem that my Mother-in-Law couldn’t coax it to do so.
Naturally, the answer was more practice and proper instruction – which, unfortunately, she had not gotten at her handgun class. After a bit of dry firing and a few loaded cylinders, she was printing 3-4” slow-fire groups on the page.
The Revelation:
Up to that point, we’d fired around 50-60rnds of the “cheap gunshow reman ammo” that she had picked up from the vendor that sold her the revolver. She had 2 or 3 misfires out of that bunch, which we dismissed since she was shooting ‘rot gut’ ammo.
Realizing that she had only been firing Single Action, I made the suggestion that since it’s her defensive pistol, she needs to spend a lot of time practicing Double Action fire with it. That’s when the wheels came off…
With the ‘gunshow ammo’ it misfired almost every round when fired DA, literally 4 or 5 out of each cylinder would misfire on the first DA trigger pull, and many of them would not fire even striking them 3 or 4 times. We offered for her to try some of our Rem UMC Ball to try, which proved to be better, but still 2 or 3 out of every 5 shots loaded would misfire on the first trigger pull in DA mode.
Unacceptable for any firearm, let alone a defensive weapon… To the workbench…
The Problem(s):
Upon inspection, I found problems all over:
- The mainspring had been cut so short that it was almost slack on the strut when the hammer was down - which explained the light strikes
- The firing pin protrusion was really short, unnecessarily limited by an excessively long hammer nose – also a contributor to light strikes
- Endshake was excessive, the cylinder would make contact with the forcing cone at one end, then had 0.009” B/C when held rearward – can also contribute to light strikes when forward
- Headspace was great when the cylinder was rearward, but it was borderline out of spec when the cylinder was forward against the barrel tennon
- The timing was late AND slow for both SA and DA fire, the pawl was visibly worn, and the extractor indexing ratchet was galled terribly – this revolver was NOT SAFE TO FIRE
- The sights were terrible, while the topstrap was bead blasted to reduce glare, the stainless on stainless sights with an aged bead blast finish were just a mottled grey that made sighting difficult – especially for aging eyes
- And of course, it was rougher than a rock quarry on the inside and looser than a goose on laxatives
I have joked a few times with my wife that the REAL “problem” is that it shoots so well. If it grouped like a scattergun, I’d have given up on it and thrown it in the scrap pile, but since it shoots so sweet, I just couldn’t let myself give up on it.
The Warranty:
As mentioned in the opening, I don’t want this to be misconstrued as a slight on Taurus’s Products or their Customer Service. Their service was actually quite good and their reps were very friendly and knowledgeable. At the end of the day, it was my choice to NOT take their warranty offer and not any fault of theirs.
I called Taurus to set up a return and repairs per their Lifetime Warranty. This revolver predates their current records system, so that was a bit of a challenge at first, but they did agree that the warranty would apply. Unfortunately, their warranty policy, considering its age and particular problems (needing a new extractor – which meant new cylinder), was to offer a discount on a REPLACEMENT revolver, rather than repair the old girl. The Replacement Discount described to me was fair, totaling ~$150 towards a new 85 plus shipping, basically half price.
I own a couple new production 85’s, and I find this older version to be superior quality overall, and the old grips on this that my Mother-in-law likes so much don’t fit new 85’s, as such getting new grips would just cost MORE on the new Taurus. Overall, we decided that we’d rather fix this revolver at our own cost, rather than exchanging it on warranty towards a new one.
The Resurrection:
Timing:
I started with the timing issues – this revolver was late at both ends. It started rotating late and it locked late – AFTER the DA break and the SA sear engagement. Nothing else I could do to this revolver would matter unless I could correct the timing and make it safe to fire. The pawl was obviously worn, and the extractor ratchet was an absolute mess; ripped and peened like crazy.
Since it is easier to find replacement pawls than cylinders/extractors, I started with the pawl. Taurus sent me two replacement pawls for different eras of 85 production, but neither fit. One was pretty close in profile, but about 1/8” short, so I had a local weld shop drop a bead on the tip to build it up, and I reprofiled it by hand. That helped the cylinder start rolling a bit earlier ($13 from Taurus for the pawl, 6pk of Bud Light for the welder’s time). Note: I chose not to temper-harden this part such that it will not be as prone to gall the cylinder indexing ratchet. I’ll tolerate a faster rate of wear on the pawl, a part that’s easily replaced for under $20, rather than have it chew up the extractor, a part that’s expensive and difficult to replace.
I also noticed that the pawl was disengaging earlier than it should have been, so I was losing stroke on the extractor. There’s a ramp in the rear of the frame and a pin on the pawl that rides the ramp to disengage itself as it rises past the lock up position. This disengagement was happening too early – it should be timed such that the pawl extracts AFTER the ratchet teeth clear the pawl’s window in the recoil plate. By reprofiling the ramp at the rear of the frame slightly, I gained a few more degrees of rotation before the ratchet cleared the window and lost contact.
The longer pawl and altered frame ramp was enough to fix the SA timing completely, as well as fix the DA issue for 3 out of 5 chambers, but the other two teeth were so damaged that they still were not locking in time. Unfortunately, the only way to remedy the indexing ratchet was to replace the entire cylinder. I emailed my “ideal” cylinder dimensions to Numrich (gunpartscorp.com), and within a few days I had a replacement cylinder – extractor included ($83 to Numrich for take-off cylinder). Test fit proved that the new cylinder actually had less B/C gap and less endshake than the original, and just as sweet of headspace. And luckily for me, as rough as the replacement extractor ratchet looked, its timing was actually a bit too FAST, such that it would wedge the pawl against the frame window when the cylinder locked up and cause the trigger to stick. It was just a brief hang on 3 chambers, but one chamber would lock up tight and prevent the trigger from resetting. With only a few quick strokes of the file, I had it timed perfectly on all 5 chambers.
SO AT LEAST NOW IT IS SAFE!
Spring kit:
It was obvious that one of the former owners had cut coils off of the factory mainspring to lighten the action, but they had cut too much, such that it was causing inconsistent ignition from light strikes. This is NOT the proper technique to tune a two spring revolver action. As mentioned above, this bobbed mainspring was causing the revolver to misfire about 5% of the time when fired SA, and around 50%, up to 80-90% of the time depending upon ammunition when fired DA.
When I started this project (mid to late 2012ish), Taurus said the mainspring was a factory fit only part. Numrich didn’t have take-off springs in stock, so I tried out a Wolff Reduced Power Spring kit. The lighter trigger spring made it an absolute joy in SA. The reduced power Wolff mainspring was heavier than the cut factory spring and it was 100% reliable in SA mode with ANY ammo as well as 100% reliable with all of the factory ammo we tested in DA mode. Unfortunately, it still didn’t have enough power to produce 100% reliability with her ‘cheap gunshow reman ammo” when shooting DA, so I wasn’t satisfied to rely upon it as a defensive piece. With no other options, I kept an eye on ebay and Numrich for take-off springs, and we reserved this revolver to be simply a range play plinker.
I caught a break in early 2014. I tried one more time on a whim and finally managed to sweet talk one of the Taurus reps into going around the “factory install only” policy on the mainspring. With the new full length factory spring in place, even the ‘cheap stuff’ fires 100% reliably ($8 Wolff Spring Kit from Midway, $8 for 3 pack of mainsprings from Taurus).
In the meantime, I also remedied the short firing pin protrusion. I determined the maximum protrusion possible by measuring it with the transfer bar pressed forward against the frame with a screwdriver. Compared to the protrusion when pressed by the hammer, there was over 0.015” extra pin protrusion to be gained! I honed down and polished the nose of the hammer to maximize the protrusion of the firing pin without creating a “pinch” on the transfer bar against the frame. (The nose should be the exact height that just lets the hammer nose rest on the frame at a height that presses the transfer bar against the firing pin without ‘pinching’ the transfer bar or firing pin on their forward stops).
I reassembled and took a few hundred rounds of different ammo to the range, 100% reliable with all makes, even fired DA.
So now it’s SAFE AND RELIABLE!!!
Internal Polish and Shims:
Now that this old girl was marching to the beat and firing on all cylinders, I gave it a proper once over on the inside to make her sing. I was ordering a gaggle of action shims from Lance at Triggershims.com for other revolvers, so I picked up a set of S&W J-frame shims on the same order (same pin OD’s as the Taurus 85). I polished out all of the non-shimmed bearing surfaces inside for the pawl, transfer bar, and cylinder bolt, and while I had the rouge handy, I threw a high luster polish on the trigger, hammer, and crane latch slider ($8 triggershims.com + elbow grease). I also gave it a bit of buff all over with the fine white rouge to take out some dull spots and scratches, and put a bit of shine on it.
Forcing Cone, Chambers, and Throats:
Since I know my MIL will be shooting quite a bit of lead out of this old girl, especially at low pressure, I reamed and lapped an 11degree forcing cone. I also reamed the cylinder throats to 0.358", and honed the chambers with 400 and 800grit flex hones just for good measure.
So now it's SAFE, RELIABLE, RUNS GOOD, AND LOOKS GOOD!!!
Sight paint:
To help with her daytime shooting, I also threw on some sight paint for contrast. The topstrap of this revolver is bead blasted to reduce glare, but the sights were still really washed out. I tried a few different color combinations, and we ultimately settled upon lime green in the rear with a blaze orange front. I blacked out part of the topstrap groove and the rear cutout of the rear sight also. Ain't real pretty, but it's a much needed improvement to the former grey on grey sight picture.
The Food Supply:
During the interim of this project, I purchased a Ruger LCR-38 for my MIL to carry. Even though she easily manages full house 38spcl loads out of the all-steel Taurus, the lightweight LCR isn’t quite so well behaved. I talked to Hornady a bit about their 90grn Critical Defense Lite load and decided to give some a try – a 90grn FTX spec’d at 1200fps from a 4”, touting more energy than any of their other 38spcl loadings, but with lighter recoil. These fit the bill for her tolerance and her SD needs, but at just under $1 per round, they’re not a high volume practice solution. For practice, I stoked 4grn of Bullseye under a Meister 93grn LRN seated just over the lube groove with a moderate roll crimp from a Lee FCD. Based on Lyman’s data for a 90grn Linotype, I expect these would pull 825-850fps out of a 4”, but they’d likely be considerably slower from these snubby wheelguns. These pet loads have noticeably less recoil even than the Hornady CD Lite loads, making them a very pleasurable practice load, even from the lightweight LCR in my MIL’s hands. The recoil in the heavier Taurus 85 feels lighter in hand than a 22lr Ruger Mark II.
The Result:
I know a lot of folks would (and several did, during this project) call me foolish for spending so much time, money, and energy to rebuild a Taurus revolver, but beauty is in the eye of the beholder and this revolver shoots great, just needs a little adjustment to even out her idle. I have about $150 (shipping included) plus consumables into fixing this revolver with the shims, springs, pawl, and new cylinder, but she purrs like a kitten, and best of all, the Mother-in-Law is happy to be back shooting it.
Last edited by Nomercy448; 07-08-2017 at 01:02 PM.
 10-13-2014 | 05:56 PM
#3
Thread Starter
Nontypical Buck
Joined: Oct 2009
Posts: 3,938
Likes: 3
From: Kansas
I'll admit, I did a bit of "tuning" to the springs, so it's not exactly a factory 14lb mainspring nor a standard Wolff 6.5lb trigger spring. I could have gone lighter on the trigger spring, as my "test tune" spring let me cut 2 extra coils off of the 6.5# and still reset properly, but with those 2 coils off, it was under 2lb, and my Mother-In-Law has a bit of trouble controlling her Single Action triggers under 2lbs.
Double Action is a smooth and stack free 10lb 2oz, Single Action is crisp and clean at 2lb 3oz. Pretty nice to have a great "paper trigger" for single action practice and a safe "carry trigger" in the same revolver.
Even though the action work is done on this one, I may end up redoing the rear sight to open up the rear face a bit to let in more light. I'm also working on holster patterns for it; an open carry clip, OWB pancake, and a purse concealed clip. Plus, my mother-in-law is intent on getting a laser for it as well (her LCR has one already) since this Taurus will be her nightstand gun and her "dark bedroom eyesight" ain't all it used to be.
Last edited by Nomercy448; 10-13-2014 at 06:03 PM.
 10-19-2014 | 05:27 PM
#5
Thread Starter
Nontypical Buck
Joined: Oct 2009
Posts: 3,938
Likes: 3
From: Kansas
Thanks OlTimer.
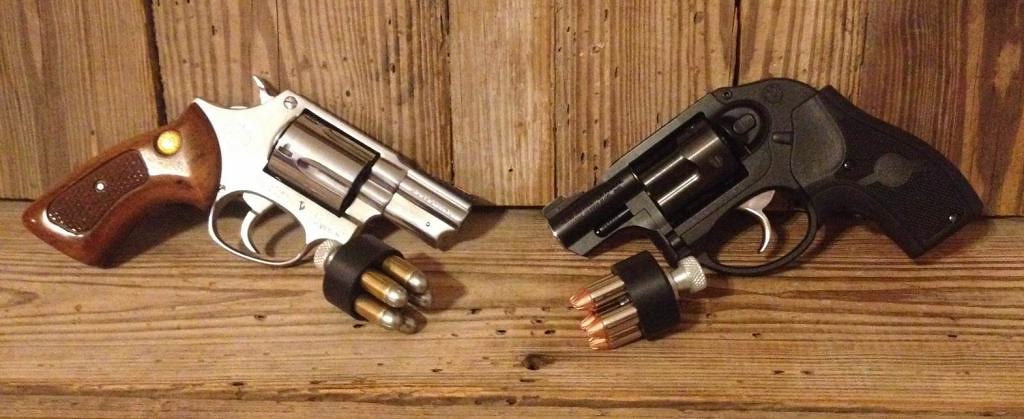
I suppose one small update: Since this will be spending a lot of time on her nightstand, and since my mother-in-law is far-sighted and has difficulty picking up her sights without her glasses, especially in the dark, she wants a laser on this one too (her LCR came with the CT LG from the factory).
On the other hand, she also REALLY likes the look and feel of the "Target" wood grips it's currently sporting. The CT laser grips for the Taurus small frame are less-than-lovely. The polymer version is shorter and smaller girth than these factory wood grips, and the rubberized CT LG is longer and kinda "sticky" in a pocket.
So, I had a thought. Something I'd like to try at least, and see if I go down in a ball of flames and wasted money. I found a new/old stock CT LG-185 on ebay for half price, then ordered a set of replacement "high grade" wood target grips from Jaruwan (grip maker in Thailand - I've heard good things, we'll see how they are when they get here).
THE PLAN, and we'll see how well I can deliver upon it, will be to integrate the electronics and laser emitter into the wooden grips. The profiles are such that the laser housing will have to extend out of the top of the wood grip, which I can't decide if that helps or hinders my integration. I'm confident that getting the electronics transplanted will be straightforward enough, but integrating that laser housing and the instinctive activation switch will be where I can screw it up. So that'll take a bit of planning.
The laser grip is supposed to show up tomorrow, but the woodies won't be here until the sometime between the end of Oct and the middle of Nov (long ways from Thailand, I guess). I'll take plenty of pics as I go, either as record of how well it goes, or as evidence of the crime. If it comes together, I figure it's worth way more than the $140 I'll have in it, if not, then it was worth taking a shot to let my MIL have the best of both worlds on her revolver.
Last edited by Nomercy448; 10-20-2014 at 12:04 PM. Reason: clarified my MIL's vision issues
10-20-2014 | 03:56 AM
#6

Boone & Crockett
Joined: Jul 2014
Posts: 16,631
Likes: 11
From: south eastern PA
I have to tell you, I would be very reluctant to give a laser sighting system to a person with poor vision and who cant see in the dark. The laser will not help her see and ID the target and tell friend from foe. The laser is just a sighting system that allows you to get on target quickly. Just some concerns form a retired police firearms instructor.
10-20-2014 | 12:27 PM
#7
Thread Starter
Nontypical Buck
Joined: Oct 2009
Posts: 3,938
Likes: 3
From: Kansas
I have to tell you, I would be very reluctant to give a laser sighting system to a person with poor vision and who cant see in the dark. The laser will not help her see and ID the target and tell friend from foe. The laser is just a sighting system that allows you to get on target quickly. Just some concerns form a retired police firearms instructor.
In the interest of concision - something I'm not known for!
 - and since this isn't a thread about defensive weapon strategy or laser accessories, I suppose I wasn't compelled to delve into specifics about our decision making process for lasers on her defensive revolvers, and her defensive strategy in general.
Since you bring it up, I'll take the time to elaborate these considerations...
Lasers:
Obligatory disclaimer: while I'm not generally a proponent of laser sights, I do believe there are specific circumstances in which they can be beneficial, one of which, in my opinion, is for far-sighted shooters that have difficulties focusing on their traditional sights. I don't have interest in debating that.
FIRST AND FOREMOST: My mother-in-law is far-sighted. I went back and edited my original post to reflect that detail, and her specific issues with sight acquisition. Her visual acuity is fine past arms-length, so she has no issue - no moreso than the rest of us at least - with target identification. She does struggle, however, to pick up her sights without her reading/shooting glasses, which is naturally exacerbated by low light. While I've helped her to develop a serviceable technique of looking over her prescription shooting glasses to see her sights and her target, she doesn't sleep in her glasses. With a laser-sight, even without her glasses she can see a crisp POA on a focused target. That's in no way meant to start a debate about "head's up shooting vs. front-sight press" or point shooting vs. aimed, but only a statement of fact that a far-sighted shooter can see a target clearly, but not their sights, and as such, can benefit from a projected laser-sight.
To quickly provide contrast to that point, I'm a near-sighted shooter. Without my glasses, I can see my sights just fine, but I'm not able to focus on my target at range. A laser-sight would not help me without my glasses - it's just a blurry red dot setting somewhere on top of a blurry target.
I'll also comment that it should go without saying that a laser-sight will not make a person pull the trigger. As oldtimr said, a laser-sight only helps with sighting, nothing more, nothing less. In this case, the laser-sight offers a secondary aiming device in the event that she cannot effectively use her primary sights - which is pretty much any time she isn't wearing her glasses. Covering an unintended target with a laser dot will not kill someone. Negligent discharges come from poor discipline, poor training, or poor trigger control, not from laser-sights.
We also considered that she's probably more apt to miss and potentially injure a bystander or neighbor if she forces herself to rely on out-of-focus sights, rather than seeing the POA dot IN FOCUS on the potential intruder.
So to be clear, I say all that to whole-heartedly agree with you that visual acuity is something that every would-be self-defender must consider. Lasers can have real benefits for some folks, not for others (like myself), and DISCIPLINE/TRAINING TRUMPS ALL!!!
Defensive Strategy:
We've also considered the "friend or foe" aspect thoroughly, weighed the facts of her circumstances, and made our decisions accordingly.
FIRST AND FOREMOST: After extensive consideration of her living situation, family, friends, and history, nobody should ever be in her home at night without her knowledge, let alone in her bedroom (important distinction, as you'll read below). If one of us (friends/family) needs her, or something of hers, night or otherwise, there is no foreseeable reason why we would ever enter her home without waking her up, either by calling ahead, or by announcing ourselves loudly at the door to be let in. If she is ever surprised by anyone in her bedroom, THEY SHOULD NOT BE THERE.
We have also thoroughly discussed (and trained) a response protocol for the "someone's in the house" scenario. Her "defense strategy" is about "self defense," not "home defense." As such, her protocol is to "barricade in place, escape if necessary." She's a small 60yr old woman that lives alone in a city with good police response time. There is no circumstance in which she needs to leave the safety of her locked bedroom and risk physical assault or even a "gunfight" with an intruder to defend her belongings. If she hears someone in the house in the middle of the night, she grabs her gun, grabs her phone, calls the cops, props a chair behind the door, and takes up an advantaged defensive position to the door. If someone then tries to enter her door, she will announce that she has a gun and is on the phone with the police. If they still try to get in, she's out the window.
That protocol is not appropriate for everyone. Not all home circumstances are the same, so not all defensive strategies are the same. As a man in my 30's with a toddler in another room in the home, my strategy is to barricade my wife behind me in our bedroom and move to my son to ensure his safety. My mother-in-law has no need to leave her room unless the threat imposes upon that room.
She also practices to remember "Kevin, is that you?" if she hears anything at night and isn't sure whether she should call the police or not. We don't know anyone named "Kevin," so the answer should never be "yes." If she shouts "Kevin, is that you?" from behind her locked door and someone that happened to be sleeping over doesn't answer "no stupid, it's me, I'm just getting a drink," then she knows to call the cops. If she hears someone walking about that doesn't respond and recalls that nobody was staying over that night, she calls the cops. But again, she doesn't leave her room. If it was just a sleepwalking visitor, she wouldn't have an accidental shooting - the cops would show up and everybody would be honky dorey...
Sooooo.... That's the long story about the 'defensive needs assessment' we did with her that I didn't feel was really pertinent to a thread about rebuilding her revolver.
But I do agree that these types of considerations - visual acuity included - need to be weighed before someone just buys whatever they saw in an online forum or gun magazine, sticks it on their nightstand without properly training with the weapon and strategizing their response programs, and then inadvertently goes all 'tacticool' on their roommate coming home late from work...
10-21-2014 | 08:26 PM
#8
Nontypical Buck
Joined: Aug 2005
Posts: 3,814
Likes: 0
From: Phoenix, AZ
Really enjoyed reading this post - thank you for it.
I have never heard of this strategy but it is very smart.
About your protocol to barricade in place (the bedroom) - have you considered home invasions during the day time when your MiL might not be in the bedroom? Is there a possibility that she might get cut-off from the bedroom and her firearm?
Regarding the sights at night: I don't suppose replacing the factory front sight with a tritium sight would help? Or would that be too blurry to be useful?
Great post! I hope you will keep us updated on how the laser grips work out.
"Kevin, is that you?"
About your protocol to barricade in place (the bedroom) - have you considered home invasions during the day time when your MiL might not be in the bedroom? Is there a possibility that she might get cut-off from the bedroom and her firearm?
Regarding the sights at night: I don't suppose replacing the factory front sight with a tritium sight would help? Or would that be too blurry to be useful?
Great post! I hope you will keep us updated on how the laser grips work out.
10-22-2014 | 02:43 PM
#9
Thread Starter
Nontypical Buck
Joined: Oct 2009
Posts: 3,938
Likes: 3
From: Kansas
Robert, thanks for the kind words, for taking interest, and for the questions!
The short answer is that, yes, we HAVE considered daytime invasions.
The long answer is this: :P
While it's not my MO, I'm certified as a risk assessor (industrial and commercial processes), and I'm also a certified firearms instructor, and newly licensed CCW instructor. It's kinda natural for me to let that part of my job overlap into my personal pursuits.
In general, I've seen a trend that Risk Mitigation programs with fewer mitigating controls and response protocols to cover a great number of risks are more effective than more complex programs. In other words, "One solution for many problems" tends to work well - aka "Keep It Simple & Straightforward" - or whatever flavor of "KISS" you prefer.
My go-to process starts by identifying potential risks/threats. In this case, that means identifying possible infiltration points as they relate to her activity areas. I used those to develop suitable control mechanisms and response protocols to deal with those risks.
Since we're talking about my mother-in-law and her in-home defense portion of her Self-defense program:
Her "one solution to many problems" is to have her cell phone and EDC weapon (the Ruger LCR) readily accessible on or near her person at all times. Another "universal solution" to any risk is to distance herself from danger, aka "Escape". So these are high priorities in her Defense Program.
When I assessed her home, the floor plan and potential infiltration points illustrated a roughly linear evacuation profile, and as such, any invasion would cut her off from the opposite end of the house. Luckily in her case, both ends have suitable escape points AND suitable "Barricade in place/escape if necessary" positions. If cut off from the back of the house, she can escape by the front door, or if she doesn't have her EDC and cellphone, she can proceed to her bedroom, which I described in my last post as a BIP/E defensive position. Alternatively, if she's cut off from the front of her house, she can escape via the backdoor, or proceed to another BIP/E position in her basement. As described before, any infiltration point in the entire house when she's in bed at night would mean BIP/E in her room. Any infiltration to the top floor when she's downstairs doing laundry would mean she's 'cornered' in the basement, so she would BIP/E in the back bedroom. During the day, she should have her EDC and her cell phone, if not, both BIP/E positions have solid wood doors with substantial locks, panic buttons for her home alarm, home phone lines, cell phone rapid chargers, a secured firearm, and options for escape.
So if you're keeping track, she only has 4 threat response protocols that incorporate 3 total firearms that cover all of the activity areas in her home and all 16 infiltration points (trying to remember how many 'holes' she has in her house by memory!). She has 2 Immediate Escape routes, and 2 "Barricade in Place/Escape if Necessary" defensive positions. Each protocol includes redundancies for phone, home alarm trigger, and secured firearms, as well as escape.
We did similar threat assessment/response protocol developments for scenarios AROUND the home, at work, and in public.
So after saying all of that, I'm sure I sound like some Rambo wannabe, tacticool d-bag, mall-ninja, lunatic "prepper," but it's really not as dramatic or intense as it sounds. Only really takes a few hours to go through all of it.
Mostly it's just that her sights are too blurry. Tritium and contrast paint help, but her accuracy suffers a lot without her glasses no matter what.
Since this Taurus is fixed sights all around, I'd have to mill it out for removable sights. I HEAVILY considered milling it for Novak tritiums, but the work and cost just weren't worth it compared to the accuracy improvement (or lack thereof).
I did put a tritium night sight on her LCR, with contrasting sight paint on around the lamp lens. It also has a CT Laser-grip.
If nothing else, at least we can say that she has all of the tools she can have to improve her chances, whether they actually help result in a "win" if she ever needs them, well, we hope we never find out...
The long answer is this: :P
While it's not my MO, I'm certified as a risk assessor (industrial and commercial processes), and I'm also a certified firearms instructor, and newly licensed CCW instructor. It's kinda natural for me to let that part of my job overlap into my personal pursuits.
In general, I've seen a trend that Risk Mitigation programs with fewer mitigating controls and response protocols to cover a great number of risks are more effective than more complex programs. In other words, "One solution for many problems" tends to work well - aka "Keep It Simple & Straightforward" - or whatever flavor of "KISS" you prefer.
My go-to process starts by identifying potential risks/threats. In this case, that means identifying possible infiltration points as they relate to her activity areas. I used those to develop suitable control mechanisms and response protocols to deal with those risks.
Since we're talking about my mother-in-law and her in-home defense portion of her Self-defense program:
Her "one solution to many problems" is to have her cell phone and EDC weapon (the Ruger LCR) readily accessible on or near her person at all times. Another "universal solution" to any risk is to distance herself from danger, aka "Escape". So these are high priorities in her Defense Program.
When I assessed her home, the floor plan and potential infiltration points illustrated a roughly linear evacuation profile, and as such, any invasion would cut her off from the opposite end of the house. Luckily in her case, both ends have suitable escape points AND suitable "Barricade in place/escape if necessary" positions. If cut off from the back of the house, she can escape by the front door, or if she doesn't have her EDC and cellphone, she can proceed to her bedroom, which I described in my last post as a BIP/E defensive position. Alternatively, if she's cut off from the front of her house, she can escape via the backdoor, or proceed to another BIP/E position in her basement. As described before, any infiltration point in the entire house when she's in bed at night would mean BIP/E in her room. Any infiltration to the top floor when she's downstairs doing laundry would mean she's 'cornered' in the basement, so she would BIP/E in the back bedroom. During the day, she should have her EDC and her cell phone, if not, both BIP/E positions have solid wood doors with substantial locks, panic buttons for her home alarm, home phone lines, cell phone rapid chargers, a secured firearm, and options for escape.
So if you're keeping track, she only has 4 threat response protocols that incorporate 3 total firearms that cover all of the activity areas in her home and all 16 infiltration points (trying to remember how many 'holes' she has in her house by memory!). She has 2 Immediate Escape routes, and 2 "Barricade in Place/Escape if Necessary" defensive positions. Each protocol includes redundancies for phone, home alarm trigger, and secured firearms, as well as escape.
We did similar threat assessment/response protocol developments for scenarios AROUND the home, at work, and in public.
So after saying all of that, I'm sure I sound like some Rambo wannabe, tacticool d-bag, mall-ninja, lunatic "prepper," but it's really not as dramatic or intense as it sounds. Only really takes a few hours to go through all of it.
Since this Taurus is fixed sights all around, I'd have to mill it out for removable sights. I HEAVILY considered milling it for Novak tritiums, but the work and cost just weren't worth it compared to the accuracy improvement (or lack thereof).
I did put a tritium night sight on her LCR, with contrasting sight paint on around the lamp lens. It also has a CT Laser-grip.
If nothing else, at least we can say that she has all of the tools she can have to improve her chances, whether they actually help result in a "win" if she ever needs them, well, we hope we never find out...
