


String Loop (so as not to hijack)
 01-09-2007 | 12:46 PM
#1

Thread Starter
Dominant Buck
Joined: Oct 2005
Posts: 21,043
Likes: 0
From:
Lots of talk about a string loop on another thread. I have a question.....
I know VERY LITTLE about bow set-ups.....but I KNOW "I" like a very small string loop (just big enough for my nock to fit in and get my release on).
Why would my bow shop be somewhat reluctant (it seems) to make my string loop the size I want it????? They always make it bigger (though not as big as many I see) than I want it.
just rying to learn......
 01-09-2007 | 01:05 PM
#2
Boone & Crockett
Joined: Feb 2003
Posts: 10,679
Likes: 0
Do you ask them to make it as small as possible and provide them with your release?
If not they have to assume that you might have a release with very large jaws (tru fire) and make it to fit all releases.
If not they have to assume that you might have a release with very large jaws (tru fire) and make it to fit all releases.
01-09-2007 | 01:18 PM
#3
Dominant Buck
Joined: Feb 2003
Posts: 21,199
Likes: 1
From: Blossvale, New York
Why would my bow shop be somewhat reluctant (it seems) to make my string loop the size I want it????? They always make it bigger (though not as big as many I see) than I want it.
01-09-2007 | 01:42 PM
#5
Joined: Feb 2003
Posts: 6,006
Likes: 0
From:
Jeff, the guy I had tie one on for me when I picked up my bow openly expressed his dislike for them. I assume this is why he did such a poor job tying mine on. It was about 1/2" long, at least 1/4" longer than I tie my own on.
I bit my tongue and let it slide as I had already been there for two hours waiting for him to take his time setting me up.
I bit my tongue and let it slide as I had already been there for two hours waiting for him to take his time setting me up.
01-09-2007 | 01:50 PM
#6
Site Buck Guru
Joined: Dec 2005
Posts: 5,922
Likes: 0
From: Racine, Wisconsin
I'm with the do it yourself crowd. Tying a string loop is not rocket science. You can learn how to do it from the internet or a proshop, maybe a friend that knows how. This is probably one of the best ways to tune in your draw length perfectly, after the initial set up. Once you get the perfect length string, measure it and make a couple of spares. Always write that kind of info on your tuning card. Your personal spec card is valuable, but that's another topic.
Good luck.
Good luck.
 01-09-2007 | 02:30 PM
#9
Site Bouncer
Joined: Dec 2004
Posts: 4,099
Likes: 0
From: Illinois
GMMAT,
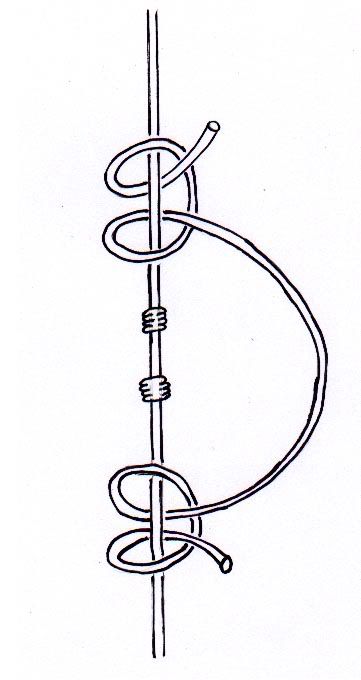
I posted this a while back on the Tech side, but this is how I tie my nocks, I also like them only as big as to fit my release:
I start out with a 4 3/4 in piece of loop material. I have found that Allen makes a great string loop material, it burns good, does not stretch and holds it's shape very well.
After I cut my loop to length I burn both ends into a nice big melted ball. I like to do this off of the bow as it gives me more control of the melt. If the flame is too close it will burn the end leaving a burnt charred like appearance. This is not good as it will make the end weak and could break. The end should melt but never catch fire.
Next I locate my nock position and tie in my first nock set. I tie the nock just like you would any knot but instead of a complete knot I only tie half, then wrap the serving material around the bow string and tie again. I repeat this till I have done it 5 times (you can do more of less) the last knot is a full square not to keep it in place. I cut the ends and ment into place.
I then slip on an arrow nock to give me my proper spacing and tie the second nock set. Once that is done I am ready to tie on the loop. This is a little difficult especially if you have big hands like me, but if I can do it anybody can.
I tie the first knot on the outside of my tied on nock and pull it as tight as I can. I do this by wrapping the loop material around a screwdriver and pull (like a "T" Handle), I then lay theuntied end down on the string over my second tied on nock. I tie the second knot. This one will be difficult because there is not alot of material to work with, you will end up pushing the melted ball through the knot. Take your time and don't get frustrated.
After it's tied you will have no loop to speak of but after you pull it some it will take shape. I use a pair of needle nose pliers to spread the loop and get it tight. After that I knock an arrow, attach my release and pull. I don't pull it all the way into the let off because I want as much weight to cinch the knot. Make sure you are pointing your bow in a safe direction.
It's important to make sure you tie your string loop in opposite directions so the melted balls are on opposite sides of the string.
When done it will look like this:

As you can see there is just enough room to put my release on once an arrow is nocked.
Good luck and remember it will take time to get that second knot tied on but this way you will be assured a nice small loop.
This is what it looks like with the release attached:

I posted this a while back on the Tech side, but this is how I tie my nocks, I also like them only as big as to fit my release:
I start out with a 4 3/4 in piece of loop material. I have found that Allen makes a great string loop material, it burns good, does not stretch and holds it's shape very well.
After I cut my loop to length I burn both ends into a nice big melted ball. I like to do this off of the bow as it gives me more control of the melt. If the flame is too close it will burn the end leaving a burnt charred like appearance. This is not good as it will make the end weak and could break. The end should melt but never catch fire.
Next I locate my nock position and tie in my first nock set. I tie the nock just like you would any knot but instead of a complete knot I only tie half, then wrap the serving material around the bow string and tie again. I repeat this till I have done it 5 times (you can do more of less) the last knot is a full square not to keep it in place. I cut the ends and ment into place.
I then slip on an arrow nock to give me my proper spacing and tie the second nock set. Once that is done I am ready to tie on the loop. This is a little difficult especially if you have big hands like me, but if I can do it anybody can.
I tie the first knot on the outside of my tied on nock and pull it as tight as I can. I do this by wrapping the loop material around a screwdriver and pull (like a "T" Handle), I then lay theuntied end down on the string over my second tied on nock. I tie the second knot. This one will be difficult because there is not alot of material to work with, you will end up pushing the melted ball through the knot. Take your time and don't get frustrated.
After it's tied you will have no loop to speak of but after you pull it some it will take shape. I use a pair of needle nose pliers to spread the loop and get it tight. After that I knock an arrow, attach my release and pull. I don't pull it all the way into the let off because I want as much weight to cinch the knot. Make sure you are pointing your bow in a safe direction.
It's important to make sure you tie your string loop in opposite directions so the melted balls are on opposite sides of the string.
When done it will look like this:
As you can see there is just enough room to put my release on once an arrow is nocked.
Good luck and remember it will take time to get that second knot tied on but this way you will be assured a nice small loop.
This is what it looks like with the release attached: