


FPJ becomes NFPJ
 03-13-2012, 06:05 PM
#1
Nontypical Buck
Thread Starter
Join Date: Aug 2008
Location: Rapid City, South Dakota
Posts: 3,732
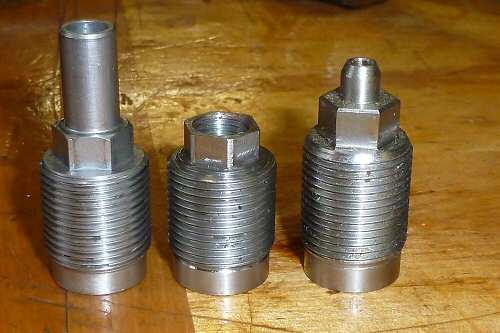
My first Knight rifle was the 45 caliber disc elite. GM54-120 alerted us all to the seller, and i jumped at it for $200. New in the box; what a wonderful purchase that rifle was. The nfpj plug later purchased from Knight worked perfect. After shooting the rifle for a while, i started yearning for a 50 caliber with sights. Chet was kind enough to sell me a brand spankin' new 50 caliber disc extreme, without the unneeded box. However, this rifle didn't work so very good with a new nfpj plug from Knight. The adapter didn't fit the bolt, nor did primers fit the plug. A little work polishing the primer pocket fixed the plug, and more work removing material from the face of the bolt, allowed the adapter to marry up dandy. However, primer fit was too loose, and there was considerable blow by.
The bolt from the elite was tried in the extreme, and then the extreme burned perfectly clean. However, the elite now had issues. I fiddled around with the elite, and it did OK for a time, but here lately it became irritating. Hopefully i have now found the permanent cure. Today the wind howled around here, and i figured i would get something constructive done for a change. However, instead of working a chore, my attention drifted back to muzzle loaders. My day was spent converting a fpj plug into an nfpj plug in hopes to make the elite shoot more better.
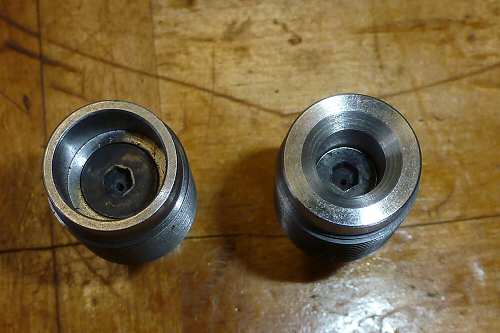
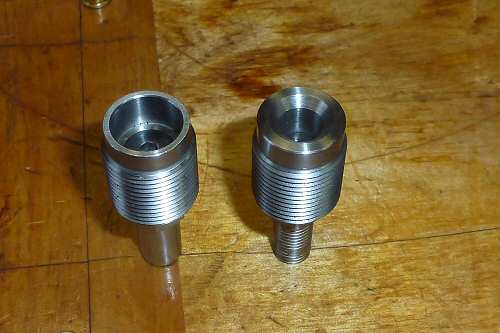
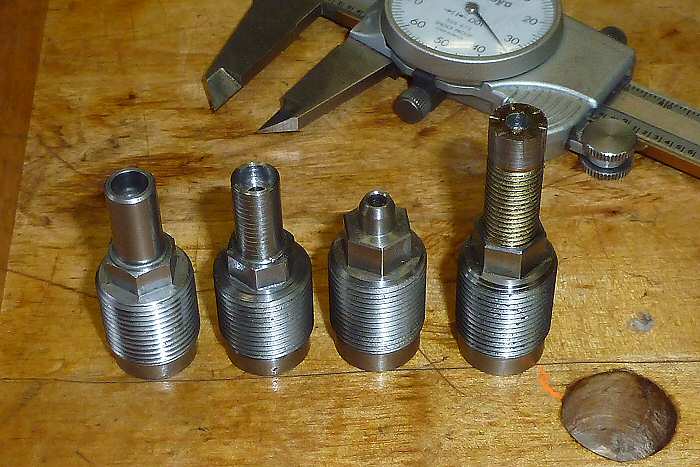
The fpj needed to be shortened, and the hex moved more into the plug.
Then the shortened fpj plug was drilled and tapped to receive a 3/8" bolt at the primer end.

The head of the 3/8" bolt was cut off, and the end tapered to fit the bottom of the hole made by the drill.
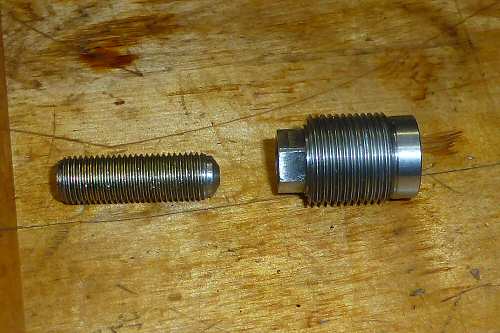
Red loctite was applied, and a pipe wrench used to tighten the bolt into the plug. A 1/8" hole was drilled through the bolt, and the threads mostly removed. The bolt was shortened, and tested, and shortened, and tested, until the rifle bolt would close as it should, without rubbing on the plug.
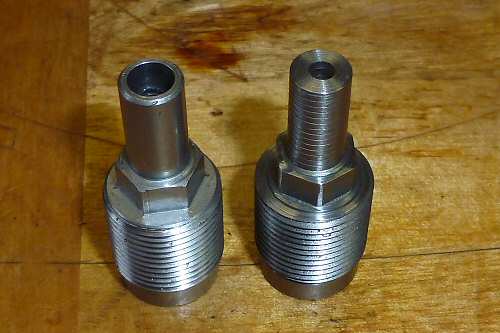
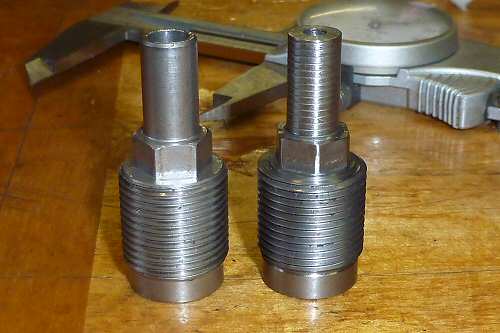
A letter C drill near flattened was used to make a primer pocket. Extreme care was taken not drill too deep. The final depth of the pocket was arrived at by 'sneaking' up on it. When the rifle bolt is closed on STS primers they end up being 'crushed' about 0.006". Hopefully this will result in a perfect burn with zero blow by..
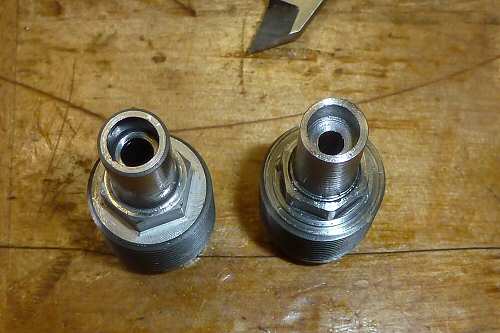
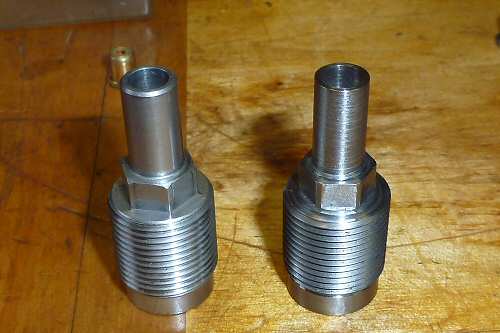
Then a pocket was made for a vent, and the flame channel was drilled larger with a # 21 drill for about 3/8". Threads were formed with a tap, and with the vent installed, the plug was finished.
I wanted to try this plug in the worst way this afternoon, but the wind was howling, and the forecast is calling for far less wind in the morning. Whilst working the plug, i noticed the fpj plug is nearly exactly the same length from the end of the plug to the end of the hex as the Mountaineer plug is. So a start was made toward making a Mountaineer plug using the fpj plug. Reason being, it kinda seemed easier to make a plug for the Mountainer this way, than to remove the brazed vent from the Knight Mountaineer plug, plus this way i can decide what primer i will use.
The bolt from the elite was tried in the extreme, and then the extreme burned perfectly clean. However, the elite now had issues. I fiddled around with the elite, and it did OK for a time, but here lately it became irritating. Hopefully i have now found the permanent cure. Today the wind howled around here, and i figured i would get something constructive done for a change. However, instead of working a chore, my attention drifted back to muzzle loaders. My day was spent converting a fpj plug into an nfpj plug in hopes to make the elite shoot more better.
The fpj needed to be shortened, and the hex moved more into the plug.
Then the shortened fpj plug was drilled and tapped to receive a 3/8" bolt at the primer end.
The head of the 3/8" bolt was cut off, and the end tapered to fit the bottom of the hole made by the drill.
Red loctite was applied, and a pipe wrench used to tighten the bolt into the plug. A 1/8" hole was drilled through the bolt, and the threads mostly removed. The bolt was shortened, and tested, and shortened, and tested, until the rifle bolt would close as it should, without rubbing on the plug.
A letter C drill near flattened was used to make a primer pocket. Extreme care was taken not drill too deep. The final depth of the pocket was arrived at by 'sneaking' up on it. When the rifle bolt is closed on STS primers they end up being 'crushed' about 0.006". Hopefully this will result in a perfect burn with zero blow by..
Then a pocket was made for a vent, and the flame channel was drilled larger with a # 21 drill for about 3/8". Threads were formed with a tap, and with the vent installed, the plug was finished.
I wanted to try this plug in the worst way this afternoon, but the wind was howling, and the forecast is calling for far less wind in the morning. Whilst working the plug, i noticed the fpj plug is nearly exactly the same length from the end of the plug to the end of the hex as the Mountaineer plug is. So a start was made toward making a Mountaineer plug using the fpj plug. Reason being, it kinda seemed easier to make a plug for the Mountainer this way, than to remove the brazed vent from the Knight Mountaineer plug, plus this way i can decide what primer i will use.
 03-14-2012, 03:24 PM
#7
Nontypical Buck
Thread Starter
Join Date: Aug 2008
Location: Rapid City, South Dakota
Posts: 3,732
When i arrived at 4900' this morning, the temperature was 30, and there was no air movement. Setting the target for a 300 yard shoot had me thinking, 'conditions are perfect'.
The rifle was loaded with 120g of BH, 200g SST, blue harvester sabot, and STS primer. Three shots were taken. Things were good! These first 3 shots on the cold clean barrel are the holes at left in the bottom target. The scope was adjusted to the right. The 5 shots dyed green in the bottom target were taken. The bolt was hard to pull. It became harder and harder to pull the primer out of the breech plug. I had to pound the bolt with my palm to get the primers to release.

Even though a breeze was happening, i set out a salsa jug filled with water to replace the target, and shot six shots at the jug missing all six. A VIDEO of one of the misses. To get the primers to release at this point, i had to beat the bolt handle away with a block of wood. After missing the jug all 6 shots i gave up and moved to 200 yard.
The location where the target was set at 200 yard was 2 mile from where i had set up the 300 yard target, and was at 4700'. There was some breeze here blowing left to right. Since the STS primer were sticking, i switched to W209 primer. The first one released nicely; the next 2 stuck, and had to removed using a block of wood. The 3 holes dyed green in the top target were made using the W209 primer. These primer showed symptoms of a head space much too tight.
Then the powder charge was switched to 115g, because i ran out of the pre-filled 120g vials. The primer was also switched back to the STS, and the 4 holes dyed blue were made. The primers were stuck solid each shot, and the bolt handle was beat with a block of wood to remove the primer. I loaded the rifle for the fifth shot, but the breeze intensified, and i moved to 100 yard out.
When i finished setting up at 100 yard, i loaded the rifle. The ram rod sure stopped short. Oops! That was when i remembered loading the rifle before i left the 200 yard location. The breech plug was removed, and the double load was pounded out with that heavily used block of wood. Whilst getting and replacing tools, i grabbed an old roofing hatchet. After everything was put back together, 5 shots were taken at the top target. 115g BH, 200g SST, smooth light blue harvester sabot, STS primer. Between each shot the primer was removed by beating on the bolt handle with the hatchet handle.
Then i decided to take anther shot at the salsa jug out about 100 yard, whilst standing and utilizing a bipod. Standing Shooting Video.
Returning home, i measured the fired primers, and found they were 0.010" shorter than unfired primers. I then drilled the primer pocket some deeper, and polished, and polished it.
The rifle was loaded with 120g of BH, 200g SST, blue harvester sabot, and STS primer. Three shots were taken. Things were good! These first 3 shots on the cold clean barrel are the holes at left in the bottom target. The scope was adjusted to the right. The 5 shots dyed green in the bottom target were taken. The bolt was hard to pull. It became harder and harder to pull the primer out of the breech plug. I had to pound the bolt with my palm to get the primers to release.
Even though a breeze was happening, i set out a salsa jug filled with water to replace the target, and shot six shots at the jug missing all six. A VIDEO of one of the misses. To get the primers to release at this point, i had to beat the bolt handle away with a block of wood. After missing the jug all 6 shots i gave up and moved to 200 yard.
The location where the target was set at 200 yard was 2 mile from where i had set up the 300 yard target, and was at 4700'. There was some breeze here blowing left to right. Since the STS primer were sticking, i switched to W209 primer. The first one released nicely; the next 2 stuck, and had to removed using a block of wood. The 3 holes dyed green in the top target were made using the W209 primer. These primer showed symptoms of a head space much too tight.
Then the powder charge was switched to 115g, because i ran out of the pre-filled 120g vials. The primer was also switched back to the STS, and the 4 holes dyed blue were made. The primers were stuck solid each shot, and the bolt handle was beat with a block of wood to remove the primer. I loaded the rifle for the fifth shot, but the breeze intensified, and i moved to 100 yard out.
When i finished setting up at 100 yard, i loaded the rifle. The ram rod sure stopped short. Oops! That was when i remembered loading the rifle before i left the 200 yard location. The breech plug was removed, and the double load was pounded out with that heavily used block of wood. Whilst getting and replacing tools, i grabbed an old roofing hatchet. After everything was put back together, 5 shots were taken at the top target. 115g BH, 200g SST, smooth light blue harvester sabot, STS primer. Between each shot the primer was removed by beating on the bolt handle with the hatchet handle.
Then i decided to take anther shot at the salsa jug out about 100 yard, whilst standing and utilizing a bipod. Standing Shooting Video.
Returning home, i measured the fired primers, and found they were 0.010" shorter than unfired primers. I then drilled the primer pocket some deeper, and polished, and polished it.
03-16-2012, 06:58 PM
#8
Nontypical Buck
Thread Starter
Join Date: Aug 2008
Location: Rapid City, South Dakota
Posts: 3,732
Yesterday morning, after drilling the primer pocket some deeper, some more shooting was accomplished. The burned primers looked awful. Returning home, the rifle was cleaned, and the primer pocket drilled some deeper. A little shooting was done in the afternoon. The primers looked awful.
This morning more shooting was done, after the primer pocket was drilled deeper. The mallet came with.

The primers never required the mallet to remove them, but they just didn't look very good. After i tired of shooting paper, we blasted a cottage cheese jug filled with water at 220 yard.
Cottage cheese video
Returning home, i cleaned the rifle and breech plug again. The primer pocket was drilled ever so slightly deeper, and the flame channel was enlarged to 5/32". Then gathering powder, bullets, primers, rifle, water, and empty jugs we headed out again. The mallet came with, in case it was needed. Being completely disinterested in shooting paper, a potato salad jug was set out at 220 yard, and it was disintegrated. The primers looked good. The primers fell right out of the nfpj adapter. The mallet no longer seems to be needed. The head space of this combination seems to be too large for STS primer, plus the STS primer seem to be sticky for some reason, and are hard to remove. In the beginning i was making this plug for to use STS primer, but it didn't work out. The W209 primer seem to be working quite nicely right now. Of course more testing is required.
Another salad jug filled with water was set out at 220 yard. However this time the camera was placed right along side the rifle and the lens was zoomed out to 20 power. The load was 120g BH, 200g SST, smooth Harvester sabot, W209 primer.
Here is a never before seen perspective of blasting a mustard potato salad jug
This morning more shooting was done, after the primer pocket was drilled deeper. The mallet came with.
The primers never required the mallet to remove them, but they just didn't look very good. After i tired of shooting paper, we blasted a cottage cheese jug filled with water at 220 yard.
Cottage cheese video
Returning home, i cleaned the rifle and breech plug again. The primer pocket was drilled ever so slightly deeper, and the flame channel was enlarged to 5/32". Then gathering powder, bullets, primers, rifle, water, and empty jugs we headed out again. The mallet came with, in case it was needed. Being completely disinterested in shooting paper, a potato salad jug was set out at 220 yard, and it was disintegrated. The primers looked good. The primers fell right out of the nfpj adapter. The mallet no longer seems to be needed. The head space of this combination seems to be too large for STS primer, plus the STS primer seem to be sticky for some reason, and are hard to remove. In the beginning i was making this plug for to use STS primer, but it didn't work out. The W209 primer seem to be working quite nicely right now. Of course more testing is required.
Another salad jug filled with water was set out at 220 yard. However this time the camera was placed right along side the rifle and the lens was zoomed out to 20 power. The load was 120g BH, 200g SST, smooth Harvester sabot, W209 primer.
Here is a never before seen perspective of blasting a mustard potato salad jug
03-17-2012, 11:09 AM
#9
Nontypical Buck
Thread Starter
Join Date: Aug 2008
Location: Rapid City, South Dakota
Posts: 3,732
This morning the rifle/breech plug was shot 19 times. Things worked good. The bolt opened, and pulled the primer out of the plug without having to hammer on it or rassle. The primers fall right out of the adapter when the rifle is tilted. On about the 17th shot, a little strength was required to pull the primer out of the plug, but on every other shot, the primer kinda came out on it's own. The mallet was carried from the truck to the shop where it normally resides, when we arrived back at home.
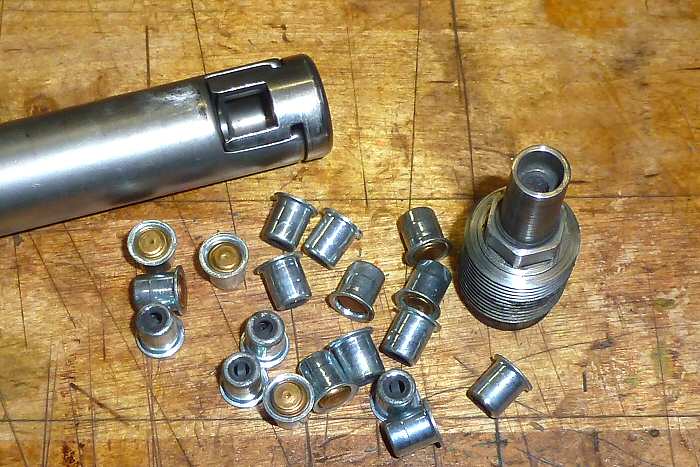
The photo previous, shows the bolt, adapter, breech plug, and primers as they looked upon arriving home.
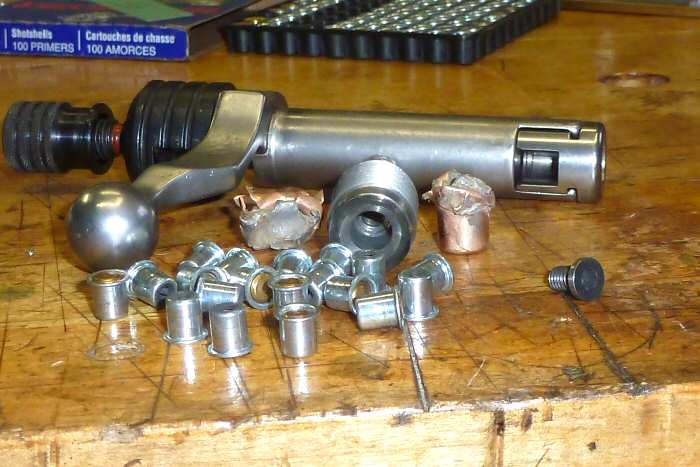
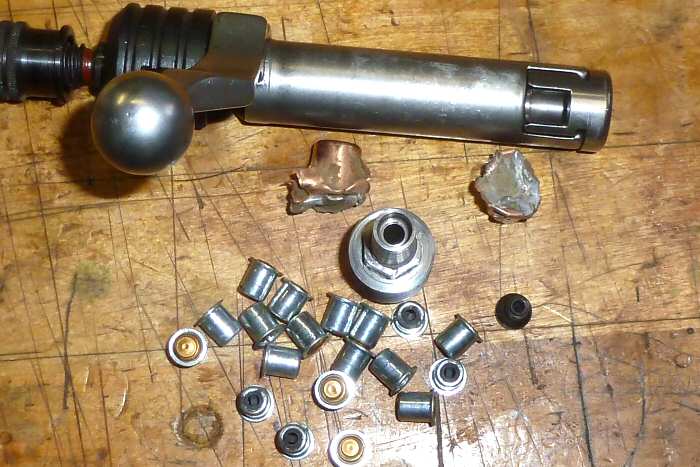
The next photo shows the bolt, adapter, and breech plug after they were washed. Also i remembered i had found a couple of bullet behind where smucked jugs were sitting, and included them in the photo.
A potato salad jug filled with pure spring water from near by cattle tubs was
smucked from 375 yard away, which ended the testing of this breech plug.
The photo previous, shows the bolt, adapter, breech plug, and primers as they looked upon arriving home.
The next photo shows the bolt, adapter, and breech plug after they were washed. Also i remembered i had found a couple of bullet behind where smucked jugs were sitting, and included them in the photo.
A potato salad jug filled with pure spring water from near by cattle tubs was
smucked from 375 yard away, which ended the testing of this breech plug.