


Glass bedding your muzzleoader (Omega)
 01-22-2011 | 10:45 AM
#1
Thread Starter
Nontypical Buck
Joined: Sep 2009
Posts: 1,455
Likes: 0
Bedding is making a custom fit between your stock and rifle by removing stock material and replacing it with a bedding compound that will conform perfectly to your gun. I had some bedding compound laying around so I thought I'd play with my Omega Z5. My approach was to bed both recoil lugs and everything between them while leaving the rest of the gun floated.
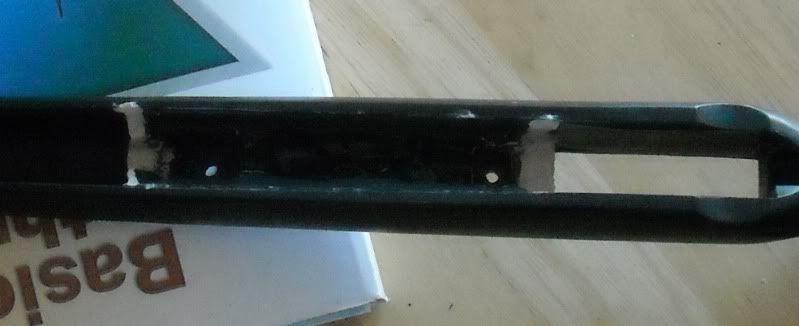
The first step is removing stock material. I started by free floating the entire bbl by running a razor blade inside the stock to shave material off (I've seen posts of barrel floating by shimming the recoil lug pockets but IMO because the lug pockets are already so shallow in the Omega you would be better off to just remove stock material). Next is to remove material in the recoil lug pockets. Because the lugs are what holds the gun to the stock, they need to be bedded to fit their bottom and rear side. So you remove material around the hole where the screw goes in, and also about 1/2-2/3 the width of the lug in the rear portion. I used a dremel tool. Leaving some of the original bottom and rear material will control the depth and rearward movement of the lug when bedding. Remove as much as you want on the sides and front because this is where I left clearance for the lug. If your lug doesn't have a screw holding it to the stock (like on a centerfire rifle) you will remove material around the entire bottom of the recoil lug recess as you want clearance in the bottom. With the barrel floated and the lug pockets opened up, you can start to roughen up the bonding areas inside the stock. Because your stock is smooth and bedding compound is an epoxy, it's necessary to roughen things up so that you create a way for the epoxy to mechanically lock itself to the stock. I used a dremel and a drill with a small bit to make these rough areas and locking holes.
Here's an example (ignore the rear modeling clay unless you want to only bed the front lug)
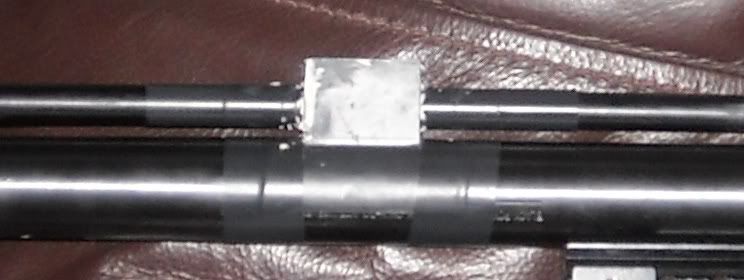
Now the stock is about ready. Time to get the gun ready. I used 2 layers of electrical tape on the front and sides of the lugs to make my clearance and then cut a holes for the ramrod to slide through. You could use masking tape or duct tape also. I also did 2 layers on the ramrod.
Example (I cut the tape off that's touching the barrel so it would be bedded and also wrapped the rest of the ramrod between the lugs)
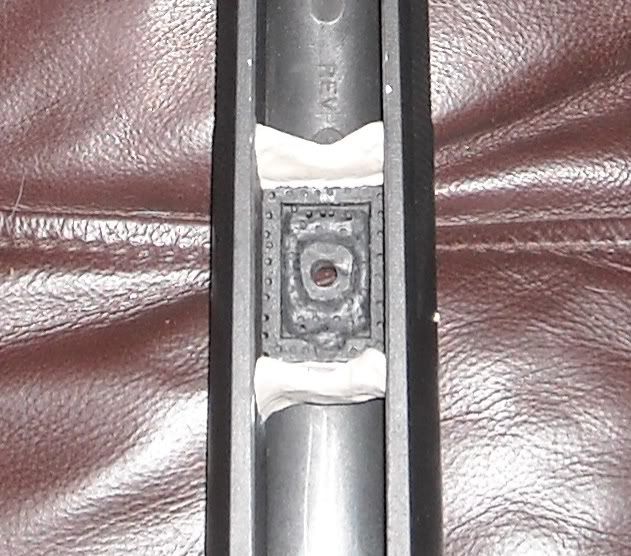
You'll need to fill the area between the barrel and ramrod with modeling clay. The clay must be at least as wide as the widest portion of the ramrod so that you do not create a void that would allow the epoxy to mechanically lock the ramrod and gun into the stock. Also fill any other holes where epoxy could seep into and place just a dab over the screw holes--just enough to cover them with a thin layer so you can still run the screw in normally.
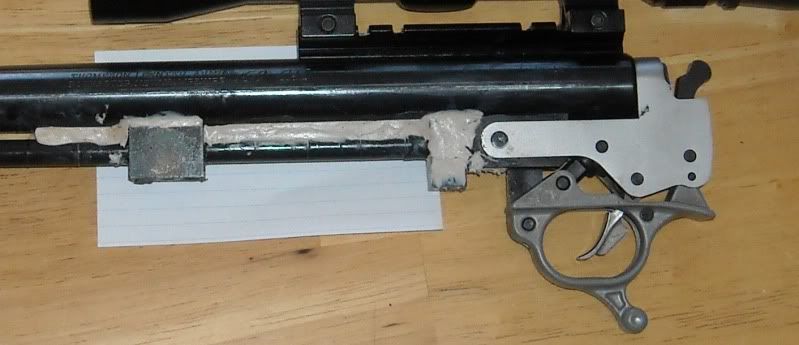
I couldnt get my electrical tape to stay stuck to the rear lug so I just built up some modeling clay to make my clearance. (pic was taken after removal from bedding)
Now create front and rear dams with modeling clay in the stock. These are your boundaries for the epoxy.
Next, place a long layer of masking tape along the top of the stock and also around the screw holes on the bottom of the stock to catch excess squeeze-out. Prepare your epoxy and fill the stock. The z5 stock is an egg-crate stock that needs a LOT of epoxy to fill it (in fact I will have to create more locking points and rebed mine because I didn't have enough the first time ). Now apply your release agent (whether this is the stuff that came with a kit, floor wax, or other lubricant) to the rifle, screws, screw holes, and all the clay on the rifle- anywhere that might contact the epoxy. This step is absolutely critical. Don't miss a spot and be sure all voids and any possible mechanical locking point is eliminated. Now push the rifle slowly into the stock, swab out the worst of the epoxy from the screw holes, and screw the stock to the rifle.
Now the waiting game. After about 6-8hrs, loosen the screws a little and tighten them back up, then leave the gun alone. After about 24hrs, remove the screws and the rifle from the stock and commence cleanup of tape, modeling clay, and release agent. Your rifle is now bedded.
The first step is removing stock material. I started by free floating the entire bbl by running a razor blade inside the stock to shave material off (I've seen posts of barrel floating by shimming the recoil lug pockets but IMO because the lug pockets are already so shallow in the Omega you would be better off to just remove stock material). Next is to remove material in the recoil lug pockets. Because the lugs are what holds the gun to the stock, they need to be bedded to fit their bottom and rear side. So you remove material around the hole where the screw goes in, and also about 1/2-2/3 the width of the lug in the rear portion. I used a dremel tool. Leaving some of the original bottom and rear material will control the depth and rearward movement of the lug when bedding. Remove as much as you want on the sides and front because this is where I left clearance for the lug. If your lug doesn't have a screw holding it to the stock (like on a centerfire rifle) you will remove material around the entire bottom of the recoil lug recess as you want clearance in the bottom. With the barrel floated and the lug pockets opened up, you can start to roughen up the bonding areas inside the stock. Because your stock is smooth and bedding compound is an epoxy, it's necessary to roughen things up so that you create a way for the epoxy to mechanically lock itself to the stock. I used a dremel and a drill with a small bit to make these rough areas and locking holes.
Here's an example (ignore the rear modeling clay unless you want to only bed the front lug)
Now the stock is about ready. Time to get the gun ready. I used 2 layers of electrical tape on the front and sides of the lugs to make my clearance and then cut a holes for the ramrod to slide through. You could use masking tape or duct tape also. I also did 2 layers on the ramrod.
Example (I cut the tape off that's touching the barrel so it would be bedded and also wrapped the rest of the ramrod between the lugs)
You'll need to fill the area between the barrel and ramrod with modeling clay. The clay must be at least as wide as the widest portion of the ramrod so that you do not create a void that would allow the epoxy to mechanically lock the ramrod and gun into the stock. Also fill any other holes where epoxy could seep into and place just a dab over the screw holes--just enough to cover them with a thin layer so you can still run the screw in normally.
I couldnt get my electrical tape to stay stuck to the rear lug so I just built up some modeling clay to make my clearance. (pic was taken after removal from bedding)
Now create front and rear dams with modeling clay in the stock. These are your boundaries for the epoxy.
Next, place a long layer of masking tape along the top of the stock and also around the screw holes on the bottom of the stock to catch excess squeeze-out. Prepare your epoxy and fill the stock. The z5 stock is an egg-crate stock that needs a LOT of epoxy to fill it (in fact I will have to create more locking points and rebed mine because I didn't have enough the first time
). Now apply your release agent (whether this is the stuff that came with a kit, floor wax, or other lubricant) to the rifle, screws, screw holes, and all the clay on the rifle- anywhere that might contact the epoxy. This step is absolutely critical. Don't miss a spot and be sure all voids and any possible mechanical locking point is eliminated. Now push the rifle slowly into the stock, swab out the worst of the epoxy from the screw holes, and screw the stock to the rifle. Now the waiting game. After about 6-8hrs, loosen the screws a little and tighten them back up, then leave the gun alone. After about 24hrs, remove the screws and the rifle from the stock and commence cleanup of tape, modeling clay, and release agent. Your rifle is now bedded.

