
|
Originally Posted by mick669
(Post 3584656)
I started with the old cap lock, moved to the Knight disc and moved up to a Encore and than to a Traditions Prusuit and on up to the first style Pro Hunter. The latter being my pick out of every ML I've had the pleasure to own. The Knight had few different style BP's meaning the fire path was larger or the back of the BP was more open or the back was split supposedly to help lignite the powder. The Traditions if the BP got worn you have to pry the primer out. All these ideas in my opinion came to a head w/ the Encore/Pro Hunter that will all but flip your primer out. The Idea of being able to remove the BP w/ my hand does influence me to not ever buy a ML that has that feature. If I can't carry a BP wrench then I shouldn't be hunting. It also allows for more blow by. Manufactors need to forget the speed breech and move on to other improvements. The thing to remember is what ever BP you have is keep it clean and the threads greased or taped. If the ML was designed w/ that plug then you might improve it but in the end is it worth the expense. The main thing in my book is the speed I can remove & replace a primerbecause w/ a 209 misfires are rare.
I too agree more thought should be put in the BP area of (Blow Back) that is where we have the most problems, not weather we can remove the BP in 2 seconds or 30, to me it's just a faster way for lazy people to get it out to clean. Now if the Speed BP also eliminates 100% of the Blow Back also then now they have a Great BP! Also removing a spent 209 Primer also has no complaints from me wich ever BP Im using in my ML. If you shoot you still have to reload and that takes time, getting the spent Primer out should'nt matter that much even if you need a second shot. If you cant get it reloaded and the Primer out in time for a second shot than mabey the second shot was'nt one you should consider taken. If all goes well as it should there should be no hurry for a second shot as your first shot should have been your best shot and it should have done the job, that's why we shoot a ML because we choose the one shot rule. My Opinion anyway, Sorry if I offended anyone........... (BP) |
Originally Posted by mick669
(Post 3584656)
The thing to remember is what ever BP you have is keep it clean and the threads greased or taped. If the ML was designed w/ that plug then you might improve it but in the end is it worth the expense.
"Is it worth the expense to modify a breech plug?" you wrote. Here is a picture of a breech plug that shows severe flame cutting to primer seat. 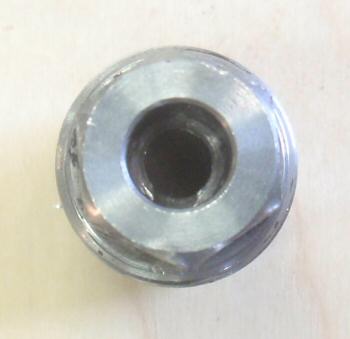 One could toss it, and replace it with new, but one could also find and old washer laying around the house, and cut it down on the lathe which is similar to what was suggested by sabotloader in another thread. 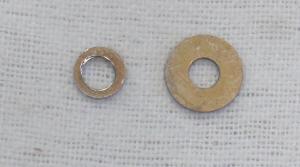 As suggested by Screwbolts a letter 'C' drill was used to make the primer pocket deeper in the breech plug with flame cutting damage. The intention was to remove the flame cutting from the primer pocket and use the washer to reduce the depth of the pocket, so the primer would fit tight. The washer i found here was about 1/32" thick. The washer was cut to a diameter just a few thousandths larger than the diameter of the primer pocket, so that it could be installed, and would be a tight fit. The depth of the pocket, with the washer installed, ended up being 0.012" less than a factory breech plug, which seemed like it might work. It did, however, make for a tight fit when closing the breech on the Omega. This morning i headed up into the hills to see if this thing would shoot. The blow back was virtually zero using this steel washer; it was certainly was much better than it was before the flame cut damage was removed. It may be that one should make the primer height difference less than the 0.012" inch this ended up; perhaps 0.008" would be tight enough to have little blow back, and loose enough so it would be easier to put the rifle into battery. So, mick669 was it worth the expense? |
Originally Posted by ronlaughlin
(Post 3583248)
Haven't really felt the need to use an O ring in my Accura too much, but here is what i did to the worn Omega breech plug pictured.
 This breech plug has seen many rounds, and also has been modified and fitted with a savage vent liner. It hasn't seemed to be as accurate as a new unmodified breech plug, so i figured i would toss it. Screwbolts suggested i drill the primer pocket deeper using a letter C drill which would allow the use of an O ring. I tried using an O ring in the damaged breach plug without drilling it, but couldn't get the action to close. So, i followed Screwbolts advice; purchased a letter C drill, and drilled the primer pocket some deeper. 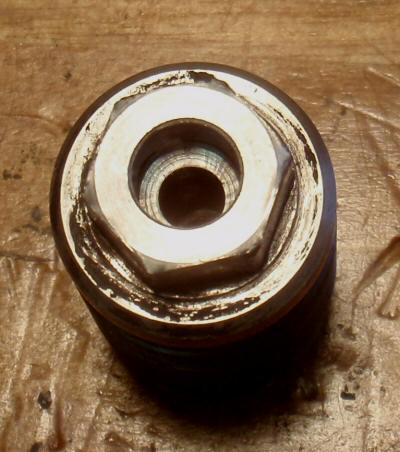 Here is what the breech plug looked like with the O ring installed. It fits nicely, and doesn't want to fall out. The O ring is 1/4" outside diameter; 1/8" inside diameter, and 1/16" thick. 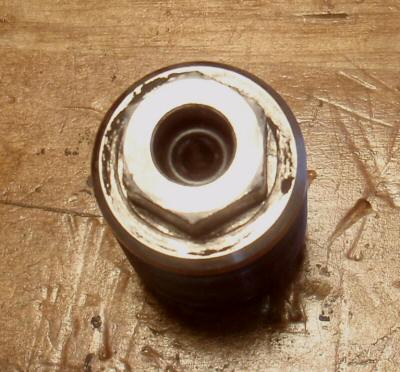 This morning i headed up in the hills, and fired 7 shots with the Omega, and the modified breech plug, with an O ring installed. The load was 105g BH209, a 300g 44 caliber xtp, a Harvester crush rib sabot, and a Federal 209A primer. Following is a picture of the 7 spent primers, and the used O ring as well, along with a new O ring. 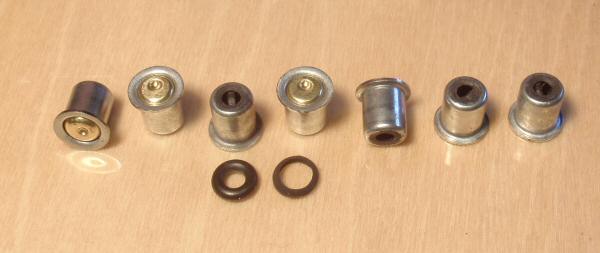 One can see there is zero blow back when using the O ring. The steel washer left virtually zero blow back in both the Omega, and the Accura. |
You guy's are almost ready to put a (Patent) on them BP's and start selling the ideas to the ML Manufactures, if there not already reading this thread,LOL.
NICE WORK GUY'S! (BP) |
After experiencing both success and failure with rubber O-rings in the Omega, i headed in a different direction and tried out metal washers like sabotloader discusses in another thread, instead of the rubber O-ring.
My first trial with metal washers was yesterday, using a steel washer; the steel washer worked OK, but there was a very little blow back. The compression was about 0.012" compared to a factory breech plug, and that seemed some tight to me. It took effort to close the breech. This morning i tried out an aluminum washer that started out as a backer washer for pop-rivet. It was turned down on the lathe, until it seemed it would make a nice fit. It was installed in the breech plug, and it won't fall out any time soon. It ended up being about a 0.008" compression compared to factory. Then i went into the hills to give the aluminum washer a try. Here is a picture of 8 primers fired this morning in the Omega:  One can see that the aluminum washer allows about as much blow back as an O-ring. The breech closed with a nice snug feeling, not like with the steel washer, where it seemed to be too tight. The 0.008 compression of the aluminum washer worked better than the 0.012 compression of the steel washer containing blow back, and it felt more better when put into battery. Three bullet speeds were timed at 13 yard, and they were 1752 fps, 1756 fps, and 1762 fps. To me, this consistency in speeds indicates a pretty tight breech. It seems i should make more aluminum washers. |
Well, the aluminum washer idea for the primer seat didn't last a month. The Accura started belching blowback about a week ago, and the Omega started releasing black spent primers 3 days ago. I am thinking they were both working great for maybe 50 shot, and then they failed.
This sent me on to the next step which was suggested by Screwbolts quite some time ago. He suggested drilling out the breech plug, and tapping it to receive a grade 8, 3/8 x 24 bolt, and then use the bolt to make a new primer pocket. This was in response to my writing and showing a picture of flame cutting in the primer seat of my Omega, and Accura breech plug(s). So, i drilled and tapped the worn Omega X7 breech plug to receive the grade 8 bolt.  Note that i ground the bolt end so that it would have a shape similar to the bottom of the hole made by the letter Q drill. I used 2 taps to make the threads, a normal tap, followed by a bottom tap. I wrapped the bolt with teflon tape, and made it super tight in the breech plug, so it won't unwind someday in the future. 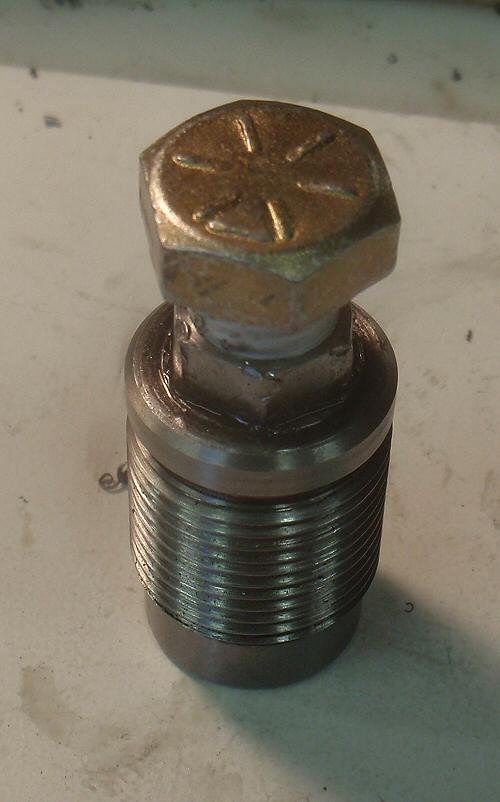 I didn't think it would work so very well to cut the bolt off with a hacksaw, and it only took me 2 swipes, before i could see that was near hopeless. So, i put a cut disc on my 4" grinder, and proceeded to cut the bolt off. Following is a picture of the bolt nearly cut off; it was easy to do. 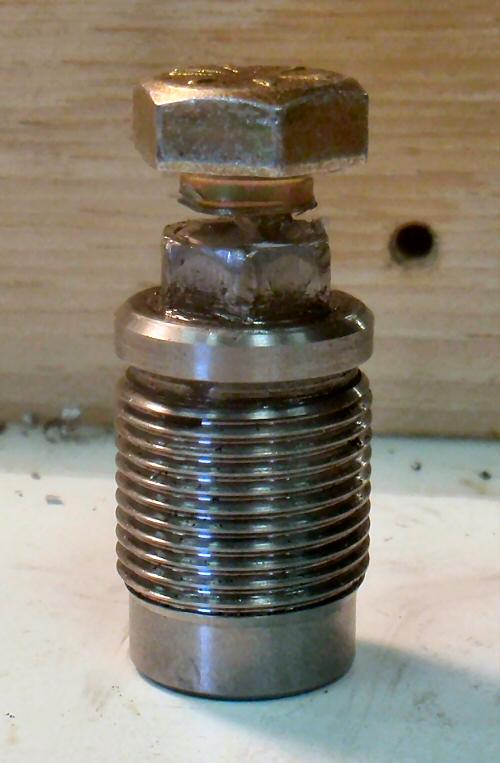 After the bolt was cut off, i used the cut wheel to sorta smooth the top. Note that one can see the edge of the bolt. 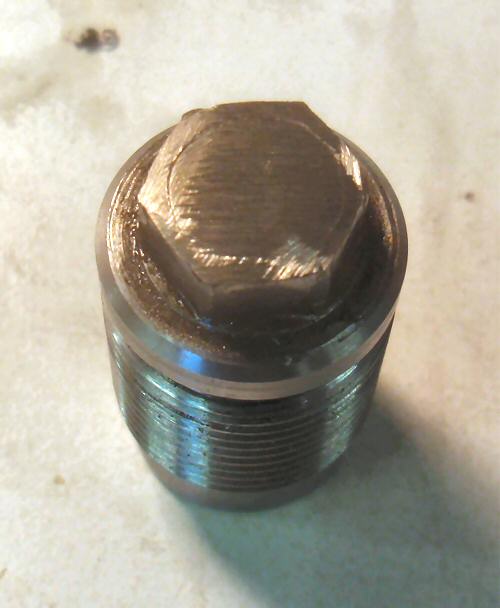 Then i started the flame channel using an 1/8" drill. My set-up didn't work so very well, thus the hole isn't centered. 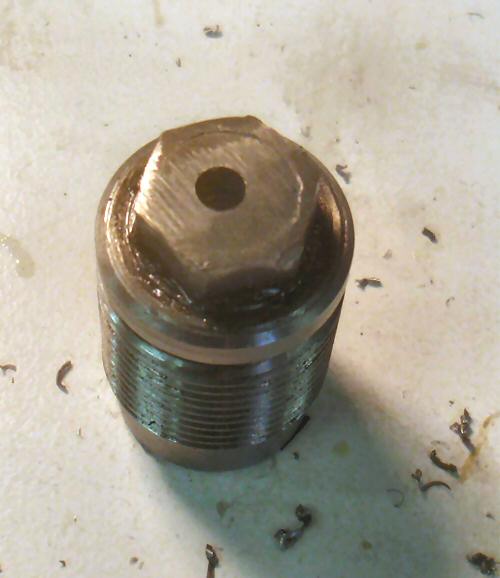 Then i drilled for the primer pocket using a letter C drill. I wanted this breech plug to have minimum head space, so i was very careful with the depth of the cut, and went real slow here. When it seemed somewhat close, i ground another letter C drill to a flatter point, and used it to get the primer pocket closer and closer to the desired depth. 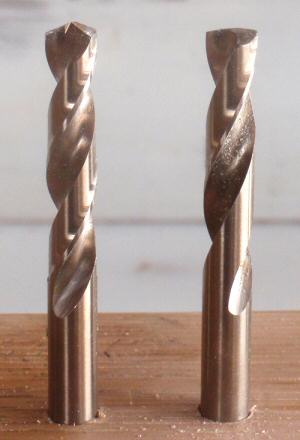 The breech plug ended up having a head space about 0.011" less than a factory breech plug. 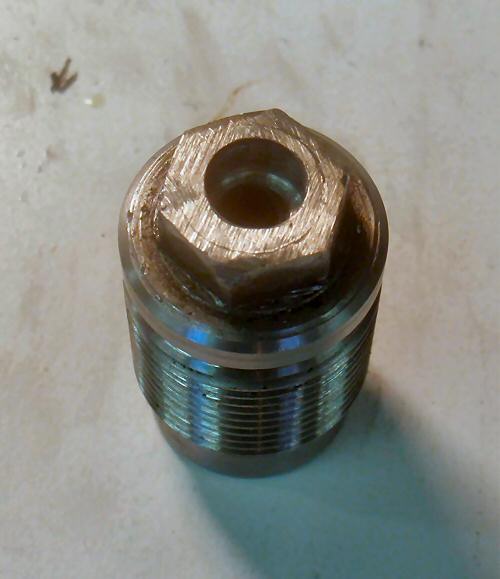 This made for a condition where one can feel the action closing on the primer. One can readily put the rifle into battery, but there is a definite resistance, and it does compress the primer some. Several primers were popped in the shop to verify this chingadero would work. This morning i went up, and shot 3 rifles at paper. I fired the Omega 3 times, raised the peep, and fired 3 more times. The spent primers are pictured along with a spent primer that was popped before the blow back was 'fixed', and a primer that was popped in the shop. One can see that the dimple made by the firing pin is some off center, which it always is even with a factory breech plug, but not this much. 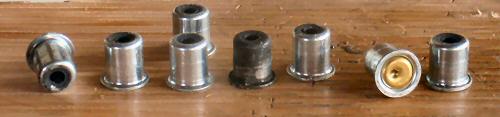 The paper was near 102 yard, and the load was 105g BH209 pushing a 270g Gold Dot in a crush rib sabot lit by a W209 primer. I should also mention the breech plug has a vent liner installed. The vent liner was supplied by Precision Rifle, and is similar to a Savage vent liner, except it differs by having a 0.033" flash hole, and a larger vent opening that steps down to the flash hole. 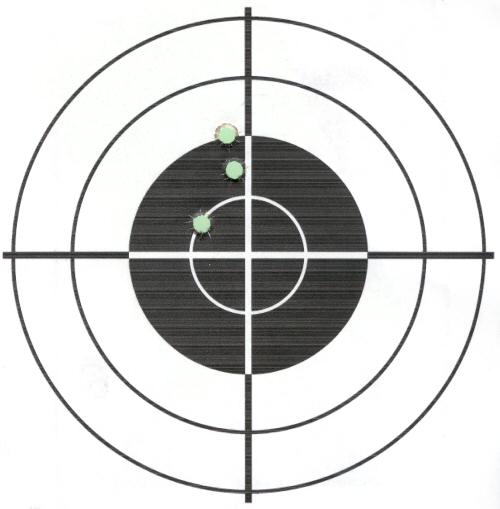 |
I think your definately onto something good Ron, it made a world of difference in the blow-Back, Im jealous! Keep up the great work and fill us in on more results and findings.
(BP) |
Very Nice work Ron, I think you will find that the new primer seat will last almost indefinably. I have not been able to find any signs of cutting in mine.
|
When the aluminum shim in the Omega breech plug failed a few day ago, it was seen that there wasn't enough primer seat left to repair, so a grade 8 bolt was installed to bring material to work on. This i was able to do because of the information and advice given by Screwbolts. When the aluminum shim in the Accura breech plug failed, it turned out there was enough material left in the primer seat to modify the breech plug to use 0-ring.
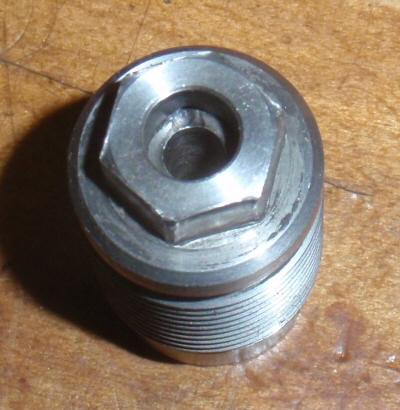
Previously i had tried rubber 0-ring, and experienced some grief trying to make it work. Part of the rubber was blown into the flash channel, by the primer, and plugged the flash hole, so i gave up the idea of o-ring. Busta posted and explained there was too much compression on the o-ring, and this along with the taper in the primer seat was why i had problems. In the days since, i ordered some silicon o-ring, and when the Accura started belching blow back, i decided to give them a try. So, what i did was grind a C drill more flatter. This flatter drill was used to drill into the primer seat of the Accura breech plug about 0.050". This allows for the o-ring without overly compressing it, and results in a nice nearly flat primer seat. Here is the modified plug next to a 'new' factory plug. 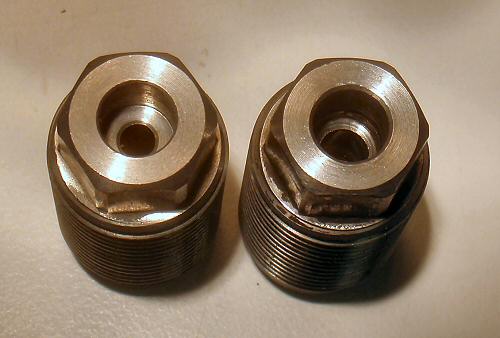 The other end of the breech plugs showing the vent liner from Precision Rifle installed in the modified plug. 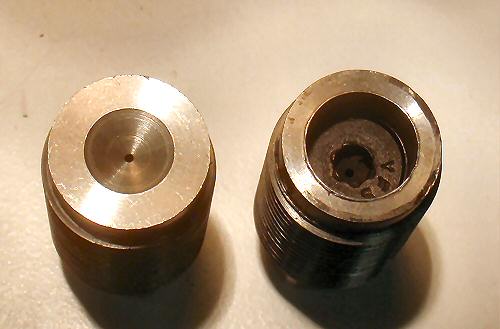 The breech plugs with the silicon o-ring installed. The headspace with the o-ring installed was 0.020" less than factory. This results in a nice tight seal between the primer and the o-ring, without too much compression, which results in zero blow back. 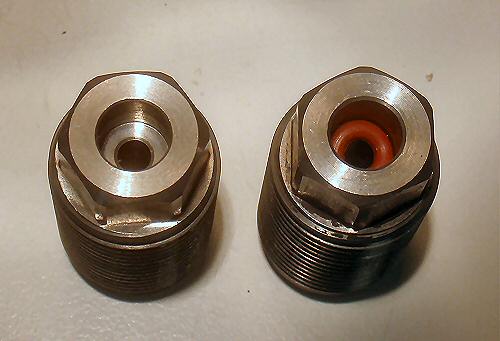 Here is what the spent primers from the Accura look like, with the nice tight seal, provided by the o-ring. 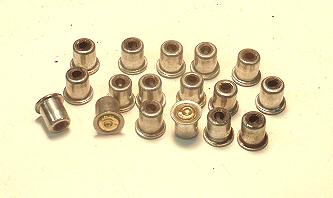 Here is a picture of the o-rings. A new rubber ring, and a used rubber ring. A new silicon ring, a silicon ring that has seen 4 shots, and a silicon ring that has seen about 25 shots. The ring with 25 shots on it, is installed in the rifle right now, has 29 shots through it, and is still viable. 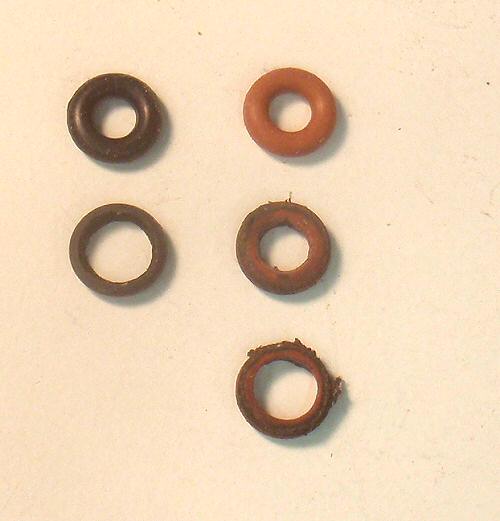 Busta' experience and advice regarding o-ring, seemingly has allowed for success. It is actually quite simple to modify a breech plug to accept an o-ring. One needs a C drill, and patience. Approaching the correct depth of drill needs be done with care. Flattening a drill also seems to be a good step, but probably isn't absolutely necessary. |
Ron where did you order the silicon O rings from and what size did you order Id like to lessen the blow back on Accura,thanks
|
gman57
Another ring you might want to check out is a 5-193. It is a commercial high pressure - high heat 'O' ring.... If you want a more permanent solution you could install a 'stainless' steel washer in the bottom of the primer pocket. You will have to turn it down to the correct diameter and thickness. One problem might be the thickness... i am not sure what that might be but Ron would know. Here is one installed in a Knight BP... 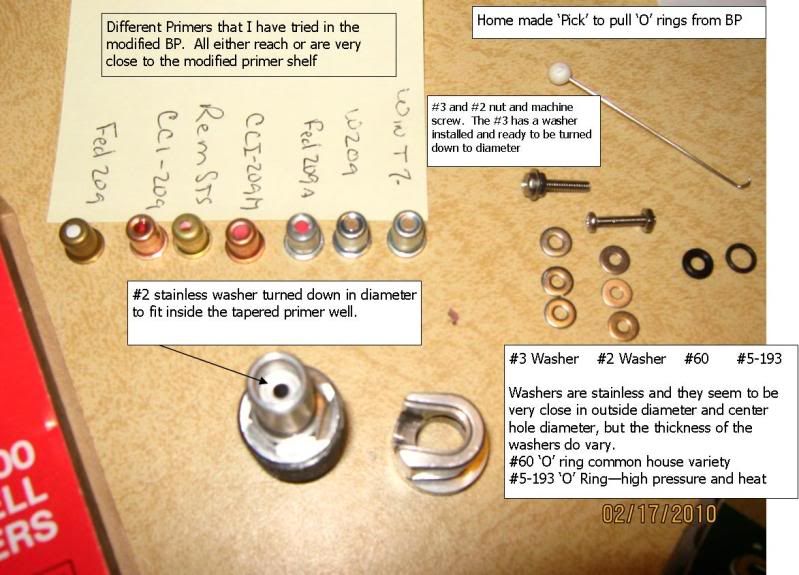 I probably have 100 shots on this stainless washer now and it shows no signs of wear - actually it is really hard to tell if the washere is in there or not... |
Originally Posted by sabotloader
(Post 3597907)
gman57
Another ring you might want to check out is a 5-193. It is a commercial high pressure - high heat 'O' ring.... If you want a more permanent solution you could install a 'stainless' steel washer in the bottom of the primer pocket. You will have to turn it down to the correct diameter and thickness. One problem might be the thickness... i am not sure what that might be but Ron would know. Here is one installed in a Knight BP... I probably have 100 shots on this stainless washer now and it shows no signs of wear - actually it is really hard to tell if the washere is in there or not... (BP) |
Originally Posted by gman57
(Post 3597900)
Ron where did you order the silicon O rings from and what size did you order Id like to lessen the blow back on Accura,thanks
sabotloader suggested you might consider a stainless washer. This would work too. However, that involves turning the diameter of the washer down to some less than 1/4", and reducing it's thickness to no more than 0.016" or so, unless you make the primer pocket deeper. If you have an Accura breech plug that is new, or in good condition, the blow back isn't much..........perhaps not enough to worry about..........not enough to go to any expense, or do a breech plug modification. Myself, i started down this road of breech plug modification, first, because i had a hang fire once in a great time using BH209, and second, because my breech plug suffered from flame cutting in the primer seat. When i think about it, it seems to me that it is possible i had problems with flame cutting on the primer seat, because i didn't keep the breech plug clean. I haven't been too diligent keeping my rifles clean. It is conceivable to me that a clean breech plug won't suffer as much flame cutting. If you wish to modify your breech plug for the fun of it, i fully understand; i have truly enjoyed playin' around with my breech plugs, and all the new things i have learned, and experienced. Right now i would rather work on breech plugs than do any of the other chores waiting for me; it is fun, and interesting. |
with the cci 209m and bh209 in my accura. blow back isnt even there. Just a fine layer of dust that wipes off with a finger. i need to try some rem sts primers, forgot all aboot them.
|
Thanks for the suggestions guys I modified 2 BPs with vent liners and enlarged fire channels as per earlier posts, just seemed like after like 15 shots or so my breech area was kinda black maybe its the Fusion ML primers I was using have to try some others, but I cant help tinkering with my gear.
|
Hey guys Ive been trying to find a C size drill bit and people in Home Depot and Lowes never heard of C size. Do you have a metric or inch equivilent? Thanks oops forgot I can just try miking it up later.
|
Originally Posted by gman57
(Post 3601432)
Hey guys Ive been trying to find a C size drill bit and people in Home Depot and Lowes never heard of C size. Do you have a metric or inch equivilent? Thanks
There is a drill size chart. I purchase my drills from a machine shop/machineshop supply business. Perhaps there is such a place where you live. |
gman57
These guys are pretty darn helpful - to even the little guys. Even when you are not sure what you are looking for the can direct... http://www1.mscdirect.com/CGI/NNSRHM |
Once again thanks guys
|
Originally Posted by Breechplug
(Post 3549346)
Does anyone have a Savage 10ML-11? I have heard they have a good BP, with the replaceable flash hole ventliner you speak of. There suppos-to-be one of the best so far,,,???
(BP) Wakeman sells some extended ware vent liner, that he claims is 2x. I change mine every year and don't worry about it no matter how many shots I shoot (not over 100, but over 20). The Savage vent liner is well designed, and I know that size of the flash hole is important in ignition in Smokeless, so that is going to go over to BlackHorn, since it is so close to smokeless. So in my mind, any breech plug that will shoot Blackhorn consistently over hundreds of shots. Plain old BP or pyrodex, I don't think it matters, but with BH or Smokeless size of hole is big deal. I like the flat breech plugs since the convave ones leave power in the hole and it sometimes is difficult to get out if your shoot a lot and you got soot in there. Chap |
He should just buy a Savage and be done with all the mods. Shoot BH in it. Chap
Originally Posted by Screwbolts
(Post 3551053)
Sabotloader has done an excellent job of explaining and drawing.
I have actually gone to the next step beyond his Modifications, I believe you should start with his mods and then let it evolve from there. I hunt/shoot even in extreme cold temps. It was -4F here one day during our late ML season. I had no fear that BH209 would light in my T-Bolt. The gun was being carried by a 16 yr old family friend that got so excited when we put deer right past him several time less than 10 yards, he couldn't move. Life and excitement is great :-) My plugs are done/modified to ignite BH209 in my customized Knight T-Bolt and even harder to light powders in My Rolling Block ML. I look forward to seeing Lehigh Dave's design, It will probably fit my T-Bolt. Make lots of noise :-) |
Hi Gleason,
Who are you suggesting, should Buy a ML10II and be done, I have built 4 smokeless ML guns to date and supply vents for 5 ML10IIs (all in the Family) and a ML10 that I helped build from parts. as you know the old 10 takes a different style replaceable vent. Being this is a Black Powder forum, I have reframed from talking about the origonal Black powder substitutes that I use in all my user built guns. I just can't go out and buy something I have the time to build. Ken |
gleason.chapman
Just for myself... I am not interested in a Savage - in fact it is way down the list - to heavy - to bulky and other than the smokeless thing - I can do everything a Savage will do with a what i have.... |
Originally Posted by sabotloader
(Post 3626587)
gleason.chapman
Just for myself... I am not interested in a Savage - in fact it is way down the list - to heavy - to bulky and other than the smokeless thing - I can do everything a Savage will do with a what i have.... |
A couple of weeks ago or so, Gm54-120 wrote
Default CVA breach plug idea I dont know how well this would work and cleaning would require removing the vent liner but.... Im not sure if it would have any advantages but im curious. If it had a slight crush fit it sounds like a good idea...maybe Add the vent liner a bit below flush but dont drill the flash hole all the way to the primer. Leave a short OEM flash channel size (or close) for a "shoulder" for the primer. This one is more interesting to me since i have a Accura 45. I want to try is a mid or deeper depth vent liner plug without head spacing (at first) but with roughly a .500 vent liner pocket if there is enough metal. The reason is my Elite 45 really likes this setup with the Lehigh conversion. Im just not sure if there is enough metal on the CVA plug for the larger pocket. Ignition seems more intense for lack of a better term with the bigger vent liner pocket but only noticeably in the 45cal. I have been watching for signs of barrel erosion too because i was concerned and it seems ok. Scott     The center breech plug was milled using a grade 8 bolt as stock. The big hole didn't end up at 0.5". It is 0.469", and that doesn't leave much in the way of a rim. The #21 drill wasn't run all the way to the primer pocket. The flash channel is 1/8" at the primer pocket, and then it becomes #21 diameter, so threads could be cut for a vent liner. The primer pocket was made so that head space is 0.019" less than factory. Naturally, after milling the plug, one must try it out. Seven shots were fired off the stick, and that was enough as the temperature today was 90*, up there in the hills. Head space was nearly too tight, as a couple of times the gun had to be 'slammed' into battery. One of the things i found interesting is head space can be readily adjusted looser, by moving the barrel end of the breech plug on a piece of sandpaper on a flat surface, because the rim is so thin. Returning home:     |
I just read this entire thread and now I'm even more insane. ;) Sometimes I realize it is a blessing that I don't have a lot of nice tools.
|
Using my nice tools helps me stay sane. The easiest way for me to escape trials and tribulations of real everyday life, is to open, and walk through the door, between the garage and the house. Writing this reminds me how blessed it is, to have a work shop loaded with nice tools.
|
I found this in the archives and brought it back as it has a wealth of information.
JW |
Originally Posted by gleason.chapman
(Post 3626450)
He should just buy a Savage and be done with all the mods. Shoot BH in it. Chap
|
Any breechplug that doesn't blow out of the barrel back into your face is a good breechplug in my opinion.
|
Originally Posted by JW!
(Post 3771038)
I found this in the archives and brought it back as it has a wealth of information.
JW (BP) |
Originally Posted by MountainDevil54
(Post 3771043)
Actually i read a post where Wakeman is recommending people mod their BP to run a 5/32" flash channel to help eliminate no fires.
The flash channel in a MLII plug is pretty long and has plenty of volume even for mag primers. Its not my favorite design but i really cant see how it would need modification (excluding liners) for book powders or BH209. Keep it clean and the vents within spec and it will go bang nearly every time. |
go to the savage forum and it will be under the Misfires topic.
|
Originally Posted by Screwbolts
(Post 3581211)
...........................( I drill my own Halo Chrome 10x32 x 3/8 screws to make vent liners)...............
Currently i am using a vent liner i made from a stainless cap screw. It is wearing well. After well over 100 primers, there is no detectable wear, but the stainless is quite hard on drills. Today i reread this thread from beginning to end. Much of the information provided by you, Screwbolts was too much for me to understand when i first read it. Wow, what valuable knowledge you shared with the forum; i am glad this thread was brought back. |
What makes a good breech plug.one that reliably ignites all powders from the factory without modifications and easy tool free removal.. so far T/C has come the closest to the perfect BP.as long as BH 209 has been out and with it's rapidly growing popularity, i am disappointed that the perfect BP hasn't been devised. Ray
|
Here is a response I received from Don Luhr of Western Powders. He addresses breech plug design in the last response. I could not figure out how to attach the picture he sent with his response. The new Omega BP design he is referring to is the one with the deep concave face. The older design had a very shallow concave face.
Paul ************************************************** * Subject: Remington STS Primers Question Type: Technical I am planning to purchase your Blackhorn 209 powder. I have read about the primers you recommend. Do you know or have test data on using Remington STS primers with BH 209? Toby Bridges did some testing and had no problems using these primers with your powder. Many thanks, Paul ************************************************ Paul, Thank you for the e-mail. It really depends on what gun you are using and the condition of the ignition system. Can you tell me what gun are you using? Best regards, Don Luhr Western Powders *********************************************** Don, Sorry about that. I shoot a T/C Omega .50 cal with no modifications. It has the original breech plug. Thank you, Paul ************************************************ Paul, That's one of my favorite. Make sure you have the new breech plug, the one on the right in the picture. Follow the breech plug cleaning illustration and you should be good to go. Our Omega can shoot a variety of primers. It's almost the perfect breech plug design. If you have any trouble at all please let us know. Best regards, Don |
Originally Posted by Screwbolts
 ...........................( I drill my own Halo Chrome 10x32 x 3/8 screws to make vent liners)............... Hi Ron, Spelling has never been one of my strong points. :-) Holo Krone : http://www.holo-krome.com/ I currently use the: Flat Head Socket cap screws in 10/32 x 3/8 If you look at the above link I am sure you will see a real similarity in the: Button Head Socket Cap Screws to the design that Lehigh markets, although this screw lacks the needed 82* taper. :-) These are very hard, Rockwell of over 50 for the screws IIRC. :-) I use Cobalt .0315 drills to drill them. I have gotten as high as 17 vents drilled per bit. |
Screwbolts
Ken, thanks for the information on the Holo-Krome screws. These stainless screws i am using, are very hard to drill. |
Ron,, some stainless alloys work hardens as you work it so if you hesitate with a cutter/drill the SS actualy gets harder right there. It can be a royal pain to work with. :-)
|
Originally Posted by Screwbolts
(Post 3782506)
Ron,, some stainless alloys work hardens as you work it so if you hesitate with a cutter/drill the SS actualy gets harder right there. It can be a royal pain to work with. :-)
Is there a technique to get lube into the hole without stopping, and removing the drill? I don't think there is, so i stop the cut, and remove the drill, clean out the chips, and relube. I try to do this before the work hardens, but i sure do break a lot of cobalt drills @ $3 each. It is hard for me to know when to hesitate or proceed. Either way i break drills. Some drills are better than others, but i forget where i got the better ones so far. I just received new drills today, and tried one out. It cut the stainless like hot butter for about 1/8", but then started to chatter. I believe the steel hardened, and dulled the drill. I think i should have quit drilling sooner. It took 3 tries to finish the hole, which it did, but i am concerned, it won't be able to finish another. I have another drill that has made about 10 stainless ventliners, but i can't remember where i got it. Gee, i wish i had more like it. |
| All times are GMT -8. The time now is 01:16 AM. |
Copyright © 2026 MH Sub I, LLC dba Internet Brands. All rights reserved. Use of this site indicates your consent to the Terms of Use.