
|
Just in case anyone is interested: On the second one I did I started using a end mill with a 40degree angle on the end of the bit to finish the seat for the vent liner. 25/64 in diameter this gives a match to the base of the vent liner for a better seat. Lee
|
Originally Posted by sabotloader
(Post 3550137)
tjj
It certainly could be done... but you could get mis-aligned also... But you have a good thought also - you could just open the flash channel and not even mess with installing a ventliner until your flash hole gets worn enough to warrant it... Breechplug hope you see this... that might be the easy answer for you right now also.... Oops, it isn't as extreme as i thought. The Omega breech plug has about 1/4' from the bottom of the flame channel to the face of the opening, while the Accura breech plug has about 1/8" from the bottom of the flame channel to the face of the opening. |
Originally Posted by sabotloader
(Post 3550137)
tjj
It certainly could be done... but you could get mis-aligned also... But you have a good thought also - you could just open the flash channel and not even mess with installing a ventliner until your flash hole gets worn enough to warrant it... Breechplug hope you see this... that might be the easy answer for you right now also.... Ron (BP) |
Originally Posted by lemoyne
(Post 3550149)
Just in case anyone is interested: On the second one I did I started using a end mill with a 40degree angle on the end of the bit to finish the seat for the vent liner. 25/64 in diameter this gives a match to the base of the vent liner for a better seat. Lee
|
ronlaughlin
That 30 degree angle will work... it is a lot nicer to have the 40 degree - but the last one I did I did, was with the drill bit as you are thinking. When you install the vent liner - you will use BP grease on the threads and under the hood of the vent liner. Snug the liner up and compress the grease. I shot 30 rounds the other day with a Knight (T7), removed the breech plug and un-screwed the vent liner no problem. Other alternative - take the bit to a machinist and have him change the angle for you.. he can do it in a hurry. |
Originally Posted by ronlaughlin
(Post 3550157)
Don't know if this is relevant or not, but in the Accura breech plug, the flash hole seems to be just that. The flame channel is almost the full length of the breech plug. Whilst drilling out the flame channel, it seems one could easily drill right out the end of the breech plug by not noticing when one was at the end of the flame channel. The Omega breech plug has a flash hole that is considerably longer. This is one thing i considered, but then it seemed like the vent liner would be more better; perhaps not.
Oops, it isn't as extreme as i thought. The Omega breech plug has about 1/4' from the bottom of the flame channel to the face of the opening, while the Accura breech plug has about 1/8" from the bottom of the flame channel to the face of the opening. I guess we'd have to measure the exact length of the flash channel and go no further, simple as that right? Or measure the length from the top of the BP to the end of the fire channel. (BP) |
Breechplug
Exactly what you have both said... you will have to measure the current depth and set your drill press to go no further... Or dill all the way through and tap the bottom and install a vent liner... |
Breechplug
Yes, that is what we could do, and it isn't as difficult as i had it in my mind it was. I think it is a worthwhile first step toward improving the bp. What i wanted to do originally was make a deeper concavity in the bp, and drill out the flash channel, but then i realized there isn't enough material there to allow the deeper concavity. So i decided to try the vent liner and forgot that one could drill out the flash channel without making a deeper concavity in the end. I guess i will give it a try on Saturday. Like sabotloader say, when the flash hole wears out, one can proceed to install a vent liner. |
sabotloader
Well, i guess it is a good thing the 25/64 drill will work, because it doesn't appear that a 40* end mill is readily available. Seems to me that it would be best if the rim of the vent liner made first contact with the breech plug. Like you say, i can make that happen by grinding the drill to a steeper angle than 30*. Seems that if the angle were ground too steep, it would be better than if it were too shallow. I guess i will start the modification before the vent liners arrive, by drilling out the fire channel with a 5/32 drill, then when i have the vent liner in hand i can drill again, and through with a #21 drill. Doesn't seem as though it will be much of a problem. Time will tell. |
Originally Posted by ronlaughlin
(Post 3550245)
sabotloader
Well, i guess it is a good thing the 25/64 drill will work, because it doesn't appear that a 40* end mill is readily available. Seems to me that it would be best if the rim of the vent liner made first contact with the breech plug. Like you say, i can make that happen by grinding the drill to a steeper angle than 30*. Seems that if the angle were ground too steep, it would be better than if it were too shallow. I guess i will start the modification before the vent liners arrive, by drilling out the fire channel with a 5/32 drill, then when i have the vent liner in hand i can drill again, and through with a #21 drill. Doesn't seem as though it will be much of a problem. Time will tell. As a point of interest, the original ML10 that uses the modules also uses a vent liner, but this vent is made from a 10/32 set screw, these have no head as a screw does. I make my own vents fro 10/32 x 3/8 Holo Krome screws, these are the same screws as the OEM savage and most of the aftermarket suppliers use. I drilled 28 last week, I got Cobalt drills for this. I start the holes using a .062 Cobalt drill This is to get threw the hard surface of the screw on both ends, this is what will break the .0315 cobalt bits. I use the .062 from both ends then finish the hole with a .0315 cobalt drill . I am still using the origonal .062 drill but have only been able to get 14 screws out of the .0315 bits. 14 is my best so far. I do use my lathe to bore these but there are many that use a drill press. I have not tested the Leighi style vent screw yet . But my next purchase of a box of 100 screws will be with the doomed head. There is no reason that the plugs can't be reworked with just a drill motor! Clamp you plug securely and drill as straight as you can. It has been proven on other boards/ groups that a crooked hole in the vent liner will not effect it's performance!!! Have you ever really looked at the flash hole in a lot of brass cases. Oem Vents from savage will not always be centered. With that said have at it! One of the things I live by is: "God hates a coward, but is very tolerant of fools!" |
Screwbolts
Perhaps i should try doing the work on my Accura breech plug, before making a reply, but i can't stop my fingers. My concern with using a counter sink would be that it wouldn't allow a deep enough concavity in the muzzle end of the breech plug. After all, my main goal in reworking the bp was to make the face of the Accura breech plug look more like the face of the Omega breech plug. To me it seems the counter sink would make a concavity too close to the edge of the breech plug before it went deep enough to make this work worthwhile. Am i thinking clearly here? |
well look on the bright side, if you screw it up, replacements are only $15
|
Originally Posted by MountainDevil54
(Post 3550605)
well look on the bright side, if you screw it up, replacements are only $15
(BP) |
cabelas sells the plugs, same that the wolf/optima use.
no clue when the new accura is coming out, sometime later this year. |
Originally Posted by ronlaughlin
(Post 3550361)
Screwbolts
Perhaps i should try doing the work on my Accura breech plug, before making a reply, but i can't stop my fingers. My concern with using a counter sink would be that it wouldn't allow a deep enough concavity in the muzzle end of the breech plug. After all, my main goal in reworking the bp was to make the face of the Accura breech plug look more like the face of the Omega breech plug. To me it seems the counter sink would make a concavity too close to the edge of the breech plug before it went deep enough to make this work worthwhile. Am i thinking clearly here? My breech plugs have an extended face that is .502 diameter this fits up the barrel slightly. about .187, the shoulder that seals is a step back. Now take .375 away from .502 that leaves Hum? oh Ya, .127 divide this by 2 for the wall thickness of the extended portion, .0635 or just slightly more than 1/16. But it has the same pressure on both sides In and out, (I did this because this is how savage/ Henry Ball does it)  This is the breech plug out of My Rolling Block, It started life as a Grade 8 Bolt 5/8 x 18 thread. Look at that primer seat extension, Holy Crap RonL that looks like a piece of Grade 8 3/8 fine thread bolt.:rolleye0011: And that is the end of the Fish whacker I use to remove it, the 2 notches don't show in this photo. This BP has experienced over 800 primers, or should I say Hot burning sensations.:wave::wave::rolleye0011: There is a primer in the BP when the photo was taken I hope this clears it up. Life was meant to be fun!!!! |
Thank's for the added info Ken and also to you Mike! I cant wait ti get er done and see the effects.
(BP) |
|
|
Screwbolts
Would you give us the length of the flame channel from the bottom of the 209 seat to the vent liner please. Lee |
Originally Posted by sabotloader
(Post 3550841)
Ron (BP) |
Originally Posted by lemoyne
(Post 3550893)
Screwbolts
Would you give us the length of the flame channel from the bottom of the 209 seat to the vent liner please. Lee |
If anyone else has some BreechPlug Modifications (befor and after) Pics and results , or just results Im sure we'd all like to hear about them. Also pictures would be better than thumbnails.
(BP) |
Here are some drawings that are by Edge from the green Board,
Stock Plug not recessed,:biggrin:  This is a recessed plug,:rock:  Here is a couple of real deal plugs the SS one has a Long life carbide bushing vent liner in it, this is another hole topic. both are recessed.  |
This drawing is a major over simplfication of what I think I am trying to explain. It non-scientific and developed between conversations with Spitpatch, Grouse, and some readings from Busta posts. Lehigh Dave was also involved to a certain point as he is currently or has currently rebuilt the Knight DISC breech plug with some of these aspect in mind. He truly is scientific and can explain the reasoning better than I can ever understand.
This drawing is an attempt to explain the thoughts behind increasing the size the 'flash channel' increases the volume of blow back the channel can hold after ignition of the powder and after the burn out of the primer... This is the period of time that pressure created in the bore is looking for anyway it can find to get out... The 'flash hole' and the 'Flash channel' offer the first place for this pressure to seek relief. This is also drawn with out the addition of a vent liner - that would come after the original 'flash hole' is burnt out. And since we are using hooter and hotter primers and hotter loads of BH - the flash is going to wear faster. Pardon the drawing - I am a complete novice at it.... 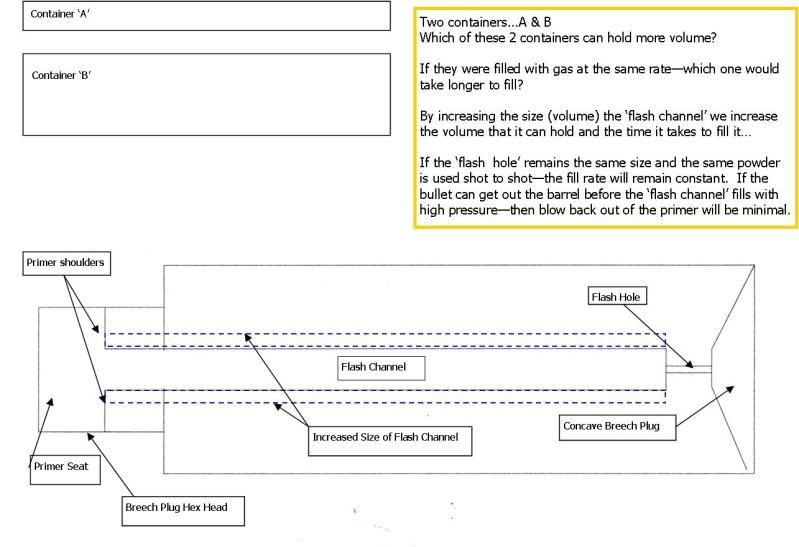 |
There is some seriously good tech in the thread.
STICKY!!! |
Sabotloader has done an excellent job of explaining and drawing.
I have actually gone to the next step beyond his Modifications, I believe you should start with his mods and then let it evolve from there. I hunt/shoot even in extreme cold temps. It was -4F here one day during our late ML season. I had no fear that BH209 would light in my T-Bolt. The gun was being carried by a 16 yr old family friend that got so excited when we put deer right past him several time less than 10 yards, he couldn't move. Life and excitement is great :-) My plugs are done/modified to ignite BH209 in my customized Knight T-Bolt and even harder to light powders in My Rolling Block ML. I look forward to seeing Lehigh Dave's design, It will probably fit my T-Bolt. Make lots of noise :-) |
U-all
Lee and I have exchanged a couple of emails and in his last one he has made an interesting point about the 'flash channel'. His concern or thought starts with the ignition of the the primer. With that ignition (explosion) his attention is directed to the 'flash channel' size also. I know in the back of my mind that you could probably 'OPEN' the channel 'TO MUCH' but really was not thinking what his thoughts have suggested - the idea you might open it 'TO MUCH'. His concerns were directed at the efficiency of the primer and it's ability to ignite the powder. As I read and think about his words - This gives more thought to some extent, it may not be the size of the 'flash hole' that gives us the abilty to ignite powder, although it is 'KEY' in the amount 'blow back' pressure that is placed on the primer and the face of the primer block or bolt which ever you have. Here is part of his explanation - to me his discussion concerns it self with the ability of the primer to do it's job.... From Lemoyne - I am really hoping it is ok to use part of words - because it did start another train of though in my mind... As I understand it every explosive [which would include priners] has several characteristics the FPS that it propagates at the force lines of the explosion and the flame temperature. If the force lines of the explosion are properly directed they will carry the pressure and the flame temperature into the powder. This is not one of my areas of expertise so I am only giving you an opinion, I am not even sure what type or class of explosive a shot gun primer falls into. so here is an other opinion, by opening the flame channel as you suggested we open the confinement allowing the explosive to burn cleaner and possibly hotter which may help ignition the Lehigh does a better job of focusing the result into the powder which ends up giving us better cleaner ignition. |
Drilled out my Accura plug this morning. I forgot to fire it yesterday, before i came home, so i went up into the hills a little ways, and fired it this morning. It was a hang fire, and that surprised me. When i went to measure drill depth, i discovered that i have been short drilling the carbon with the 7/64 drill, leaving some carbon in the flash channel. This may the cause for the hang fire this morning.
Anyway, i carefully studied the depth to drill the 5/32 hole, and drilled out the flash channel. Then i used a 3/8" drill and deepened the concavity on the muzzle end of the breech plug just a little bit. This work left a flash hole about 1/8" long. It surprised me how easy the breech plug was to drill. I used oil for lube and both drills cut the steel readily. Figured i should test the rifle, so i headed for the hills, set up the target, parked the truck in the same place as usual, and fired away. The rifle didn't seem to be as accurate as it was with the unaltered bp, but perhaps it was me. After 8 shots i moved the rear sight some and shot 3 more times. These last three shots made a 2 1/2" group at around 100yd. The altered breech plug changed the point of impact some, but i noticed no change in blow back or spent primer removal. There were no hang fires with the altered breech plug. The rifle fired right now. When the vent liners i ordered arrive, i will install one and go from there. My goal was and is to make more of a concavity on the end of the breech plug. This can't be done without the vent liner. |
Originally Posted by ronlaughlin
(Post 3551249)
Drilled out my Accura plug this morning. I forgot to fire it yesterday, before i came home, so i went up into the hills a little ways, and fired it this morning. It was a hang fire, and that surprised me. When i went to measure drill depth, i discovered that i have been short drilling the carbon with the 7/64 drill, leaving some carbon in the flash channel. This may the cause for the hang fire this morning.
Anyway, i carefully studied the depth to drill the 5/32 hole, and drilled out the flash channel. Then i used a 3/8" drill and deepened the concavity on the muzzle end of the breech plug just a little bit. This work left a flash hole about 1/8" long. It surprised me how easy the breech plug was to drill. I used oil for lube and both drills cut the steel readily. Figured i should test the rifle, so i headed for the hills, set up the target, parked the truck in the same place as usual, and fired away. The rifle didn't seem to be as accurate as it was with the unaltered bp, but perhaps it was me. After 8 shots i moved the rear sight some and shot 3 more times. These last three shots made a 2 1/2" group at around 100yd. The altered breech plug changed the point of impact some, but i noticed no change in blow back or spent primer removal. There were no hang fires with the altered breech plug. The rifle fired right now. When the vent liners i ordered arrive, i will install one and go from there. My goal was and is to make more of a concavity on the end of the breech plug. This can't be done without the vent liner. I did'nt get My (Spare) BP drilled out today as I had to cut some Fire Wood, it's COLD here! Let us know what further results you come up with. (BP) |
Breechplug
It was below zero here last night and at day break, but by the time i made it out to shoot it was already over freezing. Supposed to be in the forties this next week, so weather will change here. The load was 105g BH209, Harvester smooth sabot, 44 caliber 300g xtp, and Winchester shot gun primer. Will shoot paper once, and then go hunting some more this next week. Won't be cold this next week, but will still be putting the modified breech plug to the test whilst hunting. |
Originally Posted by ronlaughlin
(Post 3551351)
Breechplug
It was below zero here last night and at day break, but by the time i made it out to shoot it was already over freezing. Supposed to be in the forties this next week, so weather will change here. The load was 105g BH209, Harvester smooth sabot, 44 caliber 300g xtp, and Winchester shot gun primer. Will shoot paper once, and then go hunting some more this next week. Won't be cold this next week, but will still be putting the modified breech plug to the test whilst hunting. (BP) |
Breechplug
The muzzle was covered by 2 pieces of black electrical tape. There are a couple of plausible reasons for the hang fires. ONE.......The carbon in the flash channel wasn't drilled out all the way to the flash hole. TWO.........It is recommended one use magnum primer with BH209, and i don't. I think making a deeper concavity in the breech plug will help with this issue. When i first got this rifle i started with the crush rib sabot, because that is what i use in my Omega. They were definitely too loose. These Harvester smooth sabot are as tight as i want to deal with. |
Originally Posted by ronlaughlin
(Post 3551372)
Breechplug
The muzzle was covered by 2 pieces of black electrical tape. There are a couple of plausible reasons for the hang fires. ONE.......The carbon in the flash channel wasn't drilled out all the way to the flash hole. TWO.........It is recommended one use magnum primer with BH209, and i don't. I think making a deeper concavity in the breech plug will help with this issue. When i first got this rifle i started with the crush rib sabot, because that is what i use in my Omega. They were definitely too loose. These Harvester smooth sabot are as tight as i want to deal with. Have you noticed a difference in a more concave end to the BP? or have'nt you had time enough to determine this? Since BH should not draw moisture Im betting as you said the hangfire is due to the carbon in the BP. (BP) |
Originally Posted by sabotloader
(Post 3550841)
(BP) |
Here are some photos and the numbers for my actual breech Plugs. The first photo is of both rifles, that these plugs are from. (The Modifications shown below are for my purpose and use, Proceed at your own risk)
The Remington Roller was built for use with the first generation substitutes of Black Powder. ( this category to me is all Smokeless Powder) The Knight T-Bolt was modified to use Winchester 209 shotgun primers for the express purpose of shooting BH209. (IMHO BH209 falls in to what I refer to as the 2nd generation Black Powder substitutes.) Here are the Rifles:  The next photo is a photo of The Breech plugs from both rifles, Notice the copper based never seize in the threads. Both rifles had been pickled for storage. The Remington's plug is the top one. This is the Plug I made from a grade 8, 5/8 bolt along with the primer holder being from a 3/8 grade 8 bolt. The powder end of this plug duplicates the shape and dimensions of the Savage Breech plug. side view only! The lower/longer plug is the Knight's Plug, the overall length and shape of the external portion of this plug has not been altered:  The next photo is a photo of the recessed end of both plugs with Savage style vents installed. The Knight Plug, The right plug in the photo is recessed .325 to the face of the vent screw/liner. Notice how wet the plug is from an oily bore. WOW I even dried it with a patch before the photos The Rollers Plug, The left plug is recessed .625 to the face of the vent screw.liner. This plug also shows that My .375 drill did not want to make a perfect smooth hole on the surface, this was a Grade 8 Bolt.  The last photo is of the primer ends of both Plugs: Knight Plug, the Rt plug again was modified before I even started the other gun. This plug has fired in over 4 pounds of BH209 and over 400 Primers. This primer seat still shows no signs of gas cutting/erosion This MODIFIED Knight plug's dimensions: RT Plug from end of vent screw to top of plug: 1.082" Primer pocket recess is a depth of : .220 Distance from inserted primer to Vent : .862 (This is the distance RonL asked for I believe ) The Roller Plug: Left Plug, this plug is shorter overall. I have fired this plug over 800 times. The Primer seat shows no sign of gas cutting erosion. The grade 8 bolt is good stuff. from end of vent screw to top of plug: .562 Primer pocket recess is a depth of : .220 Distance from inserted primer to Vent : .340 (This demention will change due to the threaded length of vent screws.) Both plugs are stained from experiencing Hot - Flashy situations.  Did anyone catch that I threw another situation in to the pot of thoughts. Gas Cutting of the primer seat. In 03 I bought a BPI Beartooth Magnum, I fired this gun over 1200 times as a 50 cal Muzzle Loader This was with Conical Boolits Lee REALs and my maxis. The most I got out of the Soft CVA breech plugs was 400 primers. they would develop serious gas cutting in the primer seat. Check you CVA/BPI plugs for this erosion, once it starts it gets worse fast. This rifle was shot out at somewhere less than 1200 rounds, It would no longer shot accurately. I couldn't keep it on a paper plate at 50 Yards. This BPI Beartooth Magnum Rifle today has an extended breech plug that I made, it is 17.75" long and did require that I ream the existing barrel out from the breech end to a diamater of.562. This breech plug has a hole running it's full length and this hole has stuff called rifling in it. Instead of 209s to light the powder I use small pistol primers along with 38 special or 357 mag brass. This is my version of a Rook Rifle now. |
Screwbolts
Thank you for the dimensions and for going to the trouble of getting them for us. Lee |
Yea Screwbolts thank's for your time and pics. Im getting a-lot of good ideas out of all this!
(BP) |
Breechplug
I asked you a question about the BP and the concave end VS the Flat end and the pourpose of them, when you get a chance can you answer it on the forum? The concave faced breech plug seemed like a natural for the ignition of loose powder. I offered the ability of the flash to ignite the bottom of the load -start the hot ignition and then spread. I also have to tell you that I shoot a version 2 of Doc White's 209 breech plug in my model 97. It does have a flat face and is excellent for the ignition of loose T7 as well as Pryo Pellets. The faces of the breech plugs went through many changes with the advent of T7 and Underclocked's famous invention of the 'Crud Ring". There was an industry wide effort to change the face of the BP to help reduce the 'crud ring' build up. From that effort you can see many different designs and depth of the concave faces. I think the next thing to follow was the 'Convex' faced BP again designed for loose powder. I think the driving force of the 'Convex' face was an effort to clean up the amount of blow back that was sent back up the 'flash hole'. The 'Convex' face would cause some of the blow back pressure to be moved away from the 'flash hole' and conversly the 'Concave" face directed the pressure into the flash hole. The next thing that has been fooled with is the size of the 'flash hole'. I think the low end of this is .027 used by Knight to reduce blow back and to a high of .036 created by Busta to get better ignition of BH. Just my take.... and I am not an authority... |
Mike,
On My ACCURA's BP the end is kind of Concave and Flat...half of the outside diameter of the BP is flat the inner half of the BP is Concave. Did they make it this way to serve both pourposes of using lose powder and pellets? So if Im using lose powder a concave is better and pellets a flat end is better? Along with drilling out my Fire Channel on My ACCURA's BP should I add more of a concave end to what's already there? Ron (BP) |
Breechplug
It would be my suggestion - do not re-work the concave end unless you are installing a vent liner. you have to assume that CVA spent some time designing the existing BP for it's best application. Opening the 'flash channel' will only increase the volume of the BP - it should not effect the flash hole or the operation of the ignition of the powder. |
| All times are GMT -8. The time now is 02:19 PM. |
Copyright © 2026 MH Sub I, LLC dba Internet Brands. All rights reserved. Use of this site indicates your consent to the Terms of Use.