


What makes a Breechplug a Great BP?
 02-26-2010, 10:55 AM
#161
Nontypical Buck
Thread Starter
Join Date: Jan 2009
Location: Northern Chautauqua Co. N.Y.
Posts: 2,976
I started with the old cap lock, moved to the Knight disc and moved up to a Encore and than to a Traditions Prusuit and on up to the first style Pro Hunter. The latter being my pick out of every ML I've had the pleasure to own. The Knight had few different style BP's meaning the fire path was larger or the back of the BP was more open or the back was split supposedly to help lignite the powder. The Traditions if the BP got worn you have to pry the primer out. All these ideas in my opinion came to a head w/ the Encore/Pro Hunter that will all but flip your primer out. The Idea of being able to remove the BP w/ my hand does influence me to not ever buy a ML that has that feature. If I can't carry a BP wrench then I shouldn't be hunting. It also allows for more blow by. Manufactors need to forget the speed breech and move on to other improvements. The thing to remember is what ever BP you have is keep it clean and the threads greased or taped. If the ML was designed w/ that plug then you might improve it but in the end is it worth the expense. The main thing in my book is the speed I can remove & replace a primerbecause w/ a 209 misfires are rare.
I too agree more thought should be put in the BP area of (Blow Back) that is where we have the most problems, not weather we can remove the BP in 2 seconds or 30, to me it's just a faster way for lazy people to get it out to clean. Now if the Speed BP also eliminates 100% of the Blow Back also then now they have a Great BP!
Also removing a spent 209 Primer also has no complaints from me wich ever BP Im using in my ML. If you shoot you still have to reload and that takes time, getting the spent Primer out should'nt matter that much even if you need a second shot. If you cant get it reloaded and the Primer out in time for a second shot than mabey the second shot was'nt one you should consider taken. If all goes well as it should there should be no hurry for a second shot as your first shot should have been your best shot and it should have done the job, that's why we shoot a ML because we choose the one shot rule. My Opinion anyway, Sorry if I offended anyone...........
(BP)
 02-26-2010, 04:40 PM
#162
Nontypical Buck
Join Date: Aug 2008
Location: Rapid City, South Dakota
Posts: 3,732
"Is it worth the expense to modify a breech plug?" you wrote.
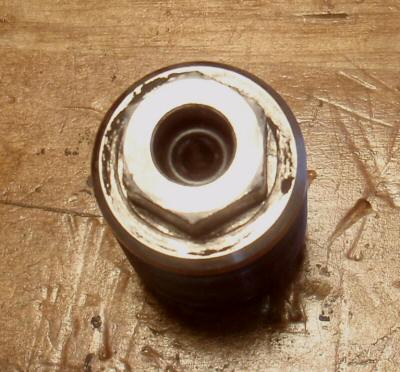
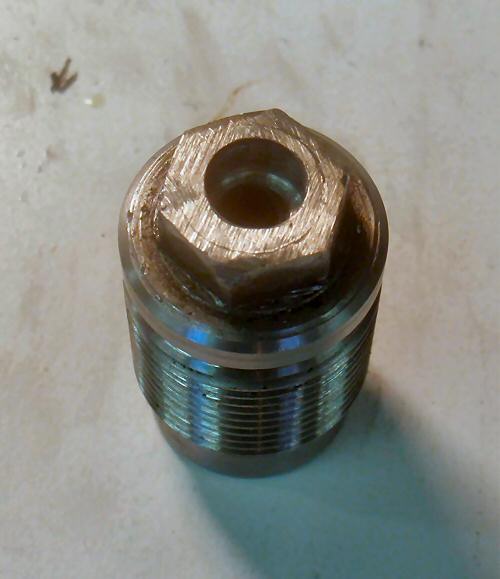
Here is a picture of a breech plug that shows severe flame cutting to primer seat.
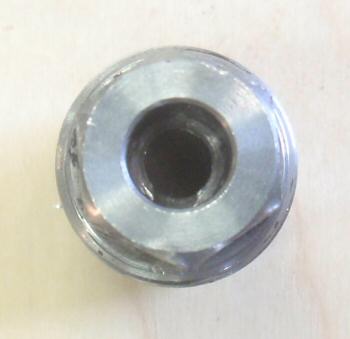
One could toss it, and replace it with new, but one could also find and old washer laying around the house, and cut it down on the lathe which is similar to what was suggested by sabotloader in another thread.
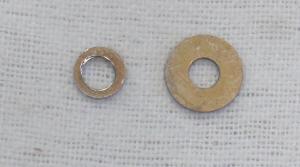
As suggested by Screwbolts a letter 'C' drill was used to make the primer pocket deeper in the breech plug with flame cutting damage. The intention was to remove the flame cutting from the primer pocket and use the washer to reduce the depth of the pocket, so the primer would fit tight. The washer i found here was about 1/32" thick. The washer was cut to a diameter just a few thousandths larger than the diameter of the primer pocket, so that it could be installed, and would be a tight fit. The depth of the pocket, with the washer installed, ended up being 0.012" less than a factory breech plug, which seemed like it might work. It did, however, make for a tight fit when closing the breech on the Omega.
This morning i headed up into the hills to see if this thing would shoot. The blow back was virtually zero using this steel washer; it was certainly was much better than it was before the flame cut damage was removed. It may be that one should make the primer height difference less than the 0.012" inch this ended up; perhaps 0.008" would be tight enough to have little blow back, and loose enough so it would be easier to put the rifle into battery.
So, mick669 was it worth the expense?
02-26-2010, 05:01 PM
#163
Nontypical Buck
Join Date: Aug 2008
Location: Rapid City, South Dakota
Posts: 3,732
Haven't really felt the need to use an O ring in my Accura too much, but here is what i did to the worn Omega breech plug pictured.
This breech plug has seen many rounds, and also has been modified and fitted with a savage vent liner. It hasn't seemed to be as accurate as a new unmodified breech plug, so i figured i would toss it.
Screwbolts suggested i drill the primer pocket deeper using a letter C drill which would allow the use of an O ring. I tried using an O ring in the damaged breach plug without drilling it, but couldn't get the action to close. So, i followed Screwbolts advice; purchased a letter C drill, and drilled the primer pocket some deeper.
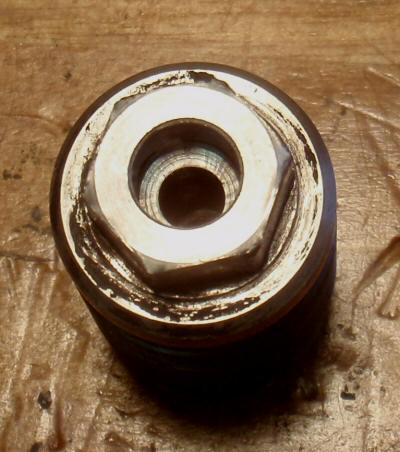
Here is what the breech plug looked like with the O ring installed. It fits nicely, and doesn't want to fall out. The O ring is 1/4" outside diameter; 1/8" inside diameter, and 1/16" thick.
This morning i headed up in the hills, and fired 7 shots with the Omega, and the modified breech plug, with an O ring installed. The load was 105g BH209, a 300g 44 caliber xtp, a Harvester crush rib sabot, and a Federal 209A primer. Following is a picture of the 7 spent primers, and the used O ring as well, along with a new O ring.
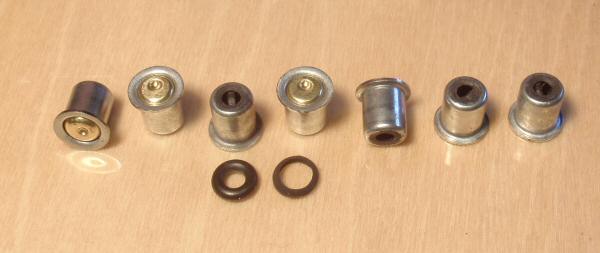
One can see there is zero blow back when using the O ring.
This breech plug has seen many rounds, and also has been modified and fitted with a savage vent liner. It hasn't seemed to be as accurate as a new unmodified breech plug, so i figured i would toss it.
Screwbolts suggested i drill the primer pocket deeper using a letter C drill which would allow the use of an O ring. I tried using an O ring in the damaged breach plug without drilling it, but couldn't get the action to close. So, i followed Screwbolts advice; purchased a letter C drill, and drilled the primer pocket some deeper.
Here is what the breech plug looked like with the O ring installed. It fits nicely, and doesn't want to fall out. The O ring is 1/4" outside diameter; 1/8" inside diameter, and 1/16" thick.
This morning i headed up in the hills, and fired 7 shots with the Omega, and the modified breech plug, with an O ring installed. The load was 105g BH209, a 300g 44 caliber xtp, a Harvester crush rib sabot, and a Federal 209A primer. Following is a picture of the 7 spent primers, and the used O ring as well, along with a new O ring.
One can see there is zero blow back when using the O ring.
The steel washer left virtually zero blow back in both the Omega, and the Accura.
02-26-2010, 05:54 PM
#164
Nontypical Buck
Thread Starter
Join Date: Jan 2009
Location: Northern Chautauqua Co. N.Y.
Posts: 2,976
You guy's are almost ready to put a (Patent) on them BP's and start selling the ideas to the ML Manufactures, if there not already reading this thread,LOL.
NICE WORK GUY'S!
(BP)
NICE WORK GUY'S!
(BP)
02-27-2010, 05:19 PM
#165
Nontypical Buck
Join Date: Aug 2008
Location: Rapid City, South Dakota
Posts: 3,732
After experiencing both success and failure with rubber O-rings in the Omega, i headed in a different direction and tried out metal washers like sabotloader discusses in another thread, instead of the rubber O-ring.
My first trial with metal washers was yesterday, using a steel washer; the steel washer worked OK, but there was a very little blow back. The compression was about 0.012" compared to a factory breech plug, and that seemed some tight to me. It took effort to close the breech.
This morning i tried out an aluminum washer that started out as a backer washer for pop-rivet. It was turned down on the lathe, until it seemed it would make a nice fit. It was installed in the breech plug, and it won't fall out any time soon. It ended up being about a 0.008" compression compared to factory. Then i went into the hills to give the aluminum washer a try. Here is a picture of 8 primers fired this morning in the Omega:
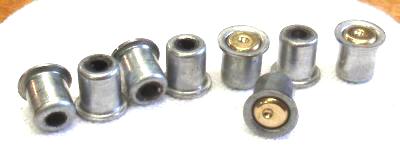
One can see that the aluminum washer allows about as much blow back as an O-ring. The breech closed with a nice snug feeling, not like with the steel washer, where it seemed to be too tight. The 0.008 compression of the aluminum washer worked better than the 0.012 compression of the steel washer containing blow back, and it felt more better when put into battery.
Three bullet speeds were timed at 13 yard, and they were 1752 fps, 1756 fps, and 1762 fps. To me, this consistency in speeds indicates a pretty tight breech. It seems i should make more aluminum washers.
My first trial with metal washers was yesterday, using a steel washer; the steel washer worked OK, but there was a very little blow back. The compression was about 0.012" compared to a factory breech plug, and that seemed some tight to me. It took effort to close the breech.
This morning i tried out an aluminum washer that started out as a backer washer for pop-rivet. It was turned down on the lathe, until it seemed it would make a nice fit. It was installed in the breech plug, and it won't fall out any time soon. It ended up being about a 0.008" compression compared to factory. Then i went into the hills to give the aluminum washer a try. Here is a picture of 8 primers fired this morning in the Omega:
One can see that the aluminum washer allows about as much blow back as an O-ring. The breech closed with a nice snug feeling, not like with the steel washer, where it seemed to be too tight. The 0.008 compression of the aluminum washer worked better than the 0.012 compression of the steel washer containing blow back, and it felt more better when put into battery.
Three bullet speeds were timed at 13 yard, and they were 1752 fps, 1756 fps, and 1762 fps. To me, this consistency in speeds indicates a pretty tight breech. It seems i should make more aluminum washers.
03-17-2010, 06:32 PM
#166
Nontypical Buck
Join Date: Aug 2008
Location: Rapid City, South Dakota
Posts: 3,732
Well, the aluminum washer idea for the primer seat didn't last a month. The Accura started belching blowback about a week ago, and the Omega started releasing black spent primers 3 days ago. I am thinking they were both working great for maybe 50 shot, and then they failed.
This sent me on to the next step which was suggested by Screwbolts quite some time ago. He suggested drilling out the breech plug, and tapping it to receive a grade 8, 3/8 x 24 bolt, and then use the bolt to make a new primer pocket. This was in response to my writing and showing a picture of flame cutting in the primer seat of my Omega, and Accura breech plug(s).
So, i drilled and tapped the worn Omega X7 breech plug to receive the grade 8 bolt.

Note that i ground the bolt end so that it would have a shape similar to the bottom of the hole made by the letter Q drill. I used 2 taps to make the threads, a normal tap, followed by a bottom tap. I wrapped the bolt with teflon tape, and made it super tight in the breech plug, so it won't unwind someday in the future.
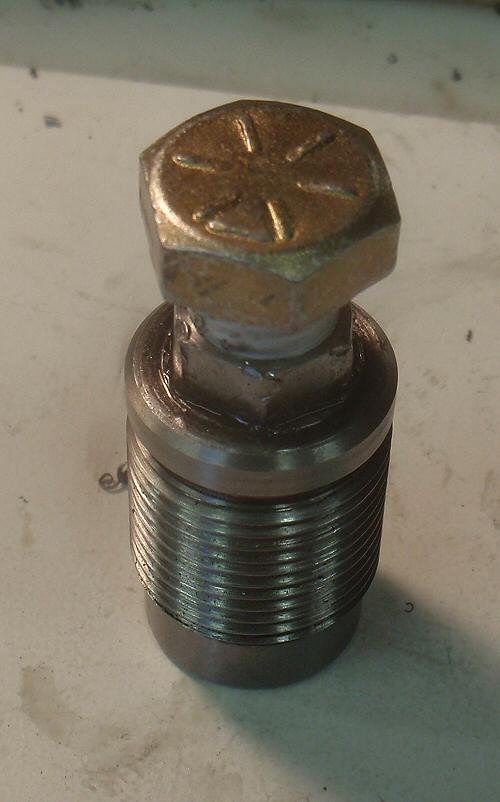
I didn't think it would work so very well to cut the bolt off with a hacksaw, and it only took me 2 swipes, before i could see that was near hopeless. So, i put a cut disc on my 4" grinder, and proceeded to cut the bolt off. Following is a picture of the bolt nearly cut off; it was easy to do.
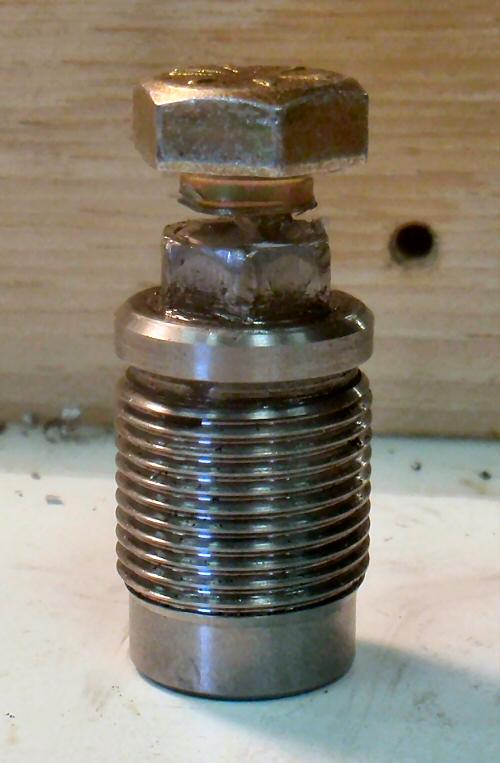
After the bolt was cut off, i used the cut wheel to sorta smooth the top. Note that one can see the edge of the bolt.
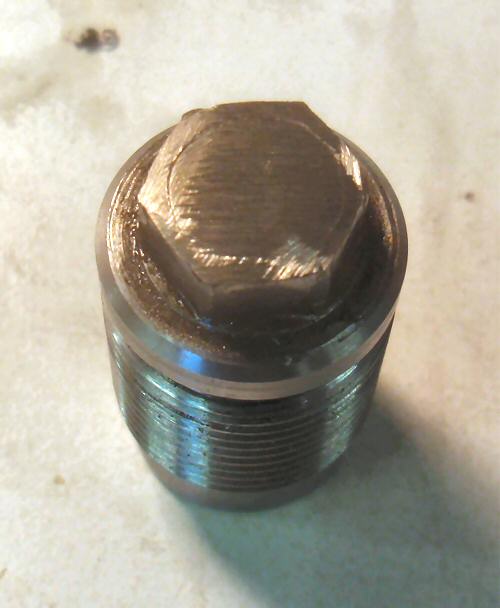
Then i started the flame channel using an 1/8" drill. My set-up didn't work so very well, thus the hole isn't centered.
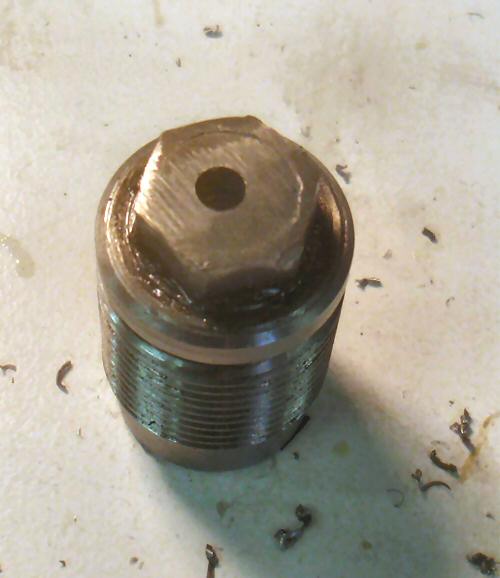
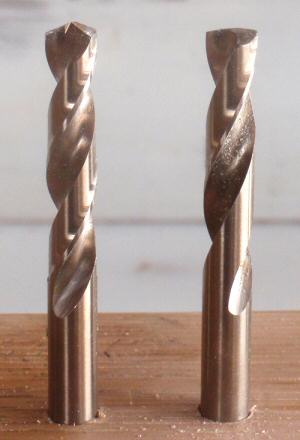
Then i drilled for the primer pocket using a letter C drill. I wanted this breech plug to have minimum head space, so i was very careful with the depth of the cut, and went real slow here. When it seemed somewhat close, i ground another letter C drill to a flatter point, and used it to get the primer pocket closer and closer to the desired depth.
The breech plug ended up having a head space about 0.011" less than a factory breech plug.
This made for a condition where one can feel the action closing on the primer. One can readily put the rifle into battery, but there is a definite resistance, and it does compress the primer some.
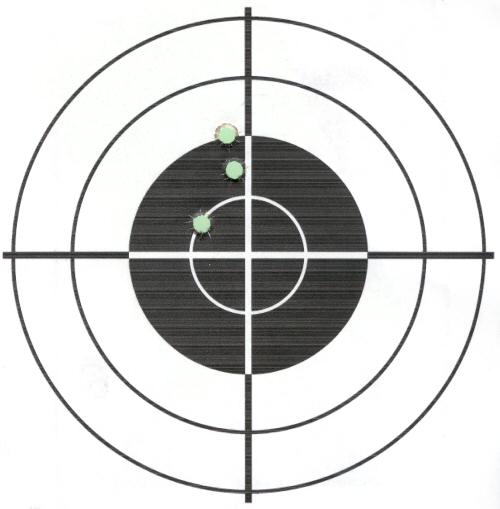
Several primers were popped in the shop to verify this chingadero would work. This morning i went up, and shot 3 rifles at paper. I fired the Omega 3 times, raised the peep, and fired 3 more times. The spent primers are pictured along with a spent primer that was popped before the blow back was 'fixed', and a primer that was popped in the shop. One can see that the dimple made by the firing pin is some off center, which it always is even with a factory breech plug, but not this much.
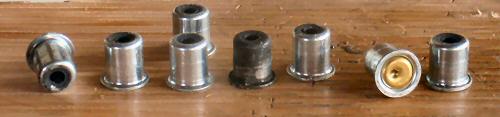
The paper was near 102 yard, and the load was 105g BH209 pushing a 270g Gold Dot in a crush rib sabot lit by a W209 primer. I should also mention the breech plug has a vent liner installed. The vent liner was supplied by Precision Rifle, and is similar to a Savage vent liner, except it differs by having a 0.033" flash hole, and a larger vent opening that steps down to the flash hole.
This sent me on to the next step which was suggested by Screwbolts quite some time ago. He suggested drilling out the breech plug, and tapping it to receive a grade 8, 3/8 x 24 bolt, and then use the bolt to make a new primer pocket. This was in response to my writing and showing a picture of flame cutting in the primer seat of my Omega, and Accura breech plug(s).
So, i drilled and tapped the worn Omega X7 breech plug to receive the grade 8 bolt.
Note that i ground the bolt end so that it would have a shape similar to the bottom of the hole made by the letter Q drill. I used 2 taps to make the threads, a normal tap, followed by a bottom tap. I wrapped the bolt with teflon tape, and made it super tight in the breech plug, so it won't unwind someday in the future.
I didn't think it would work so very well to cut the bolt off with a hacksaw, and it only took me 2 swipes, before i could see that was near hopeless. So, i put a cut disc on my 4" grinder, and proceeded to cut the bolt off. Following is a picture of the bolt nearly cut off; it was easy to do.
After the bolt was cut off, i used the cut wheel to sorta smooth the top. Note that one can see the edge of the bolt.
Then i started the flame channel using an 1/8" drill. My set-up didn't work so very well, thus the hole isn't centered.
Then i drilled for the primer pocket using a letter C drill. I wanted this breech plug to have minimum head space, so i was very careful with the depth of the cut, and went real slow here. When it seemed somewhat close, i ground another letter C drill to a flatter point, and used it to get the primer pocket closer and closer to the desired depth.
The breech plug ended up having a head space about 0.011" less than a factory breech plug.
This made for a condition where one can feel the action closing on the primer. One can readily put the rifle into battery, but there is a definite resistance, and it does compress the primer some.
Several primers were popped in the shop to verify this chingadero would work. This morning i went up, and shot 3 rifles at paper. I fired the Omega 3 times, raised the peep, and fired 3 more times. The spent primers are pictured along with a spent primer that was popped before the blow back was 'fixed', and a primer that was popped in the shop. One can see that the dimple made by the firing pin is some off center, which it always is even with a factory breech plug, but not this much.
The paper was near 102 yard, and the load was 105g BH209 pushing a 270g Gold Dot in a crush rib sabot lit by a W209 primer. I should also mention the breech plug has a vent liner installed. The vent liner was supplied by Precision Rifle, and is similar to a Savage vent liner, except it differs by having a 0.033" flash hole, and a larger vent opening that steps down to the flash hole.
03-17-2010, 06:46 PM
#167
Nontypical Buck
Thread Starter
Join Date: Jan 2009
Location: Northern Chautauqua Co. N.Y.
Posts: 2,976
I think your definately onto something good Ron, it made a world of difference in the blow-Back, Im jealous! Keep up the great work and fill us in on more results and findings.
(BP)
(BP)
03-18-2010, 12:34 PM
#169
Nontypical Buck
Join Date: Aug 2008
Location: Rapid City, South Dakota
Posts: 3,732
When the aluminum shim in the Omega breech plug failed a few day ago, it was seen that there wasn't enough primer seat left to repair, so a grade 8 bolt was installed to bring material to work on. This i was able to do because of the information and advice given by Screwbolts. When the aluminum shim in the Accura breech plug failed, it turned out there was enough material left in the primer seat to modify the breech plug to use 0-ring.
Previously i had tried rubber 0-ring, and experienced some grief trying to make it work. Part of the rubber was blown into the flash channel, by the primer, and plugged the flash hole, so i gave up the idea of o-ring. Busta posted and explained there was too much compression on the o-ring, and this along with the taper in the primer seat was why i had problems.
In the days since, i ordered some silicon o-ring, and when the Accura started belching blow back, i decided to give them a try. So, what i did was grind a C drill more flatter.
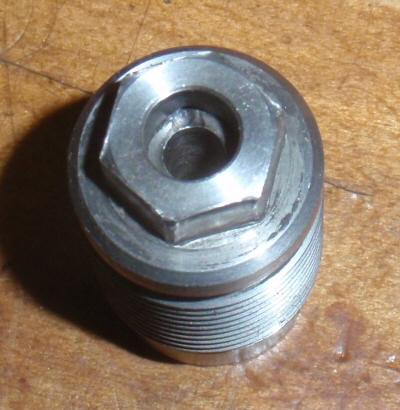
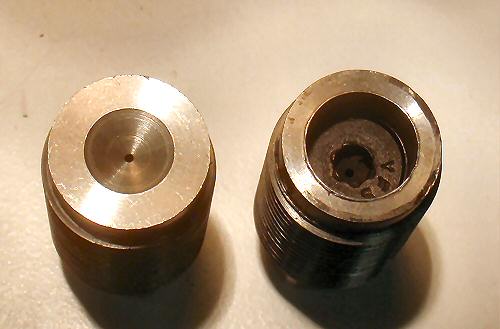
This flatter drill was used to drill into the primer seat of the Accura breech plug about 0.050". This allows for the o-ring without overly compressing it, and results in a nice nearly flat primer seat. Here is the modified plug next to a 'new' factory plug.
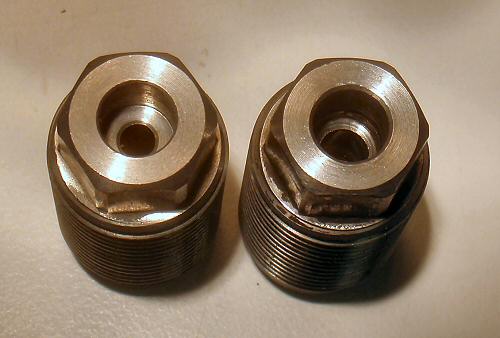
The other end of the breech plugs showing the vent liner from Precision Rifle installed in the modified plug.
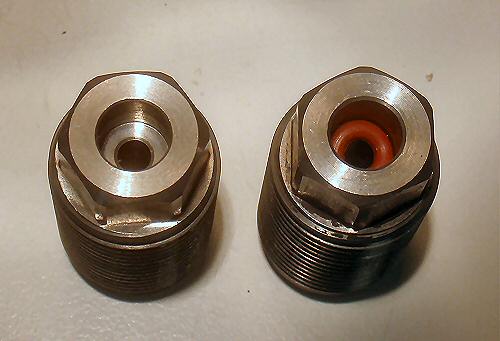
The breech plugs with the silicon o-ring installed. The headspace with the o-ring installed was 0.020" less than factory. This results in a nice tight seal between the primer and the o-ring, without too much compression, which results in zero blow back.
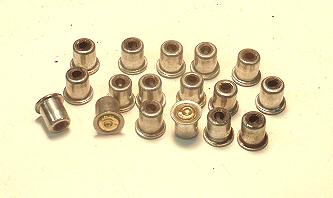
Here is what the spent primers from the Accura look like, with the nice tight seal, provided by the o-ring.
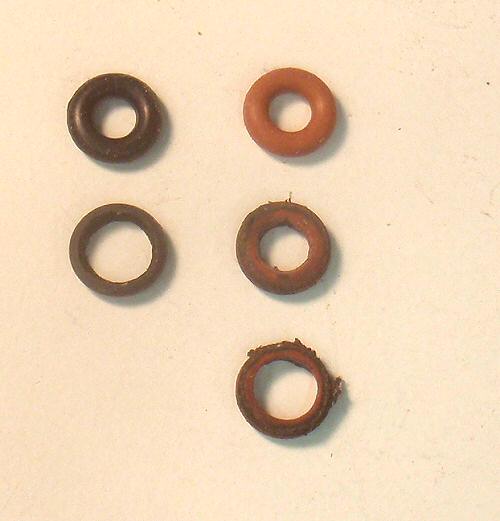
Here is a picture of the o-rings. A new rubber ring, and a used rubber ring. A new silicon ring, a silicon ring that has seen 4 shots, and a silicon ring that has seen about 25 shots. The ring with 25 shots on it, is installed in the rifle right now, has 29 shots through it, and is still viable.
Busta' experience and advice regarding o-ring, seemingly has allowed for success. It is actually quite simple to modify a breech plug to accept an o-ring. One needs a C drill, and patience. Approaching the correct depth of drill needs be done with care. Flattening a drill also seems to be a good step, but probably isn't absolutely necessary.
Previously i had tried rubber 0-ring, and experienced some grief trying to make it work. Part of the rubber was blown into the flash channel, by the primer, and plugged the flash hole, so i gave up the idea of o-ring. Busta posted and explained there was too much compression on the o-ring, and this along with the taper in the primer seat was why i had problems.
In the days since, i ordered some silicon o-ring, and when the Accura started belching blow back, i decided to give them a try. So, what i did was grind a C drill more flatter.
This flatter drill was used to drill into the primer seat of the Accura breech plug about 0.050". This allows for the o-ring without overly compressing it, and results in a nice nearly flat primer seat. Here is the modified plug next to a 'new' factory plug.
The other end of the breech plugs showing the vent liner from Precision Rifle installed in the modified plug.
The breech plugs with the silicon o-ring installed. The headspace with the o-ring installed was 0.020" less than factory. This results in a nice tight seal between the primer and the o-ring, without too much compression, which results in zero blow back.
Here is what the spent primers from the Accura look like, with the nice tight seal, provided by the o-ring.
Here is a picture of the o-rings. A new rubber ring, and a used rubber ring. A new silicon ring, a silicon ring that has seen 4 shots, and a silicon ring that has seen about 25 shots. The ring with 25 shots on it, is installed in the rifle right now, has 29 shots through it, and is still viable.
Busta' experience and advice regarding o-ring, seemingly has allowed for success. It is actually quite simple to modify a breech plug to accept an o-ring. One needs a C drill, and patience. Approaching the correct depth of drill needs be done with care. Flattening a drill also seems to be a good step, but probably isn't absolutely necessary.