


How to make your own wingbone call

 04-30-2009 | 06:09 AM
#2
Thread Starter
Super Moderator
Joined: Jan 2004
Posts: 7,490
Likes: 8
From: Wisconsin
How to Make Your Own Wing-bone (3 bone) call or a Leg-bone (2 bone) call.
Okay I was asked so here is a step by step pictorial.
I really try not to waste anything from the bird I have harvested. My tail fans are sent to a lady who uses the feathers and airbrushes wild life scenes on them. And now I save a few to use on my strutting decoys. But - you can only have so many tail fans mount on the wall! I do pluck the majority of my birds and these feathers go to a lady who makes Pine-cone turkeys as a hobby. I save my feet and use them for Hunter Education classes either making tracks for a tracking exercise or add the spurs to a few calls I make and send to others. I also have made a spur hat band. The wings of course are used for calls and so are the drumstick bones.
So let's make a call.
First ya need to get one of these! - sorry bad pun

Now cut the wing away from the body.

You will need the three major bones from the wing. the Humorous(attached at the body) and the Ulna and Radius bones (two bones laying right next to each other in the turkeys so called forearm - Ulna is where the major flight feathers are attached and Radius lies under in the muscle.) The tip of the wing or the rest of the wing bones are thrown away.
Now I boil the wings to remove the feathers as I send these to people who can use them. some use them for kid's art classes and others use them for archery.
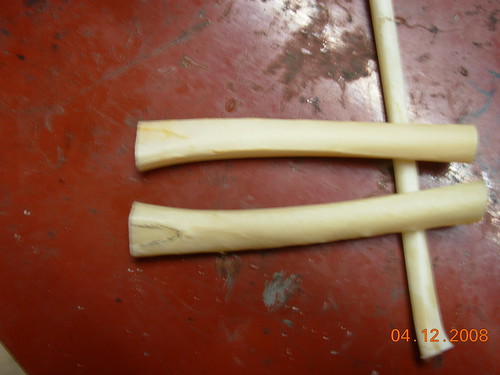
To boil I add enough water to cover the meaty portion of the wing. Bring to a boil and try to pull the wing our of the boiling water by a feather tip. When a feather comes free easily I remove the wing from the water and pull out all major feathers using gloves as it is hot! I then trim all meat away and toss this. You will end up with bones that look like this - well sorta at this point.
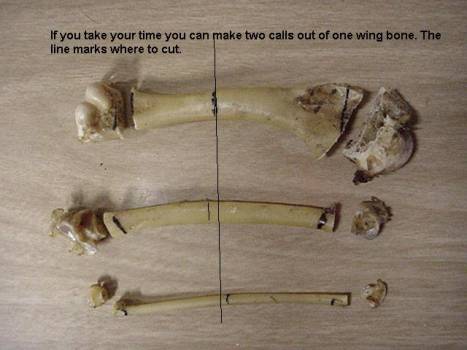
Above you can see where I cut the knuckles off using either a hack saw or a hobby band saw. I use the latter. NOTE: Keep you Radius bone cut as close to the ends as you can. One side is flatter than the other and that flat end I use as the mouthpiece.
Listed in order from top to bottom - Humorous bone [trumpet end], Ulna bone [ middle part of the call] & the Radius bone [your mouth piece]. it is like that old song the neck bone is connected to the head bone! Well the Radius bone is connected to the Ulna bone and the Ulna bone is connected to the Humorous bone. Each will fit inside the other when we get done.
Now once the knuckles are cut off. I soak these bones in a Sodium Carbonate - 4 oz to a gallon of hot water to loosing marrow, gristle and any excess meat. This can be found in any taxidermy shop. I soak for one or two days and then clean the bones in soapy water. I use a Scocth brite scrubby and a small bottle brush and a pipe cleaner and a sharp knife. It is not necessary to get them all that clean.
Okay I was asked so here is a step by step pictorial.
I really try not to waste anything from the bird I have harvested. My tail fans are sent to a lady who uses the feathers and airbrushes wild life scenes on them. And now I save a few to use on my strutting decoys. But - you can only have so many tail fans mount on the wall! I do pluck the majority of my birds and these feathers go to a lady who makes Pine-cone turkeys as a hobby. I save my feet and use them for Hunter Education classes either making tracks for a tracking exercise or add the spurs to a few calls I make and send to others. I also have made a spur hat band. The wings of course are used for calls and so are the drumstick bones.
So let's make a call.
First ya need to get one of these!
- sorry bad punNow cut the wing away from the body.
You will need the three major bones from the wing. the Humorous(attached at the body) and the Ulna and Radius bones (two bones laying right next to each other in the turkeys so called forearm - Ulna is where the major flight feathers are attached and Radius lies under in the muscle.) The tip of the wing or the rest of the wing bones are thrown away.
Now I boil the wings to remove the feathers as I send these to people who can use them. some use them for kid's art classes and others use them for archery.
To boil I add enough water to cover the meaty portion of the wing. Bring to a boil and try to pull the wing our of the boiling water by a feather tip. When a feather comes free easily I remove the wing from the water and pull out all major feathers using gloves as it is hot! I then trim all meat away and toss this. You will end up with bones that look like this - well sorta at this point.
Above you can see where I cut the knuckles off using either a hack saw or a hobby band saw. I use the latter. NOTE: Keep you Radius bone cut as close to the ends as you can. One side is flatter than the other and that flat end I use as the mouthpiece.
Listed in order from top to bottom - Humorous bone [trumpet end], Ulna bone [ middle part of the call] & the Radius bone [your mouth piece]. it is like that old song the neck bone is connected to the head bone!
Well the Radius bone is connected to the Ulna bone and the Ulna bone is connected to the Humorous bone. Each will fit inside the other when we get done.Now once the knuckles are cut off. I soak these bones in a Sodium Carbonate - 4 oz to a gallon of hot water to loosing marrow, gristle and any excess meat. This can be found in any taxidermy shop. I soak for one or two days and then clean the bones in soapy water. I use a Scocth brite scrubby and a small bottle brush and a pipe cleaner and a sharp knife. It is not necessary to get them all that clean.
04-30-2009 | 06:10 AM
#3
Thread Starter
Super Moderator
Joined: Jan 2004
Posts: 7,490
Likes: 8
From: Wisconsin
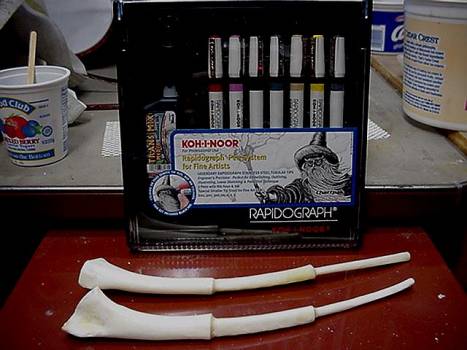
The pipe cleaner will help remove the marrow from the Radius bone. The small bottle brush removes the marrow from the Ulna bone. The Humorous bone you just remove any excess gristle or meat. No marrow to remove.
I then soak the bones a day in 3% Hydrogen peroxide. This whitens the bones. DO NOT USE BLEACH IT RUINS THEM!@!@.
Once done you have this!
NOTE: Keep all bones from the same wing together. I use a rubber band. Reason? They fit better!

Now a few tips on cutting the ends off – Knuckles
Small bone or the mouthpiece. The Radius bone
Again saw the knuckle off so it looks like this. You can sand away excess but can not add!
Okay now we start to fit our bones.
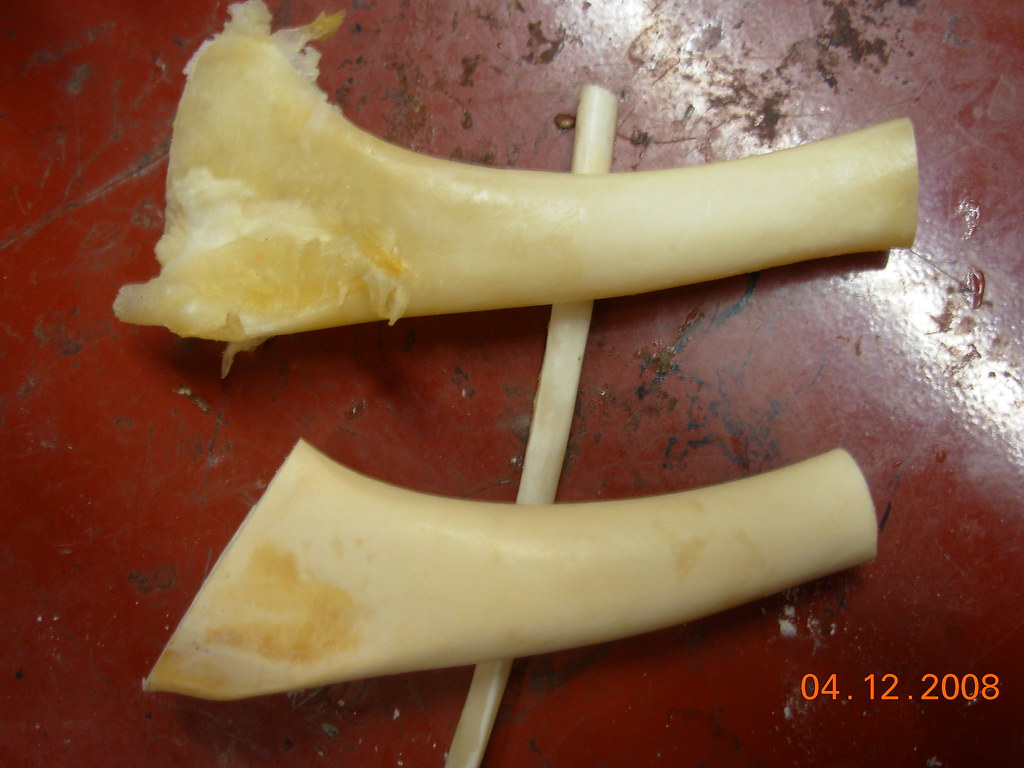
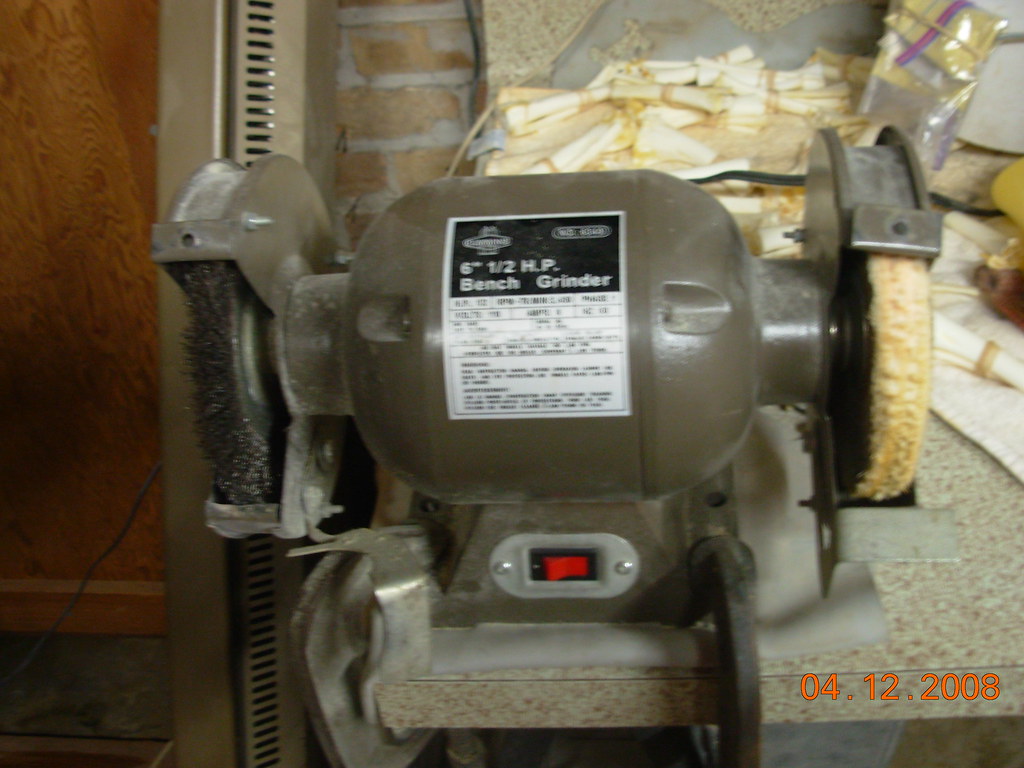
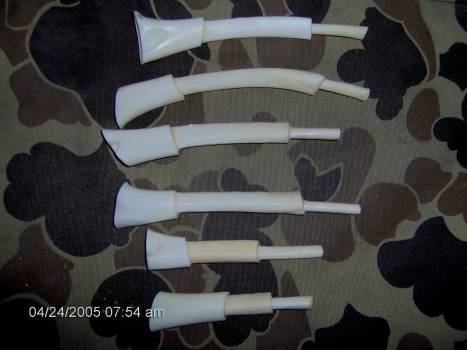
First thing I do is remove the lace-work of bone found inside the Humorous bone with a Dremel tool and a conical grinding bit. If you do not have this you will just need to cut this away until you can ream out with a knife. But it shortens your call!
Now I sand the trumpet end on a desk top 3” belt sander with 120 grit sand paper. The belt sander is connected to a vacuum as there will be dust!

Here you are looking at the large end of a Humorous bone. Raw - not soaked, cleaned and whitened which shows the bone lace work and Reamed.

Do both ends. the larger end is the worse. If you use a Dremel tool the Humorous bone will change tone when you have removed the lacework. Listen for it to sing to ya!
I use a Dremel tool with a Conical grinding bit #395
I start by grinding the bone lacework from the small end and then start on the big end.
Middle piece or the Ulna.
Do notice that depression like V mark on the bone. That end fits into the Humerous bone (trumpet end) smallest opening with a bit of sanding. I have found you want to sand that down . Then I sand the outside diameter so it fits easily into the Trumpet end. Do NOT Force. You will crack the bone.
Now fit your Radius Bone to the other end of the Ulna (middle piece of the call). Again Flattest end is your mouthpiece.
I then soak the bones a day in 3% Hydrogen peroxide. This whitens the bones. DO NOT USE BLEACH IT RUINS THEM!@!@.
Once done you have this!
NOTE: Keep all bones from the same wing together. I use a rubber band. Reason? They fit better!
Now a few tips on cutting the ends off – Knuckles
Small bone or the mouthpiece. The Radius bone
Again saw the knuckle off so it looks like this. You can sand away excess but can not add!
Okay now we start to fit our bones.
First thing I do is remove the lace-work of bone found inside the Humorous bone with a Dremel tool and a conical grinding bit. If you do not have this you will just need to cut this away until you can ream out with a knife. But it shortens your call!
Now I sand the trumpet end on a desk top 3” belt sander with 120 grit sand paper. The belt sander is connected to a vacuum as there will be dust!
Here you are looking at the large end of a Humorous bone. Raw - not soaked, cleaned and whitened which shows the bone lace work and Reamed.
Do both ends. the larger end is the worse. If you use a Dremel tool the Humorous bone will change tone when you have removed the lacework. Listen for it to sing to ya!
I use a Dremel tool with a Conical grinding bit #395
I start by grinding the bone lacework from the small end and then start on the big end.
Middle piece or the Ulna.
Do notice that depression like V mark on the bone. That end fits into the Humerous bone (trumpet end) smallest opening with a bit of sanding. I have found you want to sand that down . Then I sand the outside diameter so it fits easily into the Trumpet end. Do NOT Force. You will crack the bone.
Now fit your Radius Bone to the other end of the Ulna (middle piece of the call). Again Flattest end is your mouthpiece.
04-30-2009 | 06:12 AM
#4
Thread Starter
Super Moderator
Joined: Jan 2004
Posts: 7,490
Likes: 8
From: Wisconsin

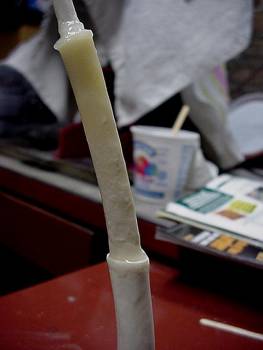
Now I dry fit many at one time and then glue in batches. I use Devcon clear Epoxy which comes in a 2 tube set.
I do not worry about excess glue at all we will take care of that later. I glue trying to fill the joint soo there are no air gaps. I then place on a plastic ice cream container and glue the next one. When the glue is slightly hardened or if you are only doing one – go back and add extra filling all air gaps/depressions you see in your joint. Air gaps will cause loss of volume.
NOTE:
I also will stick a small dab of epoxy in the mouthpiece end as I have found if I ream this with a smaller hole I get a much easier call to use! I use a diamond conical drill bit in my Dremel. Not too much now as you don't want to plug it so bad you can not drill it!
Glued with excess

And Cleaned!
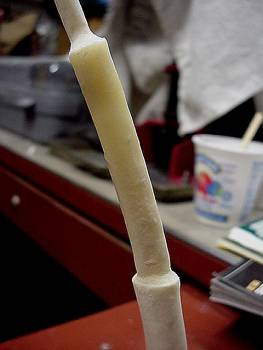
Now I clean all my calls with a wire wheel. It is a medium brush wire wheel I have added to a grinder. The wire removes the excess epoxy nicely and also removes excess old gristle to which I told you not to worry about. It will also burnish the call a bit and really clean it up. I also will wire brush he mouthpiece taken off all sharp edges.
Below you calls should now look like this after you have cleaned the epoxy glue. Now you have a finished call or you can add artwork to.
I use Rapidio-graph pens in 0.50 and 0.35 and slightly smaller. Filled with their India Black Ink.
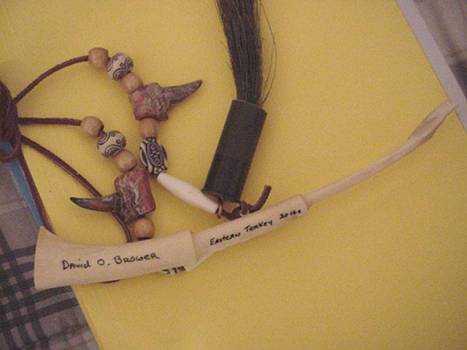
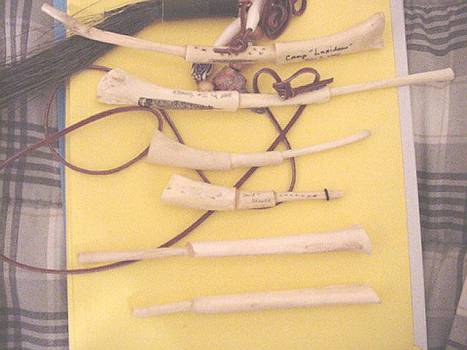
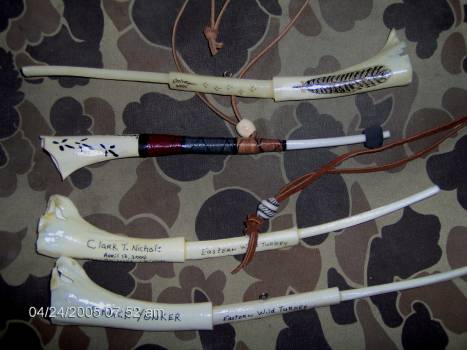
Okay now we can sign our calls, add the bird's biographic such as date of kill, beard length, weight, spur lengths, area killed, and Specie. Anything you want! Art is in the eye of the beholder! :
I also draw feathers and turkey tracks - it is a hobby as I do not sell but do trade and do donate to wildlife organizations as a silent auction article.
I draw feathers by starting the feather shaft first. Then I draw the outline of the feather and then add the feather texture with hooked lines. I then change pens and add the feather barring we see. I have several good feathers I have saved and just mimic what I see. If you make a mistake - don't like what you have written or drawn - I have an eraser! I go back to my Wire Wheel and it will take it off!
04-30-2009 | 06:15 AM
#5
Thread Starter
Super Moderator
Joined: Jan 2004
Posts: 7,490
Likes: 8
From: Wisconsin
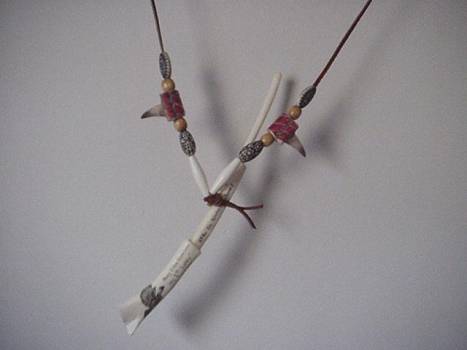
Once done I add a small screw eye which I epoxy in place. I drill the hole so it will fit in and not screw in. I add a dab of epoxy and let it dry before I coat with 2 or 3 coats of lacquer. A piece of leather for a call lanyard and may add some beads and my spurs or even the shotgun shell I used with the beard glued in it!
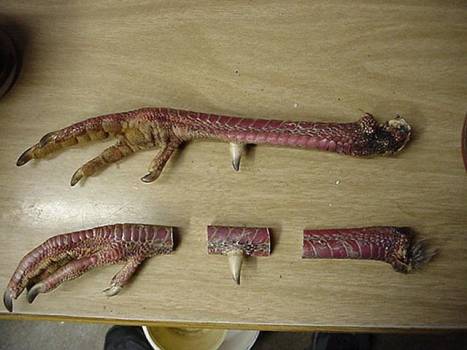
Spurs I cut off like this. These if I am going to add them to my lanyard I put in a small cup of store bought Borax to help them dry. Let dry in a cup with borax for a few week. Then I clean out the marrow and them back to my buffing wheel and lightly buff – stick on a copper wire and coat with the spray lacquer.
Once dry I run my leather strip through them.
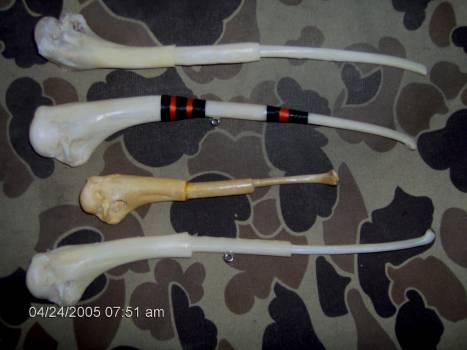
Or I have take a few legs with spurs and have made calls too! But keep your cut longer on the bone. You
can either peel the skin/scale off and whiten in peroxide or leave as is. Just dry in borax for a while.
You will notice some have lacquer some do not. It does make a difference. The bottom long call is made from Canada goose!
Spurs I cut off like this. These if I am going to add them to my lanyard I put in a small cup of store bought Borax to help them dry. Let dry in a cup with borax for a few week. Then I clean out the marrow and them back to my buffing wheel and lightly buff – stick on a copper wire and coat with the spray lacquer.
Once dry I run my leather strip through them.
Or I have take a few legs with spurs and have made calls too! But keep your cut longer on the bone. You
can either peel the skin/scale off and whiten in peroxide or leave as is. Just dry in borax for a while.
You will notice some have lacquer some do not. It does make a difference. The bottom long call is made from Canada goose!
04-30-2009 | 06:17 AM
#6
Thread Starter
Super Moderator
Joined: Jan 2004
Posts: 7,490
Likes: 8
From: Wisconsin
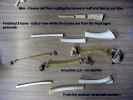
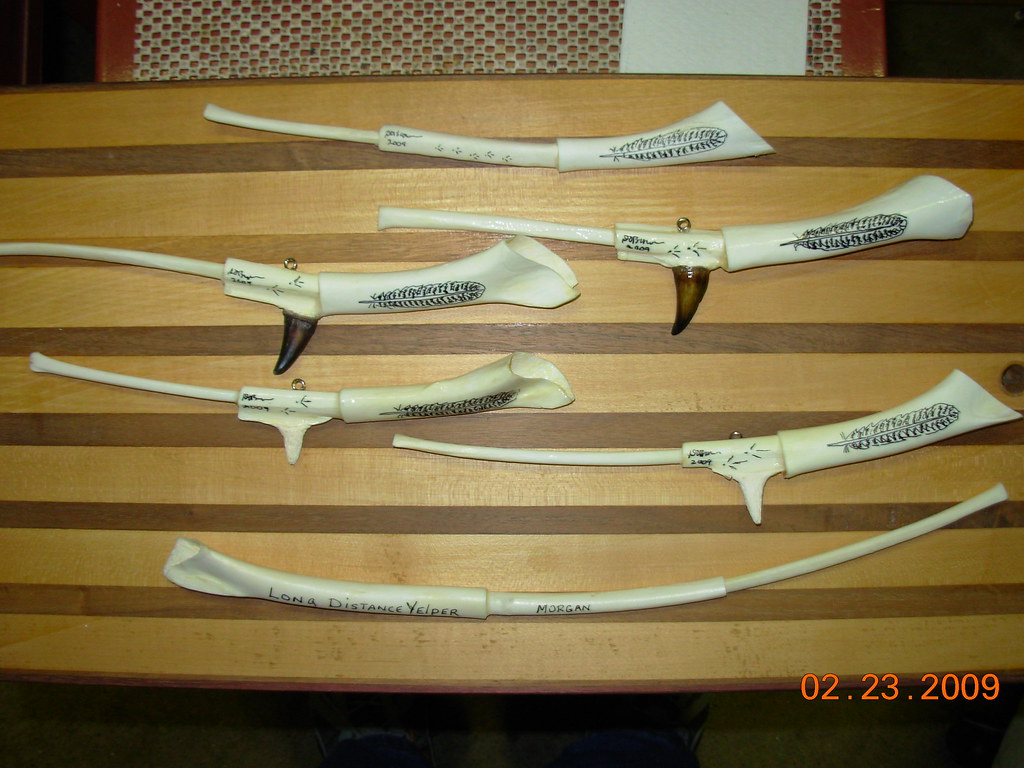
Some of my creations
Don’t want to take the knuckles off? Well these work to and the really yellow one is from the a person who told me it is from 1954 or so!
Now it sounds hard but really is not! I can finish a call in about a week.
JW!
Don’t want to take the knuckles off? Well these work to and the really yellow one is from the a person who told me it is from 1954 or so!
Now it sounds hard but really is not! I can finish a call in about a week.
JW!
04-30-2009 | 06:22 AM
#7
Thread Starter
Super Moderator
Joined: Jan 2004
Posts: 7,490
Likes: 8
From: Wisconsin
I use the drumstick and the radius from the wing. Make the radius bone no shorter than one and a half inches. The small end of the drumstick bone is where the radius bone is and glue. This will make a deeper sounding two-bone call and is a very nice pot striker too! But keep your radius bone at size above. If you get to short it will be squeaky on the pot call.

04-30-2009 | 08:25 AM
#9
Nontypical Buck
Joined: Oct 2005
Posts: 1,858
Likes: 0
From: Iowa
i made some in the past using these same steps. Turned out great. I don't use them to hunt with, but they make good memories. I usually record the date and bird size on them.
04-30-2009 | 08:56 AM
#10
Thread Starter
Super Moderator
Joined: Jan 2004
Posts: 7,490
Likes: 8
From: Wisconsin
I do the same zubba -
one for the wall - one to use - nothing better than calling in a Tom with somehting you made.
and they are the oldest turkey call known to man!

JW
one for the wall - one to use - nothing better than calling in a Tom with somehting you made.
and they are the oldest turkey call known to man!
JW