


"True Shooting Distance"
 08-16-2008 | 10:41 PM
#1
Thread Starter
Joined: Aug 2008
Posts: 43
Likes: 0
From:
Can anyone tell me how you can figure out the "true shooting distance" from an elevated tree stand no matter how high you are and no matter what distance? EX. - If you have a deer 15 yards away and your tree stand is 15 feet high, how do you figure out the distance that you will actually be shooting?
 08-16-2008 | 11:20 PM
#4
Thread Starter
Joined: Aug 2008
Posts: 43
Likes: 0
From:
Well I was having a debate between coworkers at Bass Pro tonight. Some said that if you climb a tree that you are putting more distance between you and your target. Which they proved true by math and it was 17.84 yards. But my side was that gravity creates more speed in that shoot than just a shoot from the ground which then in turn lets the arrow fly flater for a longer period of time which makes the distance shorter around 13 yards.
08-16-2008 | 11:25 PM
#5
Giant Nontypical
Joined: Feb 2003
Posts: 6,634
Likes: 0
From: HENDERSON KY USA
Gravity isn't creating more speed,atleast not in hunting distances.
Gravity doesn't know there is an angle there,it pulls in a straight line and that line only covers the distance from the base of the tree.
The same will hold true if you are shooting uphill.
There is a point when gravity plays a role with a downhill shot versus an uphill shot but it is at a much greater distance than taken while bowhunting.
08-16-2008 | 11:28 PM
#6
Giant Nontypical
Joined: Feb 2003
Posts: 6,634
Likes: 0
From: HENDERSON KY USA
If you really want to blow there minds,print this out and let them read it.
http://www.archersadvantage.com/TipSheets/UpDownHill.htm
[/size][/font]Shooting[/size][/font]
By Perry Ratcliff © 1999
The Basics
One of the most debated topics in archery is how to properly adjust for uphill/downhill shots. The most common rule given is that you set your sight for the horizontal component of the range. For example, if you were shooting a 60 yard uphill/downhill shot at a 20 degree angle, you would set your sight for 56.4 [COS(20°) * 60 ~ 56.4] yards regardless of whether the target is at an uphill or downhill angle. Figuring out Angles and Cosines on the range is tough enough, but even so this method does not work under many conditions. To understand how to adjust for uphill/downhill shots you need to understand what you are adjusting for when setting your sight. We all know that as the range increases, you must lower your front sight to compensate for the Arrow Drop. However, you are not adjusting simply for Arrow Drop. You are also adjusting for Parallax Error.
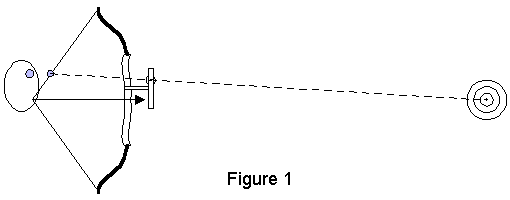
Parallax Error
When you aim your bow, your aiming eye is typically not behind the nock of your arrow(See Figure 1). Your aiming eye (or peep) is usually several inches above the shaft of the arrow, which introduces a sight offset referred to as Parallax Error. This Parallax Error varies depending on the range to target. In both Figures 1 & 2 the arrow is pointed directly at the target. In these figures, the sight is also adjusted to point directly at the target. Notice how the sight is relatively high on the sight for long ranges and very low on the sight for short targets. This sight movement, or Parallax Error, is opposite of how you adjust your sight for Arrow Drop. At ranges beyond 20 yards, Parallax Error changes very slowly with range and is hardly noticeable. However, at ranges below 15 yards Parallax Error changes very rapidly. You can see this effect when you have to move your sight backwards, or down the sight, as you get closer to the target (for ranges under 15 yards). In fact, to shoot a 2 yard target, it is not uncommon to have to set your sight for somewhere between 60 and 70 yards. This odd movement of the sight is due entirely to Parallax Error. The amount of Parallax Error for any given range is determined by how high your peep sight (or aiming eye) is relative to the arrow shaft and the distance between your peep sight and aperture of your front sight. Bow speed has nothing to do with Parallax Error or the strange things that happen at very short ranges. You would observe these same changes in sight settings with a high speed rifle if the rear sight was placed 4 or 5 inches above the barrel of the rifle.

Arrow Drop
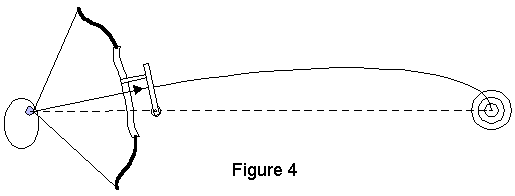
Figures 3 & 4 show sight placement with the aiming eye directly behind the nock of the arrow (no parallax error). When the target is close, the sight is relatively high on the sight and when the target is far, the sight is very low on the sight. As described above, this is opposite of the movement associated with Parallax Error.
Sight Setting
When you set your sight, you are compensating for both the Arrow Drop and Parallax Error associated with the range you are about to shoot. Why spend so much time discussing Parallax Error and Arrow Drop when the topic is adjusting for uphill/downhill shots? Because the general rule of adjusting for the horizontal component of the range doesn’t work for both Arrow Drop and Parallax Error. Adjusting Arrow Drop for the horizontal component of the range is a fairly accurate way to compensate for uphill/downhill shots (more on this later) but Parallax Error is always equal to the slant (or measured) range to the target. Unfortunately, you do not know what part of your sight setting is associated with Arrow Drop and what part of your sight setting is associated with Parallax Error. The good news is that Parallax Error changes very slowly at ranges beyond 20 yards and can be generally ignored when adjusting for uphill/downhill shots. However, at ranges below 15 yards, Parallax Error changes very rapidly. This rapid change in Parallax Error means that at these ranges, if you adjust your sight for the horizontal component of the range you will almost certainly miss high in the target. There are only two good ways to adjust for uphill/downhill shots. One is to practice as often as possible shooting many different ranges at various angles to get a feel for how to adjust your sight. This can be difficult for people who live in relatively flat areas and only occasionally travel to hilly ranges. The second is to useAAPalm and a Clinometer (angle measuring device available at surveyor supply houses). The Archer’s Advantage Pocket Computer always knows what part of your sight setting is associated with Arrow Drop and what part of your sight setting is associated Parallax Error. This information, along with an uphill/downhill angle provided by a Clinometer, allows the AAPalm to accurately adjust for uphill/downhill shots at any range or angle.
Archer Induced Errors
It is important to maintain good form for uphill-downhill shots. There are several common form breaks that can cause your arrows to shoot differrent than expected on uphill-downhill shots. The most common problem is for the archer to adjust for uphill-downhill shots by raising or lowering the bow arm instead of bending at the waist. Bending at the waist for uphill-downhill shots allows you to maintain consistent draw length and a consistent sight picture for these shots. Failure to adjust by bending at the waist can change your draw length and alter your sight picture. Either of these problems will show up in where your arrows group in the target. It is not uncomon for archers to heel the bow for uphill shots. This will also produce unexpected results and poor grouping.

 [align=center]
Additional Details
The discussion above is adequate to cover most archer’s concerns regarding uphill/downhill shooting. The following text is intended for those more technically inclined who wish to have a more complete understanding of the principals involved in adjusting for uphill/downhill shooting. While the math can be intimidating, the principals themselves are not that difficult and shouldn’t require any advanced mathematical skills to follow.
You will notice that there is no reference to arrow speed in the basic description above. However, arrow speed does have an effect on how much you have to adjust for uphill/downhill shots. The following paragraphs describe how arrow speed impacts uphill/downhill shooting.
Horizontal Arrow Speed
If you chronograph your bow at 250 fps that does not mean that your arrow will travel toward the target at 250 fps. Figure 5 illustrates this point. When you lower your sight to compensate for arrow drop you cause the bow to aim above the target (in the case of Figure 5, 10 degrees above the target). This means that when the arrow leaves your bow it is travelling at 250 fps in a line 10 degrees above the target (Drop Angle). If the arrow is travelling at 250 fps at some point 10 degrees above the target, it cannot be travelling toward the target at 250 fps. The Horizontal Arrow Speed can be calculated as follows:
[/align][align=center]

Initial Arrow Speed * COS(Drop Angle) = Horizontal Arrow Speed
250 * COS(10) = 246.2 fps
[/align][align=center]
On a level shot, Horizontal Arrow Speed is always something less than your Chronograph Speed because you have to compensate for arrow drop by pointing your arrow above the horizontal line to the target as shown in Figure 5. If you’re still with me, understanding why uphill and downhill shots are different should be easy. Figure 6 shows an archer shooting the same range as Figure 5, but the target is 10 degrees uphill. The sight position hasn’t changed so the Drop Angle remains at 10 degrees. However, your arrow is now pointed 20 degrees (Launch Angle) above horizontal because the target is 10 degrees uphill and you have a 10 degree Drop Angle. You would calculate Horizontal Arrow Speed for this case as follows:
[/align][align=center]
Initial Arrow Speed * COS(Launch Angle) = Horizontal Arrow Speed
250 * COS(20) = 234.9 fps
[/align][align=center]
Your arrow loses over 11 fps in horizontal speed relative to a level shot. Now lets take the case of a 10 degree downhill target, as shown in Figure 7. Again, the sight position hasn’t changed so the Drop Angle remains at 10 degrees. However, your arrow is now pointed 0 degrees (Launch Angle) above horizontal because the target is 10 degrees downhill. In this case, your horizontal arrow speed is 250 fps for a gain of almost 4 fps relative to a level shot. For both the 10 degree uphill and 10 degree downhill shot, the arrow must travel the same distance to the target. However, the horizontal arrow speed for downhill shots is always faster than for uphill shots. This means that it takes longer for the arrow to travel the same distance for an uphill shot vs. a downhill shot.
This difference in horizontal arrow speed for uphill/downhill shots means that to properly adjust Arrow Drop for uphill/downhill shots, you shoot for something greater than the horizontal range for uphill shots and something less than the horizontal range for downhill shots. This brings up another much debated point. Do you ever have to add range for uphill shots? The answer to this question really has two parts. You do add range for uphill and downhill shots for very short range targets (under 15 yards) because of rapidly changing Parallax Error as described above.
For ranges greater than 15 yards, the only time you have to add range for uphill shots is when you are shooting a slow bow for a shallow uphill at a long range. For example:
[/align][align=center]
Bow Speed 200 fps
Range 100 Yards
Uphill 5 Degrees
Add ¾ Yard
[/align][align=center]
As you can see in this extreme example you only need to add ¾ yard. Compare this to an average speed bow:
[/align][align=center]
Bow Speed 250 fps
Range 100 Yards
Uphill 5 Degrees
Set your sight for 100 Yards


 [/align][align=center]
Why do you adjust more for slow bows vs. fast bows? Because with a slow bow you must aim higher (larger Drop Angle) to compensate for arrow drop. The larger the Drop Angle, the more speed you lose for uphill shots as shown in the calculations above.
AAPalm compensates for all of these factors when adjusting for uphill/downhill shots. Without this tool, only experience shooting on demanding uphill/downhill ranges can prepare you for the challenges of competition.
[/align]
http://www.archersadvantage.com/TipSheets/UpDownHill.htm
[/size][/font]Shooting[/size][/font]
By Perry Ratcliff © 1999
The Basics
One of the most debated topics in archery is how to properly adjust for uphill/downhill shots. The most common rule given is that you set your sight for the horizontal component of the range. For example, if you were shooting a 60 yard uphill/downhill shot at a 20 degree angle, you would set your sight for 56.4 [COS(20°) * 60 ~ 56.4] yards regardless of whether the target is at an uphill or downhill angle. Figuring out Angles and Cosines on the range is tough enough, but even so this method does not work under many conditions. To understand how to adjust for uphill/downhill shots you need to understand what you are adjusting for when setting your sight. We all know that as the range increases, you must lower your front sight to compensate for the Arrow Drop. However, you are not adjusting simply for Arrow Drop. You are also adjusting for Parallax Error.
Parallax Error
When you aim your bow, your aiming eye is typically not behind the nock of your arrow(See Figure 1). Your aiming eye (or peep) is usually several inches above the shaft of the arrow, which introduces a sight offset referred to as Parallax Error. This Parallax Error varies depending on the range to target. In both Figures 1 & 2 the arrow is pointed directly at the target. In these figures, the sight is also adjusted to point directly at the target. Notice how the sight is relatively high on the sight for long ranges and very low on the sight for short targets. This sight movement, or Parallax Error, is opposite of how you adjust your sight for Arrow Drop. At ranges beyond 20 yards, Parallax Error changes very slowly with range and is hardly noticeable. However, at ranges below 15 yards Parallax Error changes very rapidly. You can see this effect when you have to move your sight backwards, or down the sight, as you get closer to the target (for ranges under 15 yards). In fact, to shoot a 2 yard target, it is not uncommon to have to set your sight for somewhere between 60 and 70 yards. This odd movement of the sight is due entirely to Parallax Error. The amount of Parallax Error for any given range is determined by how high your peep sight (or aiming eye) is relative to the arrow shaft and the distance between your peep sight and aperture of your front sight. Bow speed has nothing to do with Parallax Error or the strange things that happen at very short ranges. You would observe these same changes in sight settings with a high speed rifle if the rear sight was placed 4 or 5 inches above the barrel of the rifle.
Arrow Drop
Figures 3 & 4 show sight placement with the aiming eye directly behind the nock of the arrow (no parallax error). When the target is close, the sight is relatively high on the sight and when the target is far, the sight is very low on the sight. As described above, this is opposite of the movement associated with Parallax Error.
Sight Setting
When you set your sight, you are compensating for both the Arrow Drop and Parallax Error associated with the range you are about to shoot. Why spend so much time discussing Parallax Error and Arrow Drop when the topic is adjusting for uphill/downhill shots? Because the general rule of adjusting for the horizontal component of the range doesn’t work for both Arrow Drop and Parallax Error. Adjusting Arrow Drop for the horizontal component of the range is a fairly accurate way to compensate for uphill/downhill shots (more on this later) but Parallax Error is always equal to the slant (or measured) range to the target. Unfortunately, you do not know what part of your sight setting is associated with Arrow Drop and what part of your sight setting is associated with Parallax Error. The good news is that Parallax Error changes very slowly at ranges beyond 20 yards and can be generally ignored when adjusting for uphill/downhill shots. However, at ranges below 15 yards, Parallax Error changes very rapidly. This rapid change in Parallax Error means that at these ranges, if you adjust your sight for the horizontal component of the range you will almost certainly miss high in the target. There are only two good ways to adjust for uphill/downhill shots. One is to practice as often as possible shooting many different ranges at various angles to get a feel for how to adjust your sight. This can be difficult for people who live in relatively flat areas and only occasionally travel to hilly ranges. The second is to useAAPalm and a Clinometer (angle measuring device available at surveyor supply houses). The Archer’s Advantage Pocket Computer always knows what part of your sight setting is associated with Arrow Drop and what part of your sight setting is associated Parallax Error. This information, along with an uphill/downhill angle provided by a Clinometer, allows the AAPalm to accurately adjust for uphill/downhill shots at any range or angle.
Archer Induced Errors
It is important to maintain good form for uphill-downhill shots. There are several common form breaks that can cause your arrows to shoot differrent than expected on uphill-downhill shots. The most common problem is for the archer to adjust for uphill-downhill shots by raising or lowering the bow arm instead of bending at the waist. Bending at the waist for uphill-downhill shots allows you to maintain consistent draw length and a consistent sight picture for these shots. Failure to adjust by bending at the waist can change your draw length and alter your sight picture. Either of these problems will show up in where your arrows group in the target. It is not uncomon for archers to heel the bow for uphill shots. This will also produce unexpected results and poor grouping.
Additional Details
The discussion above is adequate to cover most archer’s concerns regarding uphill/downhill shooting. The following text is intended for those more technically inclined who wish to have a more complete understanding of the principals involved in adjusting for uphill/downhill shooting. While the math can be intimidating, the principals themselves are not that difficult and shouldn’t require any advanced mathematical skills to follow.
You will notice that there is no reference to arrow speed in the basic description above. However, arrow speed does have an effect on how much you have to adjust for uphill/downhill shots. The following paragraphs describe how arrow speed impacts uphill/downhill shooting.
Horizontal Arrow Speed
If you chronograph your bow at 250 fps that does not mean that your arrow will travel toward the target at 250 fps. Figure 5 illustrates this point. When you lower your sight to compensate for arrow drop you cause the bow to aim above the target (in the case of Figure 5, 10 degrees above the target). This means that when the arrow leaves your bow it is travelling at 250 fps in a line 10 degrees above the target (Drop Angle). If the arrow is travelling at 250 fps at some point 10 degrees above the target, it cannot be travelling toward the target at 250 fps. The Horizontal Arrow Speed can be calculated as follows:
[/align][align=center]
Initial Arrow Speed * COS(Drop Angle) = Horizontal Arrow Speed
250 * COS(10) = 246.2 fps
[/align][align=center]
On a level shot, Horizontal Arrow Speed is always something less than your Chronograph Speed because you have to compensate for arrow drop by pointing your arrow above the horizontal line to the target as shown in Figure 5. If you’re still with me, understanding why uphill and downhill shots are different should be easy. Figure 6 shows an archer shooting the same range as Figure 5, but the target is 10 degrees uphill. The sight position hasn’t changed so the Drop Angle remains at 10 degrees. However, your arrow is now pointed 20 degrees (Launch Angle) above horizontal because the target is 10 degrees uphill and you have a 10 degree Drop Angle. You would calculate Horizontal Arrow Speed for this case as follows:
[/align][align=center]
Initial Arrow Speed * COS(Launch Angle) = Horizontal Arrow Speed
250 * COS(20) = 234.9 fps
[/align][align=center]
Your arrow loses over 11 fps in horizontal speed relative to a level shot. Now lets take the case of a 10 degree downhill target, as shown in Figure 7. Again, the sight position hasn’t changed so the Drop Angle remains at 10 degrees. However, your arrow is now pointed 0 degrees (Launch Angle) above horizontal because the target is 10 degrees downhill. In this case, your horizontal arrow speed is 250 fps for a gain of almost 4 fps relative to a level shot. For both the 10 degree uphill and 10 degree downhill shot, the arrow must travel the same distance to the target. However, the horizontal arrow speed for downhill shots is always faster than for uphill shots. This means that it takes longer for the arrow to travel the same distance for an uphill shot vs. a downhill shot.
This difference in horizontal arrow speed for uphill/downhill shots means that to properly adjust Arrow Drop for uphill/downhill shots, you shoot for something greater than the horizontal range for uphill shots and something less than the horizontal range for downhill shots. This brings up another much debated point. Do you ever have to add range for uphill shots? The answer to this question really has two parts. You do add range for uphill and downhill shots for very short range targets (under 15 yards) because of rapidly changing Parallax Error as described above.
For ranges greater than 15 yards, the only time you have to add range for uphill shots is when you are shooting a slow bow for a shallow uphill at a long range. For example:
[/align][align=center]
Bow Speed 200 fps
Range 100 Yards
Uphill 5 Degrees
Add ¾ Yard
[/align][align=center]
As you can see in this extreme example you only need to add ¾ yard. Compare this to an average speed bow:
[/align][align=center]
Bow Speed 250 fps
Range 100 Yards
Uphill 5 Degrees
Set your sight for 100 Yards
Why do you adjust more for slow bows vs. fast bows? Because with a slow bow you must aim higher (larger Drop Angle) to compensate for arrow drop. The larger the Drop Angle, the more speed you lose for uphill shots as shown in the calculations above.
AAPalm compensates for all of these factors when adjusting for uphill/downhill shots. Without this tool, only experience shooting on demanding uphill/downhill ranges can prepare you for the challenges of competition.
[/align]
08-16-2008 | 11:45 PM
#7
Thread Starter
Joined: Aug 2008
Posts: 43
Likes: 0
From:
Some people said that if you climb a tree to 15 feet and have a shoot at a deer that is 15 yards away from the base of the tree that you are getting further away from your target and the distance would be longer(which they proved to be true by math and that distance was 17.84 yards), and you are saying that the shot stays the same than how can you disprove the there fact.