
|
instructional thread for capping and cresting your own arrows!
OK, I've been thinking about doing this for quite some time as a lot of questions get asked around here about capping and cresting. In light of that, I've put together a little step-by-step instructional on just a basic, no-frills approach to getting a good-looking arrow that most any bowhunter would be proud of.
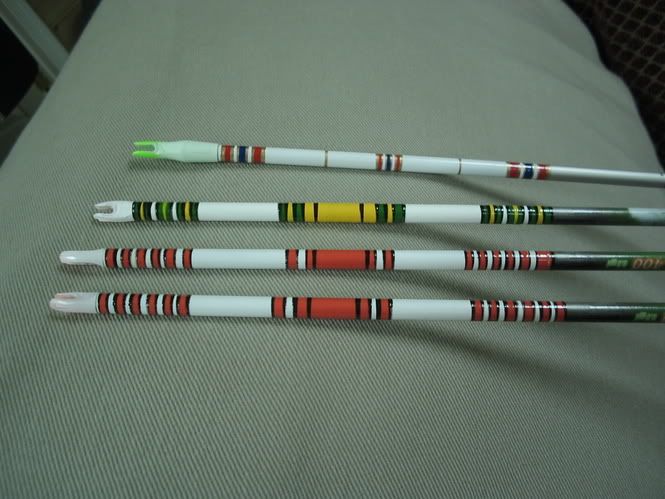
To start with, you're going to need a cresting machine. Bohning offers one for around $130, but I found some awesome plans for making your own forless than$20. They can be viewed at: http://www.stickbow.com/stickbow/arrowbuilding/cresting.html Here's how mine turned out: 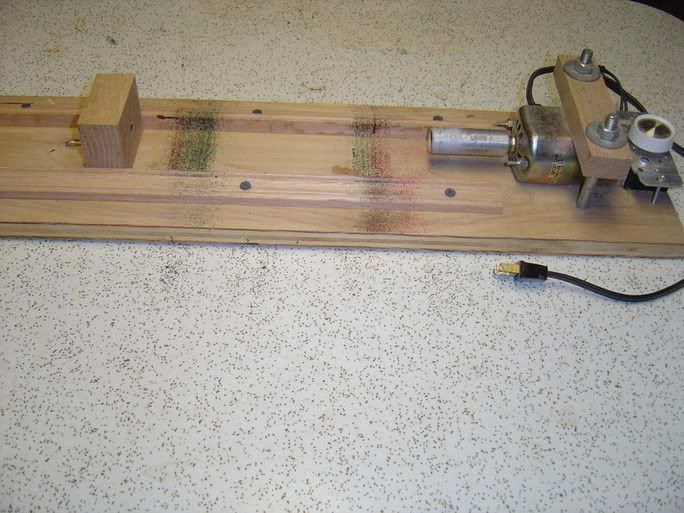 You'll notice the one upgrade I permitted myself from the plans on stickbow.com was that I neglected to use the piece of surgical tubing as a coupler, instead opting to actually order the chuck which comes with the Bohning kit. You can order it separately for $7-8, I think. I think it would be well worth it, considering this is the piece that actually comes in contact with the arrow. You may also notice that I decided against using a "V" block as the plans show, and instead chose to use a solid block of oak with a hole drilled out at the precise height to hold my arrow level. I just didn't want to have to worry about my arrow "bouncing" out of the V block; the solid block with a hole in the middle holds the shaft absolutely secure. Here's a length-wise view looking down the machine: 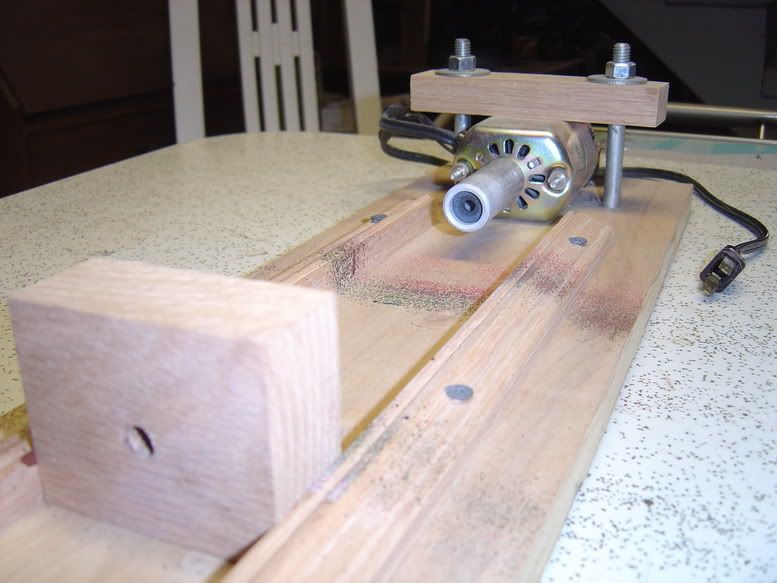 That view also gives you a great shot at the sewing-machine motor. I was very pleasantly surprised to find it available at a local sewing machine repair shop for $5 -- just like stickbow.com said I would be able to! You can see in the first photo that I attached a simple variable resistor as a speed control, even though I have only used it at its slowest speed that I can dial it down to. These little babies hum! After stripping the old fletching and any wraps or anything of the sort off, I gently sand my shaft with 150-grit sandpaper, followed up by a rigorous going-over with 320-grit. 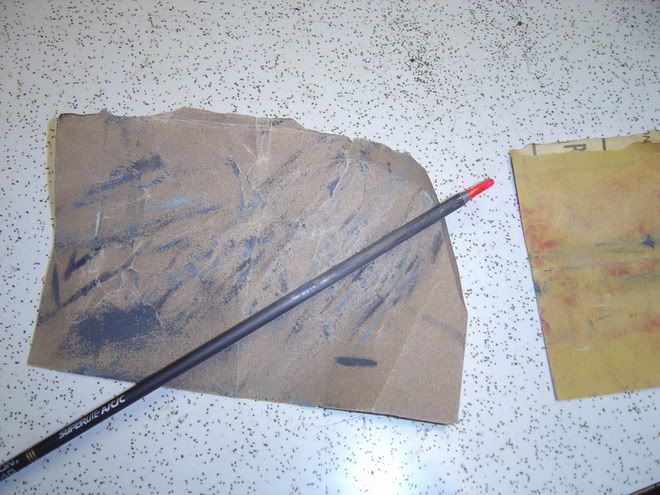 The next step (after cleaning off the residual dust with a wet paper towel and drying it off) is to mask off where you want your cap to stop. I like mine to come just up to the arrow rest, but not go past it; that way, when I'm sitting in the stand during a hunt, all my gloss white is kinda hid behind the bow and against my body, if that makes sense. 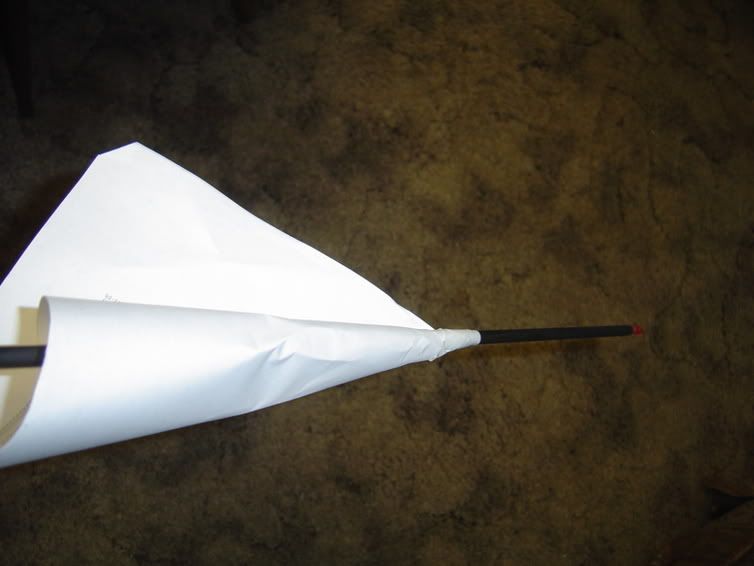 I first place a small strip of masking tape perpendicular to the shaft where I want the cap to stop, then I tape on a piece of copy paper or anything that's handy to stop the overspray. I use just the cheapest gloss white enamel spray that Wal-Mart sells; I think it costs like .97 cents a can. The key is to lay down a couple thin coats. This stuff dries fast and hard; there's no use putting it on thick, and your arrow will look a lot better by putting on a few thin coats. You'll also keep from getting a thick line where your masking tape is. This was one coat: 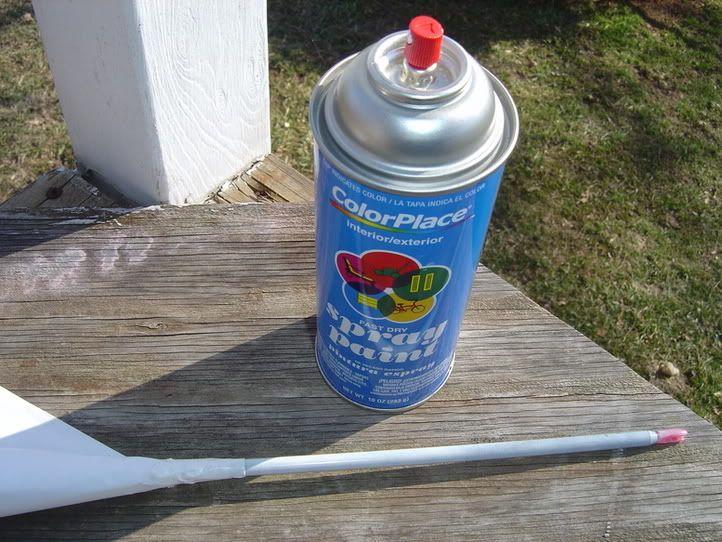 Here's the arrow after a couple coats ready for cresting: 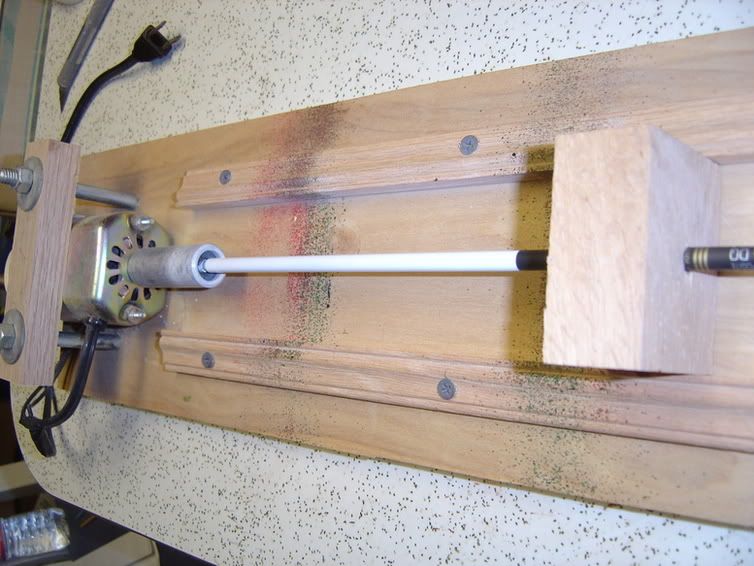 You'll only need a few basic supplies; it's really amazing how cheaply you can do this. A broader brush to lay down the wide cresting and a smaller pointed brush for pinstriping is all I use. You can see I use the little Testor's bottles that model-builders use. The toothpics are for stirring up the paint after it's sat for a while: 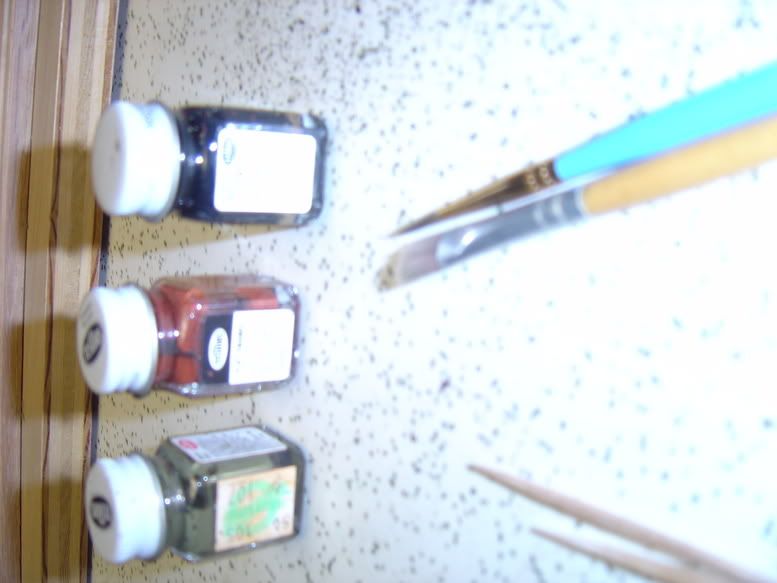 Here's the first band of paint; I try to cover the "line" where the capping ended on the arrow shaft: 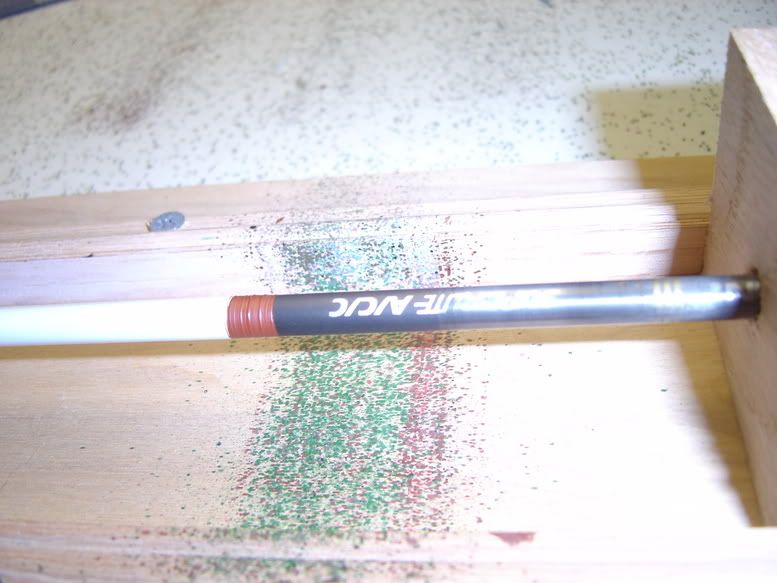 I will tell you that I've had both my brushes and paint waaaay too long; I'd get much better results if I'd just go buy some fresh bottles of paint and a couple new brushes. Probably wouldn't cost but about $5, and I'd be good for another couple years. Oh -- another bit of advice: You can see here that I literally just guess where the next band of color needs to be applied, simply because I don't want to clean out the brown and then put green on, and vice versa. If I had just one more wide brush the same width as the one I'm applying the brown with here, I could alternately put the brown on, then the green, then the brown... and so on -- without having go guess where the green will end when I'm done: 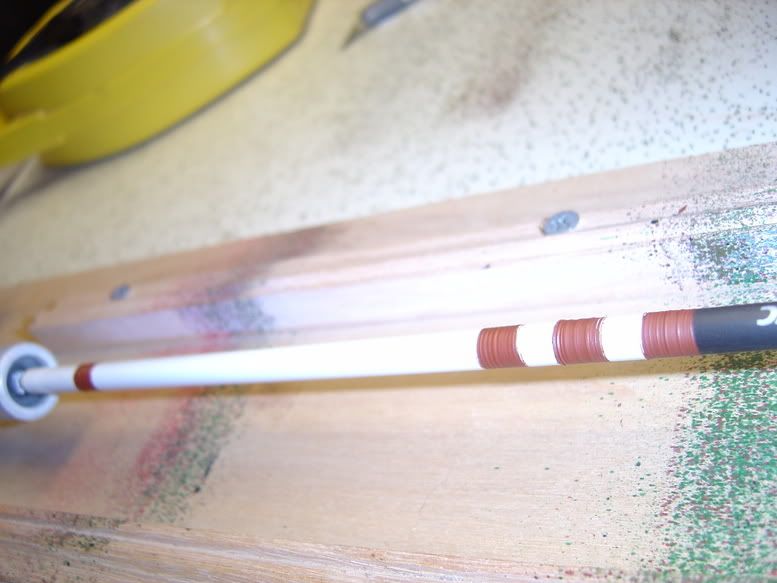 Here, I'm laying down the green between the brown bands. Like I said, my brush is about shot, and my paint is too old to get good results. This is actually the worst-looking job I've done, but I really wasn't going for a finished product as much as I wanted to capture the process; I'll show youhow they usually turn out at the end: 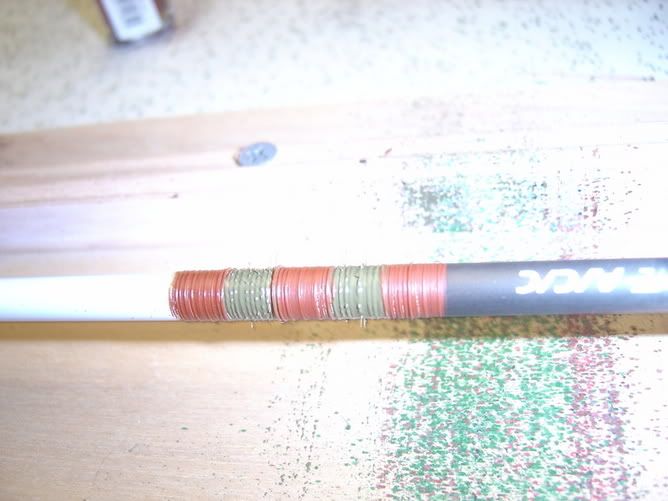 Here's where you can start to see your work taking shape; pinstriping between the bands makes all the difference in the world, in my opinion. It really cleans it up:  Here the crest is after all the pinstriping is laid down: 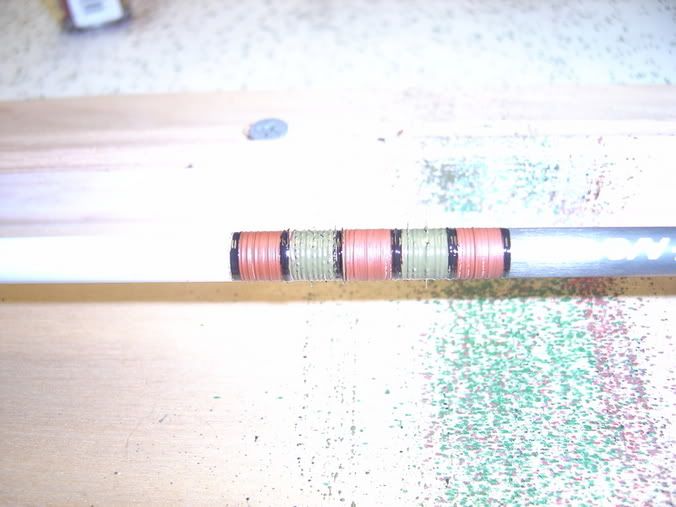 Keep in mind that my big brush is shot; that's where all the little fibers sticking out of the paint all over the place comes from. Here's the finished product. I think we'd all agree I'm not going to win any "most artistic" awards for my cresting efforts; that was never the goal. As a pure bowhunter, I wanted something that gave me a sense of pride and craftsmanship, but more importantly allowed me to find my arrows easily once I got down from my stand and hit the forest floor -- but didn't have neon colors. The white caps really stand out when they're stuck in the ground; I've never had any problem finding them, and my other colors of course allow me to keep my "camo" theme going. 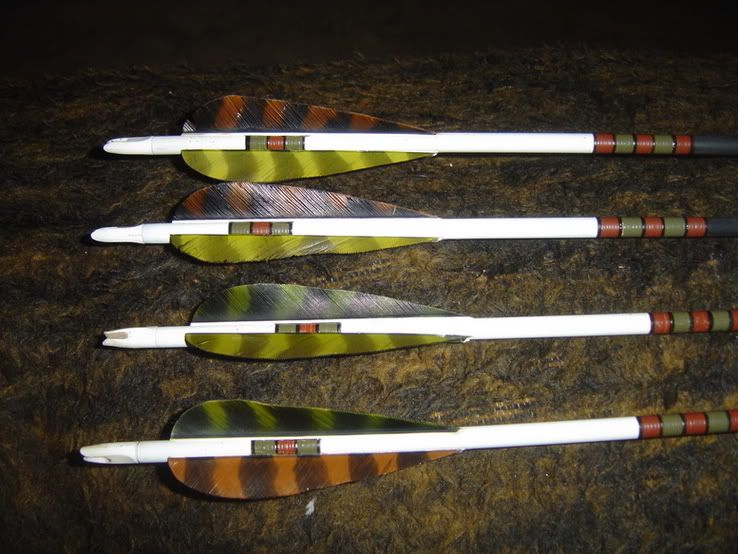 I was taught by some of the people in the "Traditional" forum here to fletch with Duco; it's a common household glue that comes in a greentube similar -- but much bigger -- to Super Glue. It costs about three or four bucks. I let my capping/cresting dry overnight, and then fletch them all up the next day. I've had some of these babies that I have honestly had four or five pass-throughs with. I just wash the blood off the feathers, let them dry out, and stick them back in my quiver. There is absolutely no adhesion worries... Obviously, with some time, effort, and ingenuity, you can do lots more with the basic principles outlined here. God bless, and good hunting!! |
RE: instructional thread for capping and cresting your own arrows!
Woo Hoo!! I have been waiting for this post!!
Thanks for the input, along with the time spentand dedication toposting this for us beginning arrow makers!! |
RE: instructional thread for capping and cresting your own arrows!
Thanks Greg, I used an old drill motor with variable speedwhen I used to crest my arrows. It sure is a lot of fun, I just have so much other things I really don't have time for that anymore... I've also made my own jig to cut arrows, I use that quite a bit. I still have my cresting jig, maybe one day, I do some more.
Thanks again, I am sure this will help those interested in cresting, it's very informative. (Good Job) |
RE: instructional thread for capping and cresting your own arrows!
Great thread. Thank you very much for the info.
|
RE: instructional thread for capping and cresting your own arrows!
Great thread here and pretty good looking arrows.
A little tip if I may.......... You will get much smoother bands if you thin down the paints to almost a water consistancy. |
RE: instructional thread for capping and cresting your own arrows!
Fantastic thread Greg and fantastic job...you might have me getting into this myself...I wish I could see all the pics but at a 24K dial up at home, it ain't happening...I'll check out all the photos on work on Monday with DSL....lol great job...I've always wanted to do this myself.
|
RE: instructional thread for capping and cresting your own arrows!
good informative post. thanks
|
RE: instructional thread for capping and cresting your own arrows!
Great post Greg. I plan on trying this myself soon and this will be
a good reference. |
RE: instructional thread for capping and cresting your own arrows!
Ok, but how do you get the stripes in the same place on all dozen arrows?
|
RE: instructional thread for capping and cresting your own arrows!
Ok, but how do you get the stripes in the same place on all dozen arrows? I actually only measure where I place the masking tape on the arrow shaft where I want the cap to end; each length of cap is exactly the same on all arrows. Then, when I lay down that first band of paint, I have it end with just the smallest amount of overlap from the cap onto the arrow shaft; that covers up any "edge" or "line" that's there from spray painting the cap onto the shaft. (As I said earlier, if you lay down at least two or three thin coats as opposed to one heavy coat, it will minimize this greatly.) As I just use the width of the brush as the exact width of my cresting bands, they all stay pretty much the same size/length -- as long as I make the same pattern on every shaft, of course. For the little crest that I make down where my fletching is, I have sometimes layed a piece of paper on the surface of my cresting machine with "tick" marks with a pencil... That way, as I'm leaning over the top of the shaft and about to lay on a strip of paint, I can look down and line up where I'm about to place the brush with the pencil mark. |
RE: instructional thread for capping and cresting your own arrows!
bump for Trembow...
|
RE: instructional thread for capping and cresting your own arrows!
Okay back at work with DSL and now I can look at all the pictures....fantastic job Greg...great post as well...I may have some questions later when I go to build one myself.....
|
RE: instructional thread for capping and cresting your own arrows!
Sweet! Thanks Greg! When I get home I'm gonna print the page out!
I'll be hitting you with questions, please have patience with me? :eek:;) |
RE: instructional thread for capping and cresting your own arrows!
No prob, trembow, no prob...
Plenty of people had patience with me just to get me to be able to do what you see here... ;) |
RE: instructional thread for capping and cresting your own arrows!
Seriously this is awesome! I just copied it over to a word document and I'm printing it out. I'm gonna hit wally world on the way home and I have to find a sewing machine repair shop nearby.
This, plus my new Switchback is going to help get me over the rough bow season I had last year and the severe lack of fishable ice we have around here now. I don't want to be all ***** or nothin, but you may have saved someone's life you know?!! Most likely it's the life of some poor unsuspecting shmuck who will cut me off on Route 495....I'll make sure he thanks you! :D |
RE: instructional thread for capping and cresting your own arrows!
Put ya in that good a mood that you're willing to forgive someone for cutting you off? Wow! That's high praise... ;):D
|
RE: instructional thread for capping and cresting your own arrows!
Bump for myself! ...(I'm gonna add some of my OWN pictures soon)
|
RE: instructional thread for capping and cresting your own arrows!
Cool, trembow! I can't wait to see 'em! :)
|
RE: instructional thread for capping and cresting your own arrows!
Hey Greg, great thread! also thanks for the good info you provided over on my thread about bucks and dressed weights.. good stuff...ty again
|
RE: instructional thread for capping and cresting your own arrows!
Okay, submitted for your review, my first ever crested arrows using the method described right here in this thread. These were my absolutely first few attempts so be kind!
  Once I got all the parts, it took me about 30 minutes to throw together my cresting machine. Notice I didn't post any pictures of it? I suppose had I taken my time: 1. It would look like a bit more than a sewing machine motor screwed down to an old shelf. 2. My "v block" would be higher so as to help make perpendicular lines. |
RE: instructional thread for capping and cresting your own arrows!
WOW!!!!! Wow, wow, wow! :D:D:D
Those are AWESOME-LOOKING!!! Are you sure those are your first few attempts? I feel kinda like a proud papa who watches his boy get his first hit in a baseball game or something! ;):) |
RE: instructional thread for capping and cresting your own arrows!
Yeah, those are awesome looking.
Man, I think I am going to go out and make that cresting machine this weekend. Rip the old fletching off of my Gold Tips and get to work!! |
RE: instructional thread for capping and cresting your own arrows!
Greg, I have a couple of questions. First off, I had never even heard of capping and cresting arrows. The purpose is just for self enjoyment and better arrow retrieval right? I'm guessing flourescent vanes will no longer be needed w/ capped and crested arrows?
Notice how Trembow has his crests close to the nock end? His go all the way around and yours do not. Does that matter or is it just a different style? I shoot easton c2 realtree hardwood HD arrows. Would cresting be a good idea for this type of arrow? Thanks for the help.:) |
RE: instructional thread for capping and cresting your own arrows!
nice i might have to try this
|
RE: instructional thread for capping and cresting your own arrows!
The purpose is just for self enjoyment and better arrow retrieval right? Secondarily, I love how my custom cresting job sets me apart from other hunters, and sort of identifies me as a "serious" bowhunter. And, third, yes -- it's just fun to put your own personal touch on your hunting equipment, and gives you something to do in the offseason. Does that matter or is it just a different style? I shoot easton c2 realtree hardwood HD arrows. Would cresting be a good idea for this type of arrow? Thanks for the help.:) |
RE: instructional thread for capping and cresting your own arrows!
I appreciate your quick response. I am going to gather the materials this week and start the project. This will also give me a good excuse for buying a fletching jig. Thanks again.
If I have any more questions I will be sure to notify you. ;) |
RE: instructional thread for capping and cresting your own arrows!
This will also give me a good excuse for buying a fletching jig. |
RE: instructional thread for capping and cresting your own arrows!
trembow, those look incredible. I have GOT to get one of those. I like my wraps, but not like that!
|
RE: instructional thread for capping and cresting your own arrows!
Thats the brand I was looking at a couple months ago. This past hunting season I was shooting arrows with a 1 degree offset (maybe even straight) but was curious about the helical vanes. Does the bitzenberger jig have different clamps that you can buy for it?
Edit: I did some research and answered my own question. Thanks for the reccomendation. |
RE: instructional thread for capping and cresting your own arrows!
Thanks for the compliments fellas! The red/white/blue one was actually my first. I'm making a set of those for my daughter who just started lessons last week. I'm still experimenting and haven't decided on a pattern for myself yet.
I haven't actually shot any of them yet either. I just got my bitz the other day and fletched my arrows up with blazers and my daughters with red and blue 4" plastifletch. We'll see how well things hold up, tonight maybe! The Bitz is really easy to use once you figure it out, the instructions seem weird at first, but once you follow them they start to make sense. I had never fletched an arrow before either but I found it was very easy and straightforward with the bitz. |
RE: instructional thread for capping and cresting your own arrows!
ORIGINAL: Greg / MO WOW!!!!! Wow, wow, wow! :D:D:D Those are AWESOME-LOOKING!!! Are you sure those are your first few attempts? I feel kinda like a proud papa who watches his boy get his first hit in a baseball game or something! ;):) |
RE: instructional thread for capping and cresting your own arrows!
For those wondering about building a cresting machine, here was my breakdown for parts/cost:
Platform: Old shelf taken down during renovation: $0 Sewing machine motor at repair shop: $10 (mine actually had an intact mounting bracket that I just bent straight and used drywall screws to mount it.) Surgical tubing, 1 foot @ 1.99/foot: $1.99 Vblock made from scrap knotty pine: $0 Testors model paints: $3.99 Fine brush: $1.99 Spray paint: $0.95 2 sheets of sandpaper $ 0.59 ea: $1.18 Rubber furniture feet: $2.99 Foam strip for vibration dampening from A/C $0 Rheostat for speed control $6.00 Total cost to get started: $29.09 Total time to build mine 45 minutes (including getting the vice out of the garage and bringing it downstairs, straightening out the bracket, ensuring that the motor worked before mounting and re-reading the rheostat wiring instructions so that I didn't smoke anything.;):D) Other tools you will need: Pliers for pulling nocks (needlenose) Blade for stripping (boxcutter) Joint compound bucket to sit on. Something to stick the arrows into to dry, I'm using a triangular cardboard shipping box I got my superslams in. I hope I can get really good at arrow building. I can definitely see myself doing this for a living! DARE TO DREAM! :D |
RE: instructional thread for capping and cresting your own arrows!
Okay, first snag:
Testing out my fletched arrows I have found that Duco may not be the ideal adhesive, perhaps at least not for sub-freezing temps. Three shots each had most of my vanes popping off and taking a bit of paint with some of them. Perhaps I need to seal with something hard and use an adhesive that's a little more temp tolerant? |
RE: instructional thread for capping and cresting your own arrows!
Hmmm... sorry to hear that. I've never had adhesion problems with Duco. I know it's sub-freezing where you're shooting them at, but did they at least have a chance to dry overnight inside a warm house somewhere? Like I said, I've literally re-used and re-used the same arrow after pass-through after pass-through, and the feathers are stuck on as good as when I took them out of my fletching jig.
If you indeed allowed the glue to dry inside, I'm not sure... Maybe experimentation time? :)You could spray a clear sealer of some kind over your artwork... Or use a different glue... And we can always turn to the guys in the Trad forum for help... |
RE: instructional thread for capping and cresting your own arrows!
THe fletchings were added after about 3 days drying time. Now one interesting point is if you read the can of spray paint, it says to re-coat within four hours or after like two weeks or something to prevent lifting.
HOw long would you say you wait between capping and then cresting and then fletching? After fletching, they all were allowed to dry indoors at about 65 - 68 degrees for at least a couple days each. I'll have to try and come up with a good set of vectors for an experiment. I mean, if I'm going to try and do this for a living, I should try and get it right :D:D:D |
RE: instructional thread for capping and cresting your own arrows!
Wow! Great job fellas and a nice thread Greg.....got me interested. I have one question and because I am lazy this morning I am asking it here. Why Duco and not something like Fletchtite Platinum? Is it because of the chemical base in the paint will not adhere using the fletching glue?
|
RE: instructional thread for capping and cresting your own arrows!
Golly, Trembow... sounds as if you did everything you could have!
I'd say I usually wait a day or so between capping and cresting. Everything else sounds like you waited at least as long as I do on the various steps; I don't see where you're incurring any problem at all. Now I do do a couple coats on my capping like I said, and -- who knows -- maybe I have waited for the advertised four hours between those coats merely by getting busy and not even realizing it. Coug, I have no idea. Like I stated way back on page one when I originally did the thread; that's what was suggested to me by the folks over in the trad forum. For some reason, it's not working as well for Trembow? Maybe the glue you suggested will solve Trembow's problems... |
RE: instructional thread for capping and cresting your own arrows!
[:o][>:] Well, it's gotta be something I'm doing or not doing. I had two other arrows I fletched without capping or cresting and on both of them at least one vane pulled right off with very minor "flicking". Actually, I had two blazers pull off of the new set of PSE Xweave Predators I just bought too...Maybe it's the blazers? They were factory fletched!
So my question is, is there something I should do to either a Blazer or AAE Elite vane (acetone?) before fletching with them? I gotta go search the tech and trad forums now... |
RE: instructional thread for capping and cresting your own arrows!
Yep, you're fletching with a different material than I've ever used... I only fletch with feathers, so maybe that's why Duco was suggested to me.
|
RE: instructional thread for capping and cresting your own arrows!
UPDATE:
I picked up some Loc-Tite super glue 2. This is a "new" super glue which is supposed to be better on plastics including polyethelyene and polystyrene. Anyone know what Blazers are made out of? [&:] Anyhow, as long as I get good coverage with both the "activator" and the glue, the vanes are on SOLID. Can't pull them off without serious effort and they all survived a midnight target session ast about 11 degrees F. I did also wash each shaft with warm water and a spot of dishwahing liquid and then wiped down with clean warm water and then dried thoroughly before fletching. I have a bottle of goat tuff on order en route as we speak. |
| All times are GMT -8. The time now is 07:45 AM. |
Copyright © 2026 MH Sub I, LLC dba Internet Brands. All rights reserved. Use of this site indicates your consent to the Terms of Use.