


First Steps to Accurizing T/C Omega
 11-19-2010 | 09:06 AM
#1
Thread Starter
Fork Horn
Joined: Nov 2009
Posts: 126
Likes: 0
From: Tennessee
Thought I'd post about how I reworked the wimpy synthetic stock on my Omega. Now it's a real shooter. After ML season I'll be pillar glass bedding.
1) I took a 1" wooden dowel, wrapped it with 120 grit sandpaper and sanded out the barrel channel.
2) Changed the sandpaper grit to fine grit to smooth out the sanding.
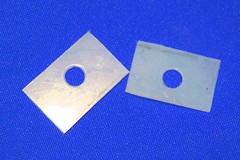
3) I cut shims from a plastic coffee can top that fit in the lug pockets. The shims measured .0480 thick.
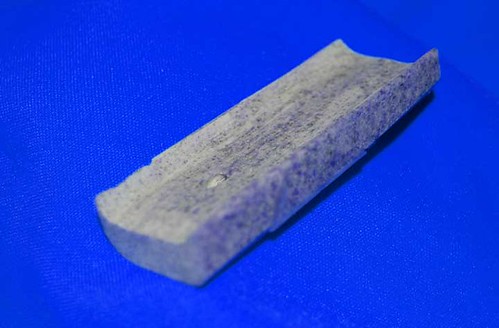
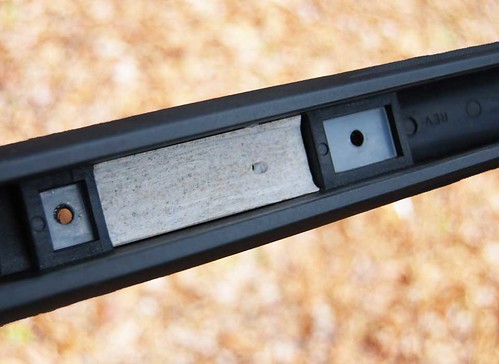
4) I fashioned a block from a piece of Corian left from my kitchen counter top & shaped it & to fit between the two lug pockets.
The small hole is so I could remove the block when fitting it.
This strengthens the flex of the stock. A block of Hard Wood will work as well.
5) Held it in place with a small dab of hot glue.
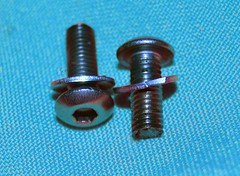
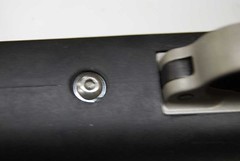
6) The front lug screw was too short because of the addition of the shims, so I got a couple of stainless button socket head 10-32 x 3/4 screws & small washers from the local hardware to replace the the original screws. Should have got a 1/2" screw for the rear lug. I had to cut it off with my Dremel. I did have to cut of a few threads on the front lug screw so it the ramrod would side in.
The socket head is better for torquing.
7) torqued the screws to 30 lbs with my Wheeler Engineering FAT Wrench.
������
My groups when from 3" to a 4 shot 1" at 100yrds. This afternoon I expect to at least put a fat doe on the ground.
�������
1) I took a 1" wooden dowel, wrapped it with 120 grit sandpaper and sanded out the barrel channel.
2) Changed the sandpaper grit to fine grit to smooth out the sanding.
3) I cut shims from a plastic coffee can top that fit in the lug pockets. The shims measured .0480 thick.
4) I fashioned a block from a piece of Corian left from my kitchen counter top & shaped it & to fit between the two lug pockets.
The small hole is so I could remove the block when fitting it.
This strengthens the flex of the stock. A block of Hard Wood will work as well.
5) Held it in place with a small dab of hot glue.
6) The front lug screw was too short because of the addition of the shims, so I got a couple of stainless button socket head 10-32 x 3/4 screws & small washers from the local hardware to replace the the original screws. Should have got a 1/2" screw for the rear lug. I had to cut it off with my Dremel. I did have to cut of a few threads on the front lug screw so it the ramrod would side in.
The socket head is better for torquing.
7) torqued the screws to 30 lbs with my Wheeler Engineering FAT Wrench.
������
My groups when from 3" to a 4 shot 1" at 100yrds. This afternoon I expect to at least put a fat doe on the ground.
�������
Last edited by thom2; 11-19-2010 at 12:17 PM.
 11-21-2010 | 05:43 PM
#6
Thread Starter
Fork Horn
Joined: Nov 2009
Posts: 126
Likes: 0
From: Tennessee
If anyone has the time could they explain to me how does this modification help accuracy?
Relieving this pressure by sanding out the stock barrel channel and add shims to raise the barrel eliminates this problem.
This video references wood stocks but the same principle works with synthetic stock.
This video will help you understand.
http://www.youtube.com/watch?v=MGEh_GYgZqk
11-22-2010 | 09:49 AM
#7
Nontypical Buck
Joined: Nov 2009
Posts: 1,475
Likes: 0
From: Virginia
Nice job. Question though, isn't sanding out the barrel channel and using the shims redundant? i.e. if you sanded out the barrel channel so that the stock didn't touch the barrel, why do you need shims?
How much weight did that Corian add?
How much weight did that Corian add?
11-22-2010 | 10:19 AM
#8
Thread Starter
Fork Horn
Joined: Nov 2009
Posts: 126
Likes: 0
From: Tennessee
isn't sanding out the barrel channel and using the shims redundant? i.e. if you sanded out the barrel channel so that the stock didn't touch the barrel, why do you need shims?
How much weight did that Corian add?
How much weight did that Corian add?
The piece of Corian added about 4 ounces.
11-22-2010 | 11:05 AM
#9
Banned
Joined: Dec 2008
Posts: 9,186
Likes: 0
From: Boncarbo,Colorado
With the Accura, you wont have to do any mods on the stock, they use a heavier synthetic stock.
11-22-2010 | 11:53 AM
#10
Thread Starter
Fork Horn
Joined: Nov 2009
Posts: 126
Likes: 0
From: Tennessee
The only rifles I own with a forearm stocks are a Browning 1885 (45-70) and a Ruger No. 1 (270 cal).
But I've floated the barrel of every other long stock rifle I own, and pillar bedded a few for increased accuracy.
