


Posting Photos - A Tutorial
 10-13-2006 | 02:08 PM
#1
Thread Starter
Nontypical Buck
Joined: Aug 2004
Posts: 2,464
Likes: 0
From: Northern Illinoise
Well, you asked for it, so here it is!
There are two methods for posting images on HuntingNet.com. One involves uploading and embedding the photo into your post, meaning the photo is hosted on the HuntingNet.com server. The second involves linking to a photo that you have hosted somewhere else. First, we'll start with uploading your photo to HNI and inserting it into your post.
This is a pretty easy one, but you must understand that all photos can be no larger than 300KB when uploading them to the site. For those of you with digital cameras or using high resolution scanners you will need to resize your photos or they will NOT upload. For those of you who do not have a photo editing program like Photoshop or Fireworks, there are a lot of free image resizing tools out there. For example, Picasa, PIX Resizer, and Microsoft Image Resizer.
Once your photo is resized you want to click the link that says "Click here to upload!" directly underneath where you are typing your post.

When you click that link, you are going to get a box that looks like this:

Now you need to browse for the image on your computer, then select it.

Once your photo has been selected you simply click the "OK" button, and your photo has been uploaded to our server.

Only a few more steps and you're done! In order to make sure the photo is embedded in your post, and not simply linked you need to make sure the "Embed picture in post" box is checked.

Now you're ready to submit your post with your pictures attached for the world to view!
There are two methods for posting images on HuntingNet.com. One involves uploading and embedding the photo into your post, meaning the photo is hosted on the HuntingNet.com server. The second involves linking to a photo that you have hosted somewhere else. First, we'll start with uploading your photo to HNI and inserting it into your post.
This is a pretty easy one, but you must understand that all photos can be no larger than 300KB when uploading them to the site. For those of you with digital cameras or using high resolution scanners you will need to resize your photos or they will NOT upload. For those of you who do not have a photo editing program like Photoshop or Fireworks, there are a lot of free image resizing tools out there. For example, Picasa, PIX Resizer, and Microsoft Image Resizer.
Once your photo is resized you want to click the link that says "Click here to upload!" directly underneath where you are typing your post.
When you click that link, you are going to get a box that looks like this:
Now you need to browse for the image on your computer, then select it.
Once your photo has been selected you simply click the "OK" button, and your photo has been uploaded to our server.
Only a few more steps and you're done! In order to make sure the photo is embedded in your post, and not simply linked you need to make sure the "Embed picture in post" box is checked.
Now you're ready to submit your post with your pictures attached for the world to view!

 10-13-2006 | 02:36 PM
#3
Thread Starter
Nontypical Buck
Joined: Aug 2004
Posts: 2,464
Likes: 0
From: Northern Illinoise
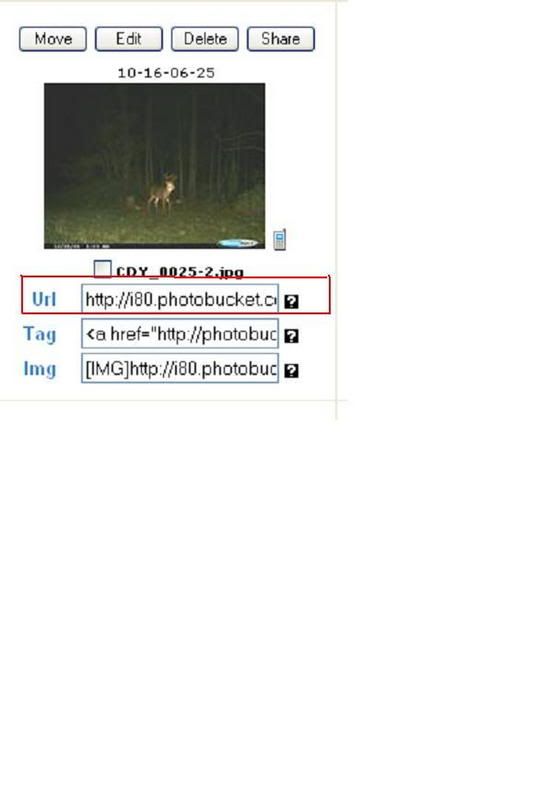
Now for the second method - using your own host.
There are a lot of great free image hosting sites out there such as PhotoBucket and Kodak Easy Share gallery among others. In fact, a lot of these hosting sites now include the HTML tags you need to embed in your postto make your pictures show up. However, we'll go through the steps anyways.
First off, you need to get your file to wherever you're going to host it. Once it's there, click the insert image button at the top of the text box. It's the yellow button with the mountain on it.

Once you click that button a window will pop up, prompting you for the location of your image. The easiest way to insert the exact URL is to copy and paste it from a browser window, however if you know the exact path to the image and the exact image name, you can type it in here.

Then you simply click OK and magically your image is inserted into your post!
Now it's party time!
There are a lot of great free image hosting sites out there such as PhotoBucket and Kodak Easy Share gallery among others. In fact, a lot of these hosting sites now include the HTML tags you need to embed in your postto make your pictures show up. However, we'll go through the steps anyways.
First off, you need to get your file to wherever you're going to host it. Once it's there, click the insert image button at the top of the text box. It's the yellow button with the mountain on it.
Once you click that button a window will pop up, prompting you for the location of your image. The easiest way to insert the exact URL is to copy and paste it from a browser window, however if you know the exact path to the image and the exact image name, you can type it in here.
Then you simply click OK and magically your image is inserted into your post!
Now it's party time!
 05-26-2007 | 04:34 AM
#7
Super Moderator
Joined: Jan 2004
Posts: 7,490
Likes: 8
From: Wisconsin
While I understand this - what is the code we can use.
In the past I used " or " (minus the qoutes) and it does not seem to wrk now.
Do you have new code?
If so how do I type it in. I share many tipes on "How To' and usually keep it as a word file so I can easily p[aste it on other sites.
Thanks
JW!
In the past I used "
Do you have new code?
If so how do I type it in. I share many tipes on "How To' and usually keep it as a word file so I can easily p[aste it on other sites.
Thanks
JW!
07-22-2007 | 10:45 AM
#9
Dominant Buck
Joined: Feb 2005
Posts: 26,323
Likes: 0
From: WC FL
ORIGINAL: mbhutton
I have been wondering how to do this for a while now and there you have it. How do you get bigger pictures on there, just take them with lees quality i guess??
I have been wondering how to do this for a while now and there you have it. How do you get bigger pictures on there, just take them with lees quality i guess??