


Quick and simple ADL spiff-up job
 12-29-2014, 09:34 PM
#1
Nontypical Buck
Thread Starter
Join Date: Oct 2009
Location: Kansas
Posts: 3,902
I didn’t do a very good job taking pictures during this little project, but I thought I’d post it up anyway. There isn’t much gunsmithing involved in this one, just a simple project, but it does illustrate how well a VERY budget friendly rifle can be made into a personalized piece with a minimal investment.
My mother called me back in November about getting her significant other a rifle for Christmas. He’s not a shooter, nor hunter, but he wanted a 243win to keep handy around the farm and feedlot for opportunity shots on coyotes. His only frame of reference came from one of his cattle partners, and older fella that favors the Remington 700 over all others (not surprising, considering his age). She said she wanted to spend $500 or so, but not more than $700.00, with the scope included, but I had freedom to pick what brand would be the best deal.
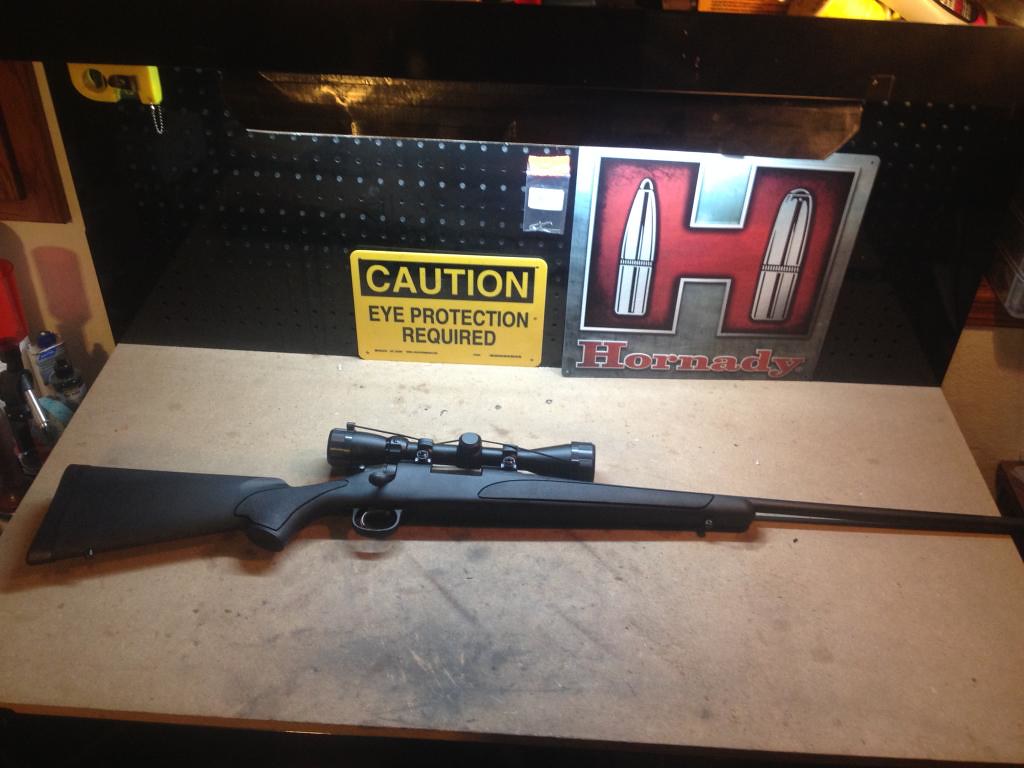
Right before Thanksgiving, Walmart dropped the Remington 700 ADL’s with a Bushnell Banner 3-9x40mm included down to $377, which beat all of the others on price, let alone he’d get to tell his cattle partner that it was, afterall, a Rem 700. So I picked it up, $377 sticker price, $410 after tax out the door.
Knowing that my mom’s boyfriend (seems odd to call a 60yr old man a “boy-friend”) wouldn’t be reloading, I picked up a few boxes of suitable “coyote killing” loads that I knew he’d be able to find readily at the shops near him, putting my hopes that the Winchester Varmint X 58grn bullet would shoot well for it. I checked the checked the boresighting of the scope and put a couple groups down range. The 58grn Varm-X bullets shot as well as anything else I tried, with all 4 loads grouping in the 1-1.2” ballpark.
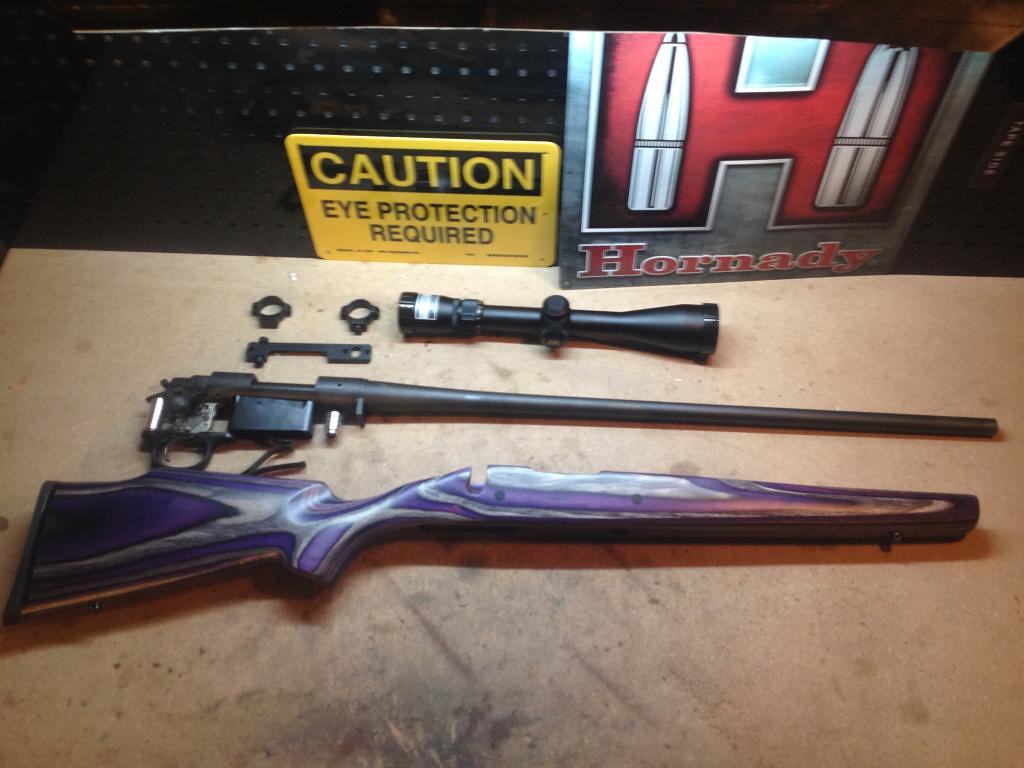
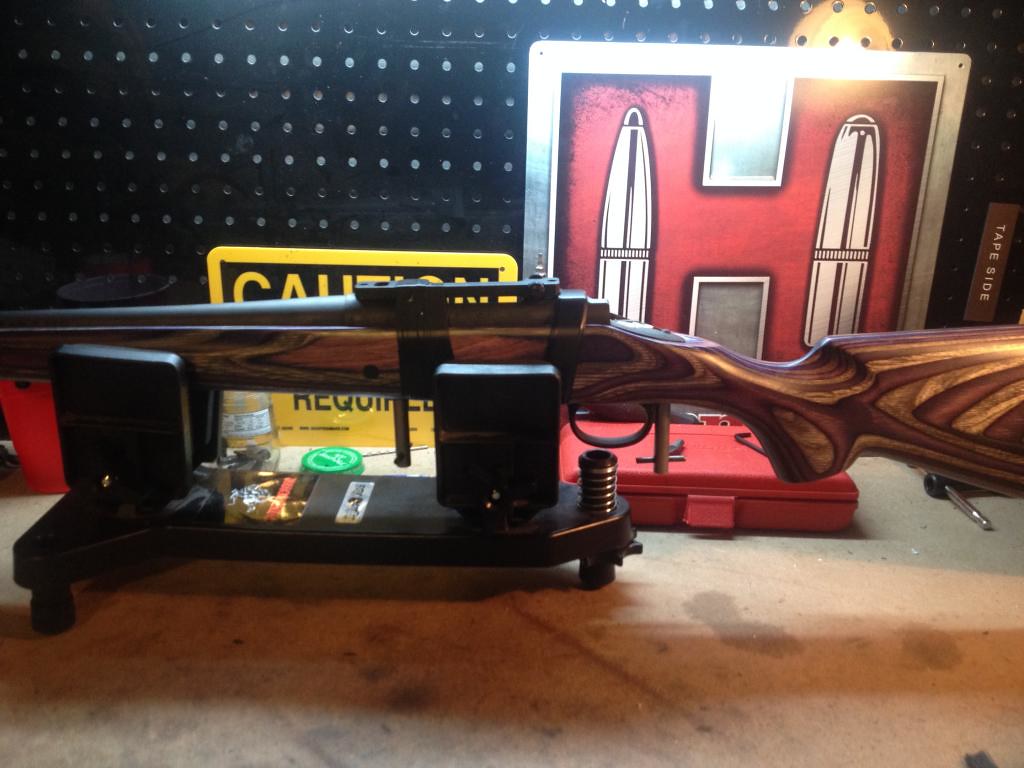
Like any of the Tupperware stocks on the market that I looked at, the ADL synthetic stock left a lot to be desired, and I recommended to my mom that if there was ONE THING we fixed, it would be that. I told her that I could add stiffeners and bed the synthetic stock, but then my sister suggested that since none of us ever know what to get him for Christmas, this year she and her husband would split a Boyd’s laminated “prairie hunter” stock with my wife and me for his Christmas present from us. And since all of our family are K-State grads, and he’s a big Wildcat fan, we picked purple and grey laminate. I also ordered a set of Score-High aluminum pillars to block the action. $97 base for the stock, $15 for custom color, and something around $15 to get it to my door, and another $30 to Midway for the pillars, good for about $160 total into the stock (plus a bit of Pro-Bed 2000 that I had on hand).
I had known what the Bushnell Banner scope would be like, since I use them on some of my rimfire rifles, which is serviceable, but not great. The range trip confirmed that the Banner that came with it was ok, but it wouldn’t be hard to do better with a bit of investment. Knowing that Nikon had recently discontinued the Buckmaster line, and that Cabelas had them on close-out for half price, I mentioned to my mom that the 3-9x40mm Buckmaster would be a great upgrade, at a REALLY good price. There’s nothing wrong with the 3-9x40 Bushnell Banner that was on it, but the 3-9x40mm Nikon Buckmaster, normally $259, is a considerably better scope. I also didn’t love the very cheap bases and rings that it came with, so I replaced them with a Leupold 1pc and Leupold rings. $129 for the Nikon Buckmaster 3-9x40mm, $60 into the Leupold 1pc base and rings, call it $190 towards optics.
The unfortunate part for me was that the stock arrived at 6pm on the Thursday before Christmas, and I was going to have to deliver it Tuesday so my mother could get it under the tree for him, including 3 nights of sequential epoxying followed by 2 days to let it cure before boresighting and live fire sighting it in. So I’ll apologize in advance that I got in a rush and didn’t get pictures through certain parts of the process.
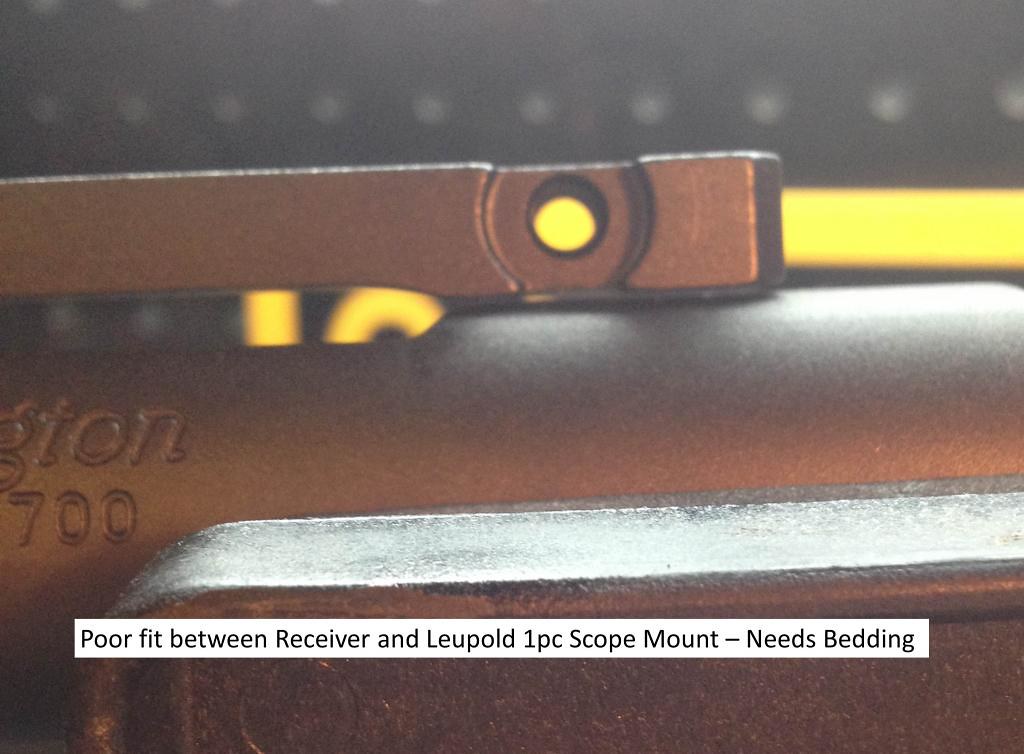
I started with the scope base. I immediately noticed that it wasn’t a great fit for the receiver, so when it was seated level to the receiver, it had a gap under the tail of the base.
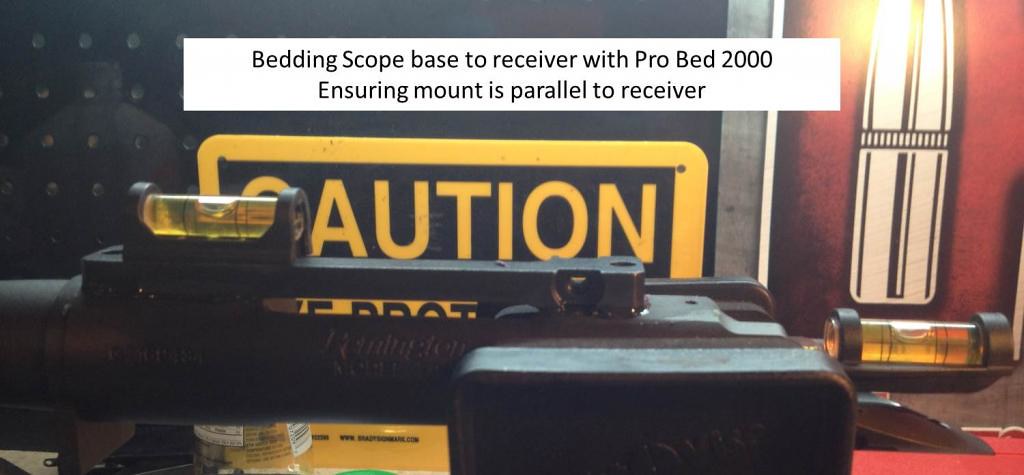
To remedy this, I used a bit of Pro-Bed 2000 and used the base screws, tightened only finger tight, to bed the mount to the receiver such that it would be level with the boltway. Of course, remembering to GENEROUSLY apply release agent to the receiver so that I wasn’t gluing the mount permanently in place. Once cured, they were torqued down with a Wheeler Fat Wrench to 28in.lbs. per the Leupold spec sheet.
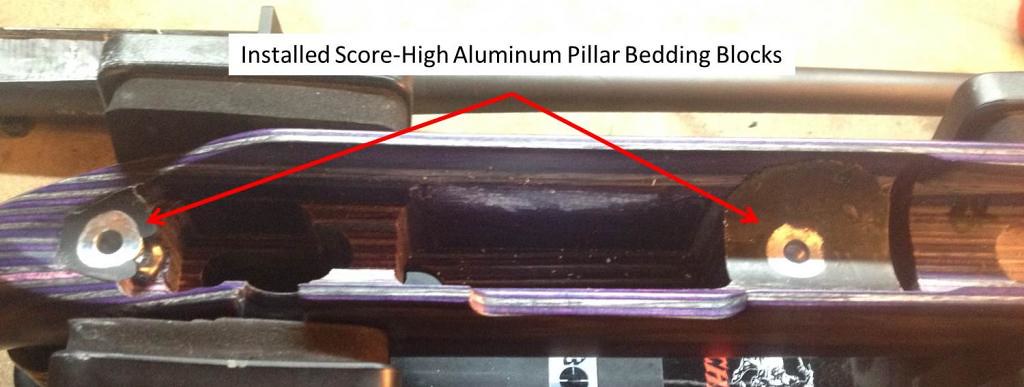
Next, I free floated the barrel channel generously, and installed the pillars in the stock. I used a Score High drilling fixture to bore out larger holes for the pillars, then glassed in the pillars (~$200-250 fixture that I already owned, plus a 5/8” drill bit, and a set of ~$30 Score-High thumb screws that also I already owned).
Unfortunately, in my rush to get this thing put back together, I didn’t get many pictures past that point, except for the final product that you’ll see below.
Once the pillars were set, I slightly enlarged the action inlet and barrel channel to bed the action, and do a full length skim bed of the barrel channel to help re-seal the stock after inletting. I used 4 layers of bedding tape on the barrel to ensure it would have sufficient free-float after adding back the skim bedding. Again, copious amounts of release agent were used on the barreled action to ensure it would release from the stock after bedding. After letting the bedding cure for 16hrs, I released some of the tension on the thumbscrews, and let them cure for 2days before any further work was done.
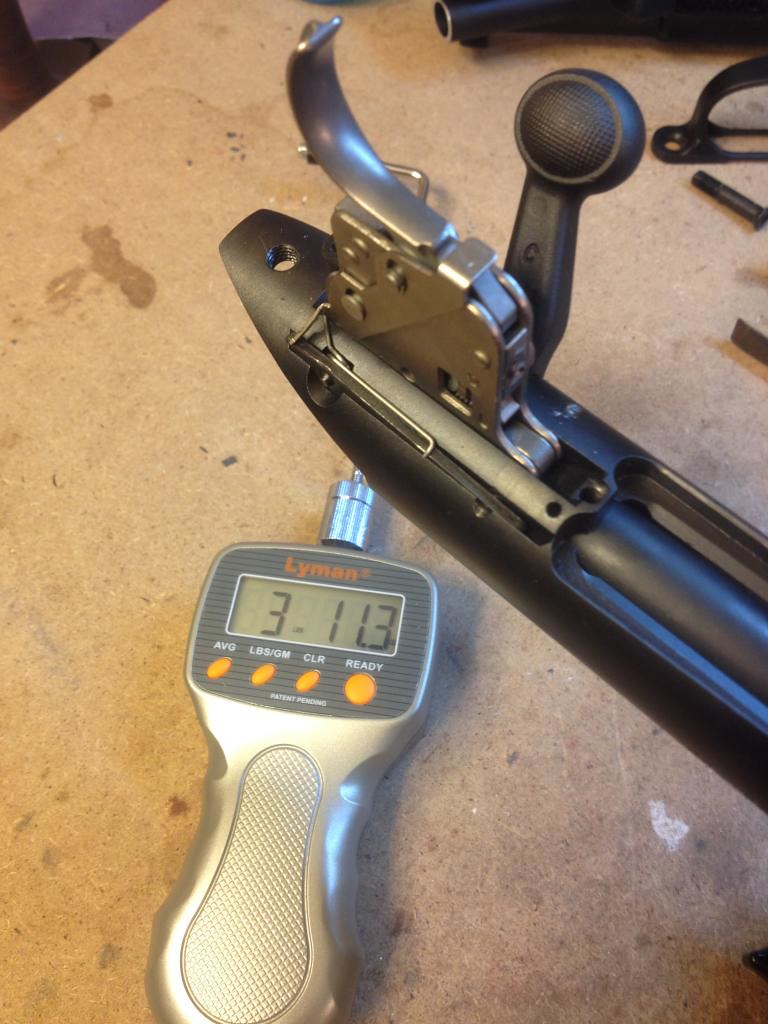
Once the bedding was cured, I pulled the action from the stock, removed the masking tape and clay, degreased to remove the release agent, then reassembled and lubricated the action. While I was working here, I turned the 8lb 7oz factory set trigger down to just under 4lbs.
Once everything was back in working order, I took the time to lap the locking lugs. I started by painting the lugs with Dykem, then working the action a few strokes. I was excited when I initially pulled it out, as the right hand lug had over 80% contact – then I noticed that the left hand lug didn’t have ANY witness mark. Assuredly, this action wasn’t going to have even lug pressure, since one lug wasn’t making contact at all! I started with 220grit lapping compound, then worked until I had over 50% contact on the left hand lug, and then worked down through 320grit and 600grit compound until I had what I’d eyeball to be around 90% contact on BOTH lugs. Since I had done so much working of the lug surfaces, I double checked the headspace with go and no-go gauges (that I already owned from rebarreling my wife’s Savage), and everything was still in spec. I’ll apologize again for not taking the time to take before and after pics of the witness marks on the locking lugs.
Since this was a quick turn-around job on a “minimum cost” feedlot rifle, that was the extent of the action job I had planned. Wasn't going to take the time or effort to blueprint the action then set-back and rechamber the barrel for a factory, standard weight barrel in a sub-$400 rifle, just to shoot coyotes at 0-200yrds a couple times a year.
I used a Wheeler ring aligning and lapping kit (that I’ve owned for several years) to install, align, and lap the Leupold rings to offer over 80% contact for a firm grip on the scope. I optically centered the scope, and used the windage adjustment on the Leupold base to bring it into horizontal alignment with the laser boresighter.
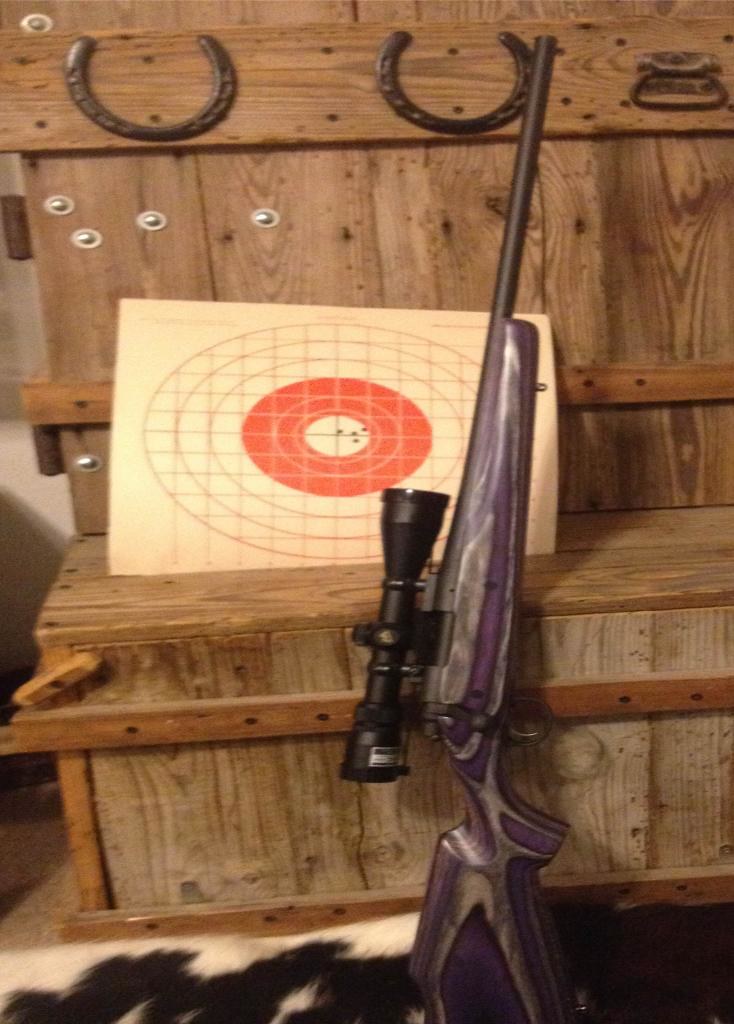
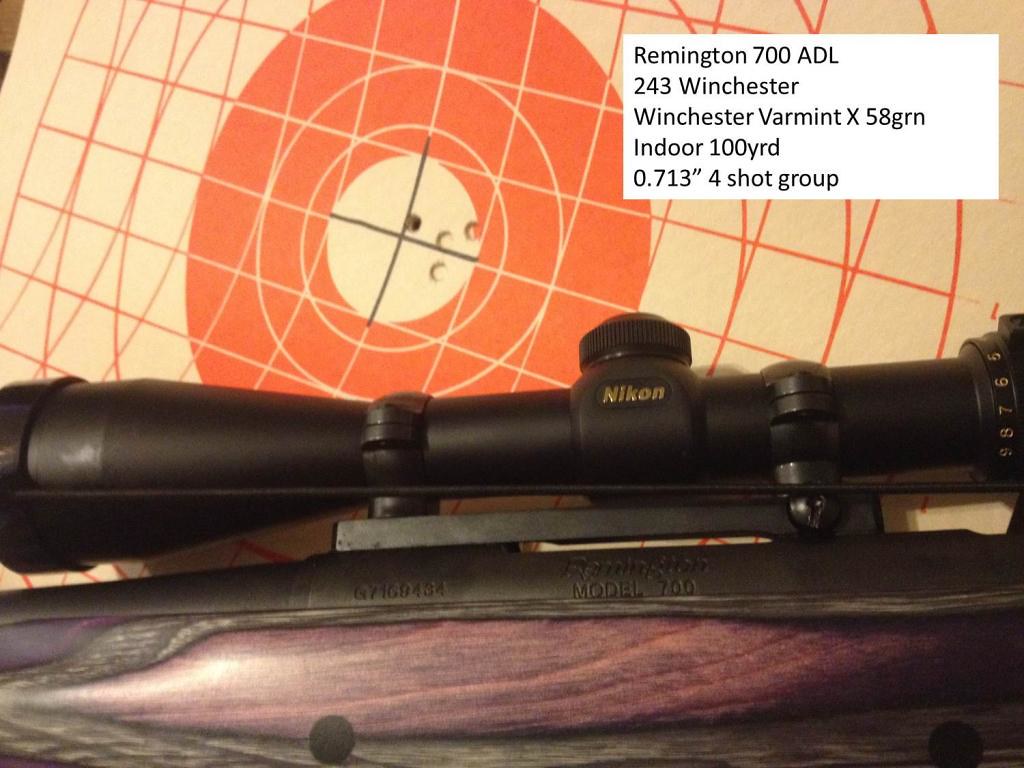
Then off to the range. I dialed 1.5” to make up for the scope height, then a half inch for drop over 50yrds, and took a test shot. 1” high and and 1” right. I used the FAT wrench to loosen the windage screw, put it back finger tight, then torqued the opposite side to spec to move it ever so slightly, and took another shot, dead center, 1” high. I dialed 1.5” down to account for my expected trajectory (should be about �” low at 50 for a 100yrd zero). I sent the target back to 100yrds, first shot was pretty close, so I sent 3 more (see group at end). Unfortunately, I only had time to shoot that one group, and had to fire a LOT faster than I would have liked because the range was closing and I had to get on the road to deliver it to my mother that evening. 4 shots into 0.72” at 100yrds, so considering it was 1-1.2” at 100yrds out of the box, at least I could be confident that I hadn’t screwed it up! I dialed over a half inch and threw one more shot on another target that landed under �” from the center, and had to be satisfied with that since the Range Officer had already been prodding me that “the range closed 10min ago”. I packed it up, ran home and cleaned it, took the obligatory completion pics, then hauled butt to deliver it to my mom in time for Christmas.
Putting 4 shots down range in under 2min had that standard weight barrel SMOKING hot to the touch, and I’m sure that between the heat and my hurried shots, the group wasn’t as good as it could be if I had more time, but it was certainly good enough for a feedlot rifle.
Project cost:
Not too bad for a sub-MOA rifle these days, with decent glass and an aftermarket stock.
My mother called me back in November about getting her significant other a rifle for Christmas. He’s not a shooter, nor hunter, but he wanted a 243win to keep handy around the farm and feedlot for opportunity shots on coyotes. His only frame of reference came from one of his cattle partners, and older fella that favors the Remington 700 over all others (not surprising, considering his age). She said she wanted to spend $500 or so, but not more than $700.00, with the scope included, but I had freedom to pick what brand would be the best deal.
Right before Thanksgiving, Walmart dropped the Remington 700 ADL’s with a Bushnell Banner 3-9x40mm included down to $377, which beat all of the others on price, let alone he’d get to tell his cattle partner that it was, afterall, a Rem 700. So I picked it up, $377 sticker price, $410 after tax out the door.
Knowing that my mom’s boyfriend (seems odd to call a 60yr old man a “boy-friend”) wouldn’t be reloading, I picked up a few boxes of suitable “coyote killing” loads that I knew he’d be able to find readily at the shops near him, putting my hopes that the Winchester Varmint X 58grn bullet would shoot well for it. I checked the checked the boresighting of the scope and put a couple groups down range. The 58grn Varm-X bullets shot as well as anything else I tried, with all 4 loads grouping in the 1-1.2” ballpark.
Like any of the Tupperware stocks on the market that I looked at, the ADL synthetic stock left a lot to be desired, and I recommended to my mom that if there was ONE THING we fixed, it would be that. I told her that I could add stiffeners and bed the synthetic stock, but then my sister suggested that since none of us ever know what to get him for Christmas, this year she and her husband would split a Boyd’s laminated “prairie hunter” stock with my wife and me for his Christmas present from us. And since all of our family are K-State grads, and he’s a big Wildcat fan, we picked purple and grey laminate. I also ordered a set of Score-High aluminum pillars to block the action. $97 base for the stock, $15 for custom color, and something around $15 to get it to my door, and another $30 to Midway for the pillars, good for about $160 total into the stock (plus a bit of Pro-Bed 2000 that I had on hand).
I had known what the Bushnell Banner scope would be like, since I use them on some of my rimfire rifles, which is serviceable, but not great. The range trip confirmed that the Banner that came with it was ok, but it wouldn’t be hard to do better with a bit of investment. Knowing that Nikon had recently discontinued the Buckmaster line, and that Cabelas had them on close-out for half price, I mentioned to my mom that the 3-9x40mm Buckmaster would be a great upgrade, at a REALLY good price. There’s nothing wrong with the 3-9x40 Bushnell Banner that was on it, but the 3-9x40mm Nikon Buckmaster, normally $259, is a considerably better scope. I also didn’t love the very cheap bases and rings that it came with, so I replaced them with a Leupold 1pc and Leupold rings. $129 for the Nikon Buckmaster 3-9x40mm, $60 into the Leupold 1pc base and rings, call it $190 towards optics.
The unfortunate part for me was that the stock arrived at 6pm on the Thursday before Christmas, and I was going to have to deliver it Tuesday so my mother could get it under the tree for him, including 3 nights of sequential epoxying followed by 2 days to let it cure before boresighting and live fire sighting it in. So I’ll apologize in advance that I got in a rush and didn’t get pictures through certain parts of the process.
I started with the scope base. I immediately noticed that it wasn’t a great fit for the receiver, so when it was seated level to the receiver, it had a gap under the tail of the base.
To remedy this, I used a bit of Pro-Bed 2000 and used the base screws, tightened only finger tight, to bed the mount to the receiver such that it would be level with the boltway. Of course, remembering to GENEROUSLY apply release agent to the receiver so that I wasn’t gluing the mount permanently in place. Once cured, they were torqued down with a Wheeler Fat Wrench to 28in.lbs. per the Leupold spec sheet.
Next, I free floated the barrel channel generously, and installed the pillars in the stock. I used a Score High drilling fixture to bore out larger holes for the pillars, then glassed in the pillars (~$200-250 fixture that I already owned, plus a 5/8” drill bit, and a set of ~$30 Score-High thumb screws that also I already owned).
Unfortunately, in my rush to get this thing put back together, I didn’t get many pictures past that point, except for the final product that you’ll see below.
Once the pillars were set, I slightly enlarged the action inlet and barrel channel to bed the action, and do a full length skim bed of the barrel channel to help re-seal the stock after inletting. I used 4 layers of bedding tape on the barrel to ensure it would have sufficient free-float after adding back the skim bedding. Again, copious amounts of release agent were used on the barreled action to ensure it would release from the stock after bedding. After letting the bedding cure for 16hrs, I released some of the tension on the thumbscrews, and let them cure for 2days before any further work was done.
Once the bedding was cured, I pulled the action from the stock, removed the masking tape and clay, degreased to remove the release agent, then reassembled and lubricated the action. While I was working here, I turned the 8lb 7oz factory set trigger down to just under 4lbs.
Once everything was back in working order, I took the time to lap the locking lugs. I started by painting the lugs with Dykem, then working the action a few strokes. I was excited when I initially pulled it out, as the right hand lug had over 80% contact – then I noticed that the left hand lug didn’t have ANY witness mark. Assuredly, this action wasn’t going to have even lug pressure, since one lug wasn’t making contact at all! I started with 220grit lapping compound, then worked until I had over 50% contact on the left hand lug, and then worked down through 320grit and 600grit compound until I had what I’d eyeball to be around 90% contact on BOTH lugs. Since I had done so much working of the lug surfaces, I double checked the headspace with go and no-go gauges (that I already owned from rebarreling my wife’s Savage), and everything was still in spec. I’ll apologize again for not taking the time to take before and after pics of the witness marks on the locking lugs.
Since this was a quick turn-around job on a “minimum cost” feedlot rifle, that was the extent of the action job I had planned. Wasn't going to take the time or effort to blueprint the action then set-back and rechamber the barrel for a factory, standard weight barrel in a sub-$400 rifle, just to shoot coyotes at 0-200yrds a couple times a year.
I used a Wheeler ring aligning and lapping kit (that I’ve owned for several years) to install, align, and lap the Leupold rings to offer over 80% contact for a firm grip on the scope. I optically centered the scope, and used the windage adjustment on the Leupold base to bring it into horizontal alignment with the laser boresighter.
Then off to the range. I dialed 1.5” to make up for the scope height, then a half inch for drop over 50yrds, and took a test shot. 1” high and and 1” right. I used the FAT wrench to loosen the windage screw, put it back finger tight, then torqued the opposite side to spec to move it ever so slightly, and took another shot, dead center, 1” high. I dialed 1.5” down to account for my expected trajectory (should be about �” low at 50 for a 100yrd zero). I sent the target back to 100yrds, first shot was pretty close, so I sent 3 more (see group at end). Unfortunately, I only had time to shoot that one group, and had to fire a LOT faster than I would have liked because the range was closing and I had to get on the road to deliver it to my mother that evening. 4 shots into 0.72” at 100yrds, so considering it was 1-1.2” at 100yrds out of the box, at least I could be confident that I hadn’t screwed it up! I dialed over a half inch and threw one more shot on another target that landed under �” from the center, and had to be satisfied with that since the Range Officer had already been prodding me that “the range closed 10min ago”. I packed it up, ran home and cleaned it, took the obligatory completion pics, then hauled butt to deliver it to my mom in time for Christmas.
Putting 4 shots down range in under 2min had that standard weight barrel SMOKING hot to the touch, and I’m sure that between the heat and my hurried shots, the group wasn’t as good as it could be if I had more time, but it was certainly good enough for a feedlot rifle.
Project cost:
- Remington 700 ADL in 243win w/ Tax: $410
- Nikon Buckmaster 3-9x40mm scope & Leupold 1pc base & Rings: $190
- Boyd’s Laminate stock w/shipping & Score-High pillars: $160
Not too bad for a sub-MOA rifle these days, with decent glass and an aftermarket stock.
Last edited by Nomercy448; 07-08-2017 at 12:52 PM. Reason: Screw Photobucket


