Well, I've noticed over the few years I've been on here that there's often questions from members on how to post pictures on the forum as well as how to post multiple images in one post. Seeing as I had some free time, I decided to make one fairly comprehensive step-by-step tutorial on how to post images in the forums so that they are embedded within your post and not as a downloadable attachment. Although I feel this is fairly complete, please feel to make comments/suggestion on how it can be improved. My goal is to hopefully provide a visual reference for those who always wanted to post pictures but never knew how. If there is enough interest, perhaps the powers that be (Mods

) may sticky this. I know it probably doesn't belong
just in the bowhunting forum, but I figured I would start here since I spend most of my time here. Enjoy.
*EDIT* : I've added a quick tutorial on resizing pictures using Photobucket's image editing tool at the bottom of this post... thanks to jmbuckhunter's request.***
Note: This tutorial is based off the Photobucket online image/video host. There are alternatives to this service, but since it is one of the most widely used, I included it. If anyone would like to see the process for other hosts, and want to add to it, feel free.
Step #1: First you need a Photobucket account. If you don't have one, simply go to
http://www.photobucket.com, and register a username. Once you have a username/password, simply login to Photobucket, and you should see a screen similar to mine below:
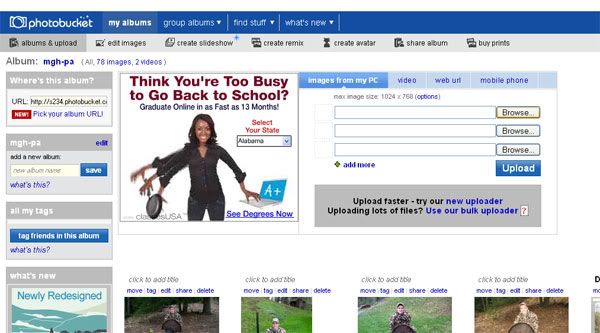 Step #2 (Uploading):
 Using the screen above, photobucket gives you several options for uploading. You can do three files at a time (as shown above), use the bulk uploader for mass file uploads, or you can click on the "video" tab for uploading video clips to photobucket. For now, we'll just stick with the default three file format as shown above.
Start by clicking the button that is labeled
BROWSE. You will see this dialog box appear:
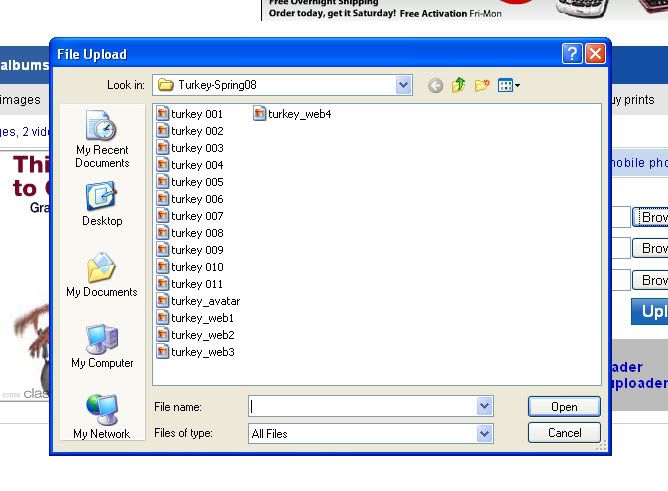
Simply browse to where your image is saved on your computer, click on the image, then click
OPEN.
Once you have added your files, your upload window should appear similar to mine below:
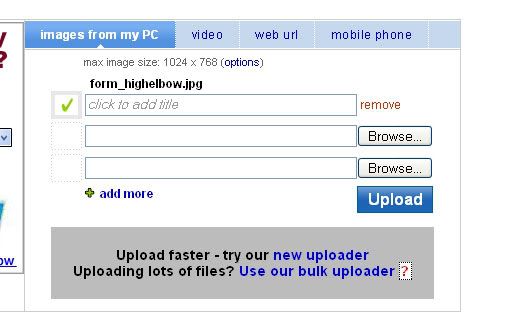
You can remove the image if you accidently selected the wrong one by clicking the red
REMOVE link next to each file. If you are satisfied with the images you selected, simply select the blue
UPLOAD button. The following progress window will then appear:
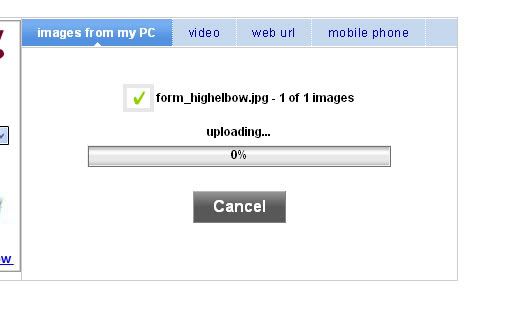
The bar will progress (depending on your internet connection and image size, the upload time will vary greatly) as the file uploads. Once the file has uploaded, you will be brought to screen that looks like this:
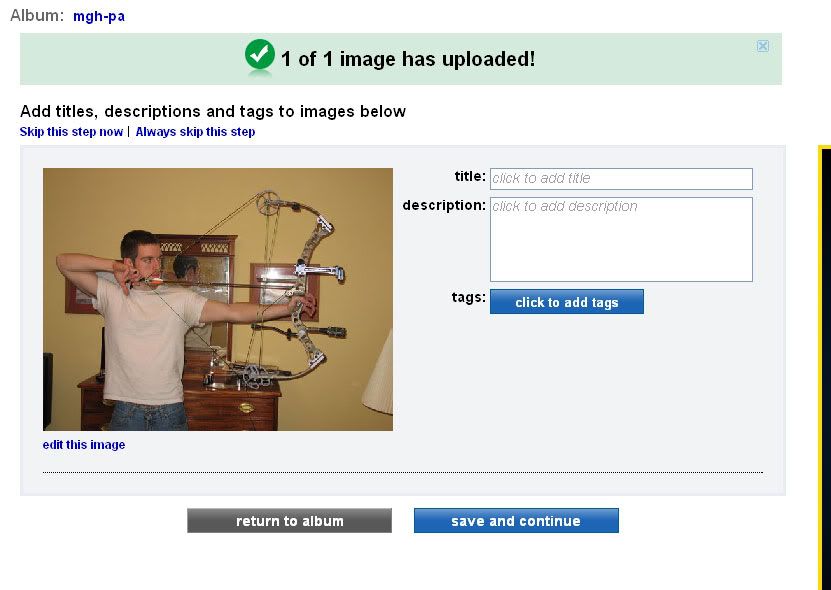
If you would like to add a title or description of the picture, simply enter them into the appropriate fields above, then click
SAVE AND CONTINUE. Once finished it will bring you to your album homepage that looks like this:
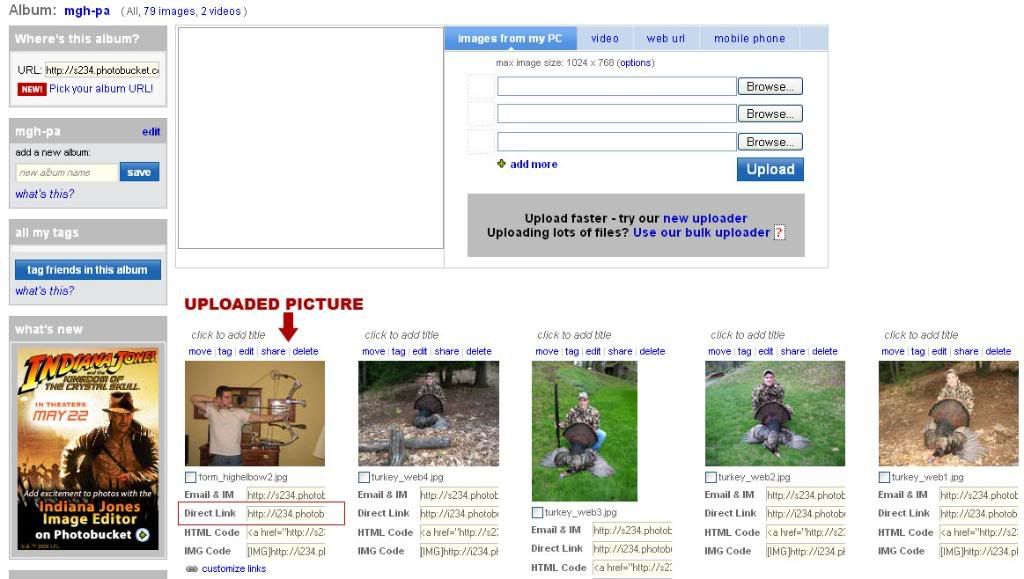
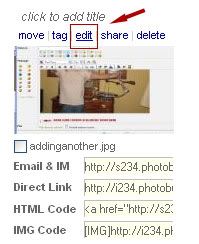
You will notice I've identified where your new pictures will appear in the album. The images you upload will always appear in the top left row (Depending on how many you uploaded, this may stretch across into the next row, etc). I've also identifed with a red box, the image code field you need to select and copy for inserting into posts on the forum...this field is named
DIRECT LINK. A closeup of what you need to do can be seen here:
Step#3 (Copying the Image):

Simply click your mouse into the
DIRECT LINK box under the picture you want to upload, then right click on your mouse, and your screen should look like this:
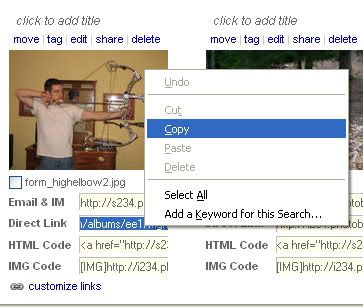
Select
COPY. Now, we can move on to our forum post.
Step #4 (Inserting/Embedding the picture into a post):
I'm going to forgo detailing how to make a new post on the HNI board assuming you all know how to do that by now
So simply create a new thread, and your dialog box will look like this:
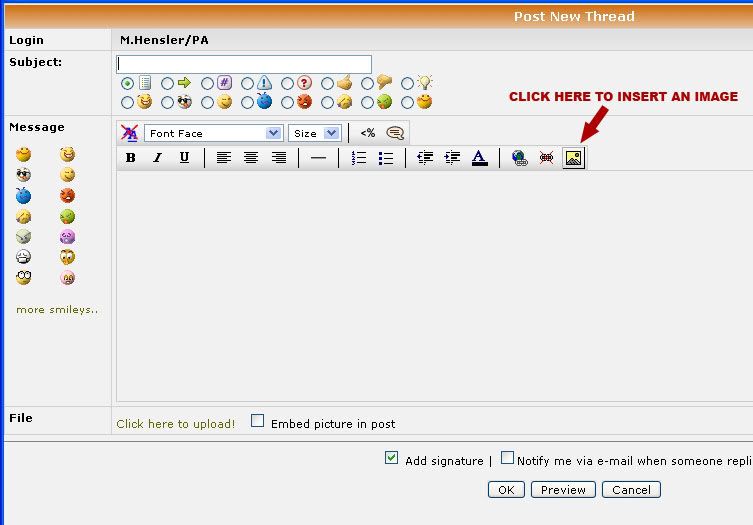
To insert an image into your post, you need to click the mountain icon I have identified in the picture above. Once you click this icon, the following window will appear:
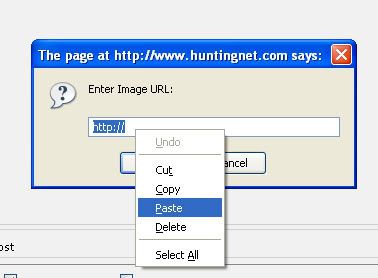
HNI's forum software already starts the image location string for you with an
HTTP://. Simply
right click in this field and choose
PASTE as illustrated in the picture above. You should then see your full image URL in the box as shown below:
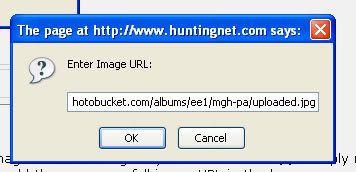
Simply click
OK, and you should now see your picture in the post window like below:
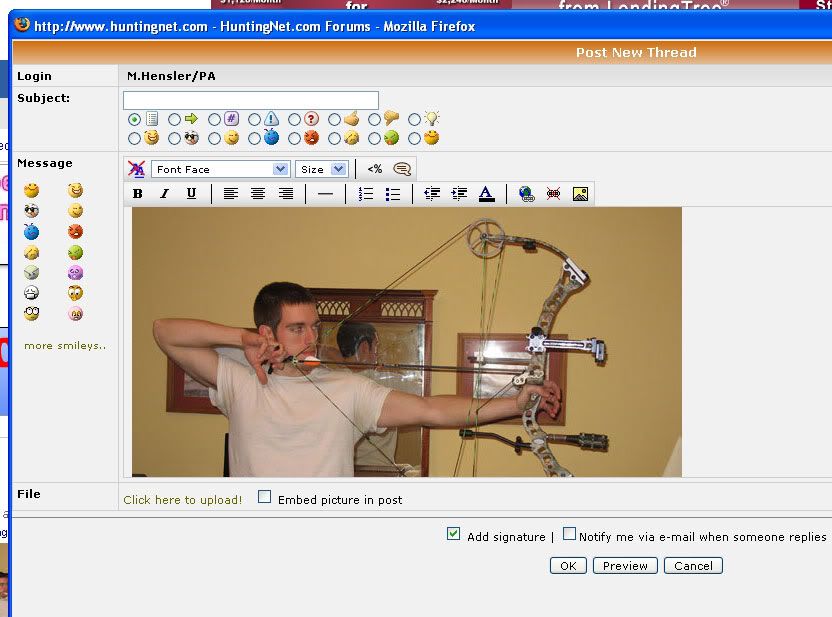
That's it! You've now inserted an image in your post! All you have to do is add any other various text (if you want) to the post, then click
OK when finished, and your thread will now display your picture right in the post. If you want multiple images in one post, read on.
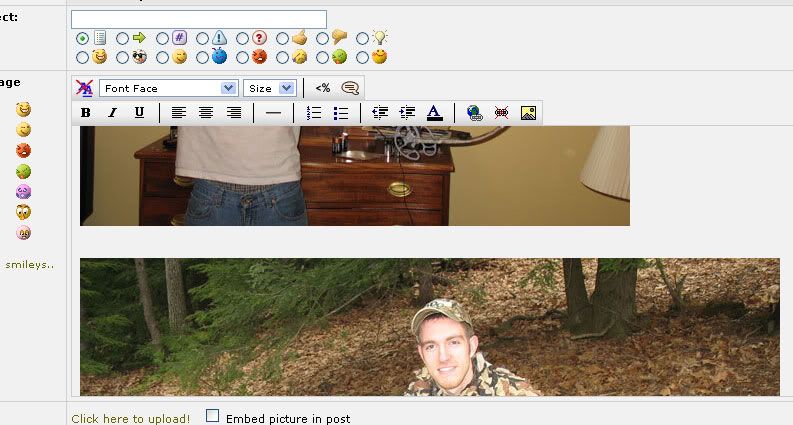
Step #5 (Adding multiple images in a post).
I've heard a few people ask about adding several images to one post (having them appear one after the other vertically). It's actually pretty simple. Once you've added ONE picture to the post using the above method, simply locate your blinking cursor in the post (it's just a blinking line where you're typing) right at the lower left hand corner of the image. Simply press
Enter once or twice to make a space between the first and second image. Your cursor should now be located like the following image:

Then all you need to do is repeat the process (locate the picture in Photobucket, right click the
DIRECT LINK box, come back to the post and click the mountain icon, right click and choose
PASTE, then click
OK). Your post should now contain two images...one on top of the other like this:
 Well, that's about all there is to it. Again, if anyone has any suggestions or additions they would like to add, feel free to PM me. I hope this post will serve to help those of you unfamiliar with posting pictures online make the experience a little easier.
RESIZING YOUR PHOTOS
Thanks to jmbuckhunter for suggesting this. For many of you, you will be uploading unresized images straight to photobucket. If you don't resize the images before inserting them into the post, they will often cause the forum page to distort, creating scrollbars, make for awkward reading, and worst of all, larger images generally slow down the forum. So, if you don't have a way to edit your images before posting, here's a quick rundown on how to resize your images once they're in Photobucket.
Step #1 (Locate the image).
Find the image on your gallery homepage. Above the image you will see several links. Click on the
EDIT link as shown in the picture below:
Once you click this, Photobucket will load it's image editing feature (have some patience as this app may take a while to load depending on your internet connection). Once loaded you will see your picture in the center, and a menu bar up top that looks like this:

You will notice, there are several editing options/features available. We're just concerned with resizing for now. Click the resize button that's identified in the picture above. You will then see this toolbar load:

There are several options here for resizing. First in the
NEW SIZE section, you can simply re-enter new width and height numbers to resize the image (first number is width, second is height). You can also use the width and height sliders found directly to the right to resize the image. However, since we are using this forum posting, Photobucket has a nice quick feature built in for you. Locate the
PRESET SIZES drop down menu. Click on it and you will see the following options:
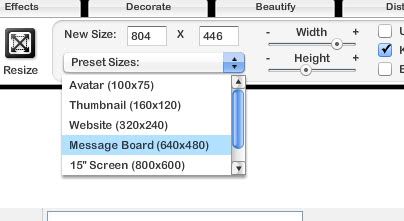
These are built in sizes for specific purposes. When selected, the image automatically resizes to those dimensions. You will notice there is a
MESSAGE BOARD option set for
640x480. This is a nice size for posting in forums like HNI. Just the right size. Go ahead and select that. You should see your image shrink. When finished, simply click
SAVE at the bottom, and you will return to your album. Your image is now resized! You can now proceed with
STEP #3 listed above in the posting procedure!