
|
Headspacing a Knight Breech Plug
I thought it would be good to do a YouTube Video on Shimming/Headspacing a Knight Bare Primer Breech Plug, This is geared toward the folks that do better when they can get a Visual on a Project. Mr Sabotloader has an AWESOME Pictorial Layout on doing this SIMPLE Procedure (How i learned to do it) Hopefully he will ad that here in this Thread :cool2:, This is REALLY easy to do Folks, and it WORKS EXCEPTIONALLY Well, After 10-12 Shots of Real Blackpowder Through my New Knight Mountaineer You could eat from the Breech of my Rifle, it stays as clean as a Centerfire! If you follow this procedure it puts an END to Blowback I have had ZERO Stuck primers, When i open the Bolt the Spent Primers literally Fall in my Hand Do yourself a BIG favor and get a Lehigh Breech Plug, and Vent liners. Here is a link to them http://www.lehighdefense.com/all Here is what my Primers look like from 2 Different outings, 2 Different Powders/Projectiles Spent primers using Real Blackpowder  And using BH209  |
Nice video Lewis. I think it should go up in the stickies.
|
Originally Posted by bronko22000
(Post 4358402)
Nice video Lewis. I think it should go up in the stickies.
Even with the video, there will undoubtedly be questions as you begin this process and now they can be answered by an individual that just did it. |
I Agree, This is as good a “Sticky” Material as there is. Between Sabotloaders Pictorial, With Description, And this Video i did, It explains and Shows Exactly how to Shim/Headspace the Primer to Breech Plug. This is DEFINITELY Important |
Thread has been "stuck" as I believe it contains valuable information that shouldn't be lost in the depth of the forums.
sabotloader, do you have a picture tutorial posted somewhere that I can merge with this thread? -Jake |
Originally Posted by Bocajnala
(Post 4358484)
Thread has been "stuck" as I believe it contains valuable information that shouldn't be lost in the depth of the forums.
sabotloader, do you have a picture tutorial posted somewhere that I can merge with this thread? -Jake mike |
Ya bump it back to the top for me and I should be able to merge it over
-Jake |
Shimming a Knight Breech Plug
Shimming a Lehigh/Knight Breech Plug I thought I would resurrect this post since it is the time of year that everyone is shooting. One thing that I really should mention - if you are the owner of a newer Knight and you are getting a lot of blow back out of the breech plug or your Primer might be sticking after shooting - Knight will and can fix this problem for you. Although if you want to fix the problem yourself these instructions should help you get it done... Thought I had posted this on here before but can not find it all... so here is a copy OK finally getting time to get to this. I am not the best writer in the world so I am hoping this makes sense to most. Headspace or the lack of can be one of the biggest reasons that a primer from the battery cup is forced up into the hammer hole in the face of the bolt. If you look carefully at this picture of a Knight NFPJ Breech Plug you can see the SS shim installed in the bottom of the primer pocket to achieve a 'primer crush' and 0 headspace with a given primer. And in my case it is modified to accept W209 primers. Most new rifles in the Mountaineer series and possibly the new Extreme series have a much tighter 'tolerance' on the depth of the breech plug pocket in the barrel. On the other hand older rifles like the Original DISC the tolerance level was much lower. In those days no-one thought about a clean breech. I have two Original DISC's that the breech plug need to be shimmed to 0.025" to achieve 0 headspace. Even older DISC Extremes/Elites can vary by as much as 10-15 thou. It seems to me the new Mountaineer series can vary but 0.005" and some will require shimming. Not all of this is dependent on the depth of the BP hole. If the bolt length is off just a little it will greatly effect the head space. Even the rear of the bolt and how it closes can effect headspace. So it really does not have to be one thing. It really helps if you determine the measurement of what shims you might need to fix your problem before you start shimming. The shims for this process come in 3 thicknesses and 2 OD sizes that you can use. OD sizes.... there are a group of shims with an OD of 0.241" that will drop right into the primer pocket. With these shims you can just keep adding shims until you feel the primer crush. Then add up the number of shims you have installed and you will know what you might need. The 0.241" will then fall out or can be easily pulled out to empty the primer pocket. The second OD size shim is a 0.248" shim and will/can pressed into the primer pocket. This shim will stick and stay in the primer pocket - you will not be able to remove it. So before installing these shims make sure you know the size you need to use. This is a package of 0.0248" x 0.032" shims -probably a size you will never need but they are available. This picture shows a 0.0248" x 0.005" shim inserted in the top of a BP ready to be driven down with a spent 209 primer and a plastic mallet. This link should carry you to the McMaster-Carr catalog page for the correct shims McMaster-Carr For the 0.241 OD shim look in the group of shims labeled -> 18-8 Stainless Steel. Three sizes 5 - 16 - 30 thou thickness. I see no reason to get any 0.030 shims, followed only a few would ever need 0.016 shims. The 0.005 is probably the best all around for testing to achieve the correct fit. For the 0.248" OD shim look in the -> Spring Steel section -> for shim thicknesses of 5 - 15 - 32 thou. These shims can be pressed in for a permanent fit. An easy way out of all of this is to use high pressure rubber "0" rings... they normally last about 50 shots. Achieving 0 to near 0 headspace is a real desirable in my mind. Shimming Continued - UP Date This is the method that I use to get to correct amount of shimming in place. With the breech plug installed snuggly in the rifle 1. Remove the bolt assembly from the rifle. 2. Remove the hammer/firing pin assembly from the bolt 3. Reinstall the bolt housing in the rifle. a. When you push the bolt forward and release the handle it should just fall down into the closed position – ne resistance at all. b. Next install a primer in the nose of the bolt and repeat the test. i. If the bolt handle falls to the bottom again then you need to into install shims in the primer pocket to get the correct headspace. ii. If the handle does not fall to the bottom and you encounter some resistance the head space is probably near correct. It should take some effort to push the bolt handle down. If the handle falls to the bottom with no resistance with a primer installed you will now need to find out how many shims you are going to need to install. For this operation I use the .214 x .005 OD shims. Also during this process the breech plug should be very clean and DRY, so the .241 shims can be easily removed. 1. Remove the breech plug and drop 1 of the shims into the primer pocket. Use a spent primer to make sure the shim is pushed all the way down and sitting on the primer shelf. 2. Install the breech plug in the rifle and repeat the steps above. Make sure the .241 shim does not fall out of the BP while doing all of this. 3. If you still do not get any ‘primer crush’ install a second shim and repeat the process. 4. When you do get ‘primer crush’ them pick out 4 new primers and repeat the test on each primer to see if all 4 feel as they are ‘crushing’. 5. Remove the breech plug and get all of the .241 shims out of the primer pocket. Count the shims to make sure you have them all out. With this information you now know how many .248x.005 shims you need to install to achieve ‘primer crush’ and 0 head space. When installing the .248 shims – place the breech plug on a smooth flat surface. 1. Place a .248 shim in the top of the BP primer pocket. 2. With a pair of needle nose pliers grip a spent primer place it on top of the .248 shim and with a small mallet tap the primer and shim down into the primer pocket. 3. Make sure it bottoms out and is sitting on the primer shelf. 4. Install the BP and bolt housing and test for ‘primer crush’ 5. Repeat this process until you have achieved 0 head space. If you do not want to purchase the extra .241 shims you can use the .248 process one shim at a time to shim your BP. Just remember once they are installed – they are not in most cases ever coming back out. So be careful and go one shim at a time. This is a link to the original post. https://www.huntingnet.com/forum/bla...eech-plug.html |
Very interesting
|
Shimming a Knight Breech Plug
After mudging up tang/lug of my first one with parallel jaws, i ground the jaws of an adjustable wrench Crescent to fit the tapers of the breech plug lug. Might not match all plugs, but can be modified again if necessary.
|
Great adds Idaholewis & sabotloader! I'd like to know if this "fix" would apply to my Knight Bighorn. As you may remember, I have a 1x scope on it and I've had a heck of a time trying to insulate the scope from blowback. I used my T/C Renegade stock with the Green Mountain 50 cal barrel this season over my Knight partially because of this blowback issue. The T/C is just easier to deal with but I feel that I am still more accurate with the Knight. Nice finding you guys again.
|
No this solution is specific to bolt action Knights. There is no bolt handle on a Bighorn. Adding shims to a plunger gun wont do anything to help blowby.
|
Originally Posted by Huntin_Jim
(Post 4364363)
Great adds Idaholewis & sabotloader! I'd like to know if this "fix" would apply to my Knight Bighorn. As you may remember, I have a 1x scope on it and I've had a heck of a time trying to insulate the scope from blowback. I used my T/C Renegade stock with the Green Mountain 50 cal barrel this season over my Knight partially because of this blowback issue. The T/C is just easier to deal with but I feel that I am still more accurate with the Knight. Nice finding you guys again.
This not a great picture but it shows the scope bra installed around the scope. Held in place with black zip ties 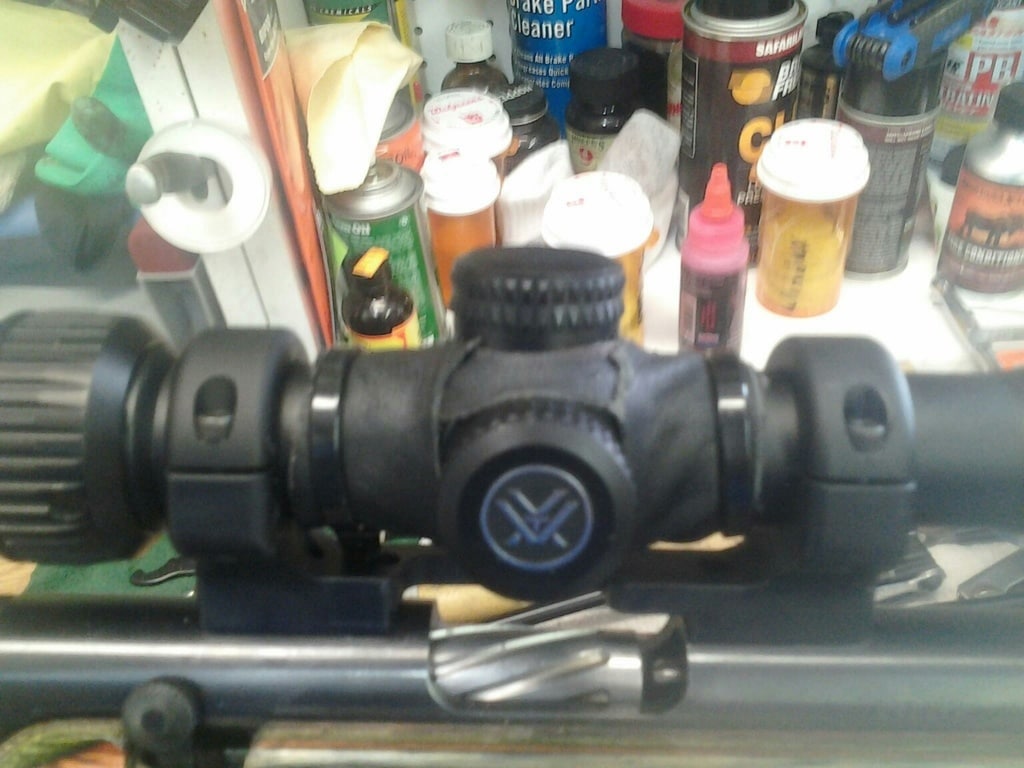 Another example  This a template that might help building a protection device 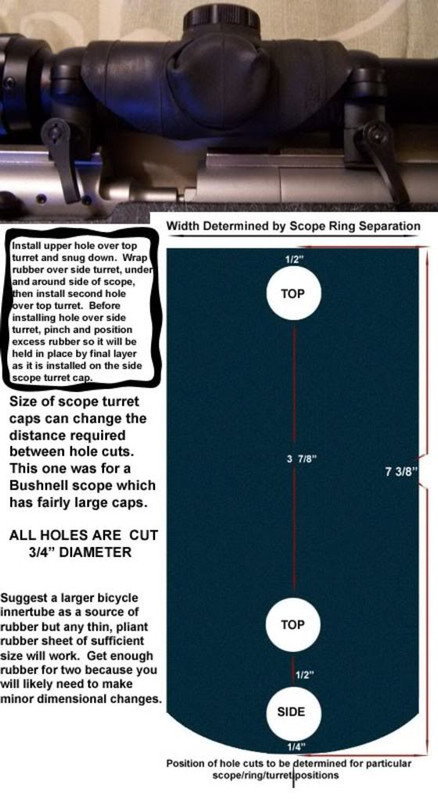 |
Thank you for the details Mike!
|
UBet! give it a try.
|
Nice fix on the Breech plug, but you'd think Knight would have addressed the problem and re made a better BP.
|
Originally Posted by Breechplug
(Post 4369656)
Nice fix on the Breech plug, but you'd think Knight would have addressed the problem and re made a better BP.
|
Originally Posted by sabotloader
(Post 4369707)
They certainly could probably fix the problem if everyone agreed to use the same primer! The primers come in many different dimensions, both in circumference and length.
When I owned the Knight Mountaineer in the Video above, I bought 4 or 500 Winchester 209s for use in it. I found that they Varied Slightly all throughout the Same Boxes, I ended up measuring and Sorting ALL of my Primers. I couldnt use The Largest ones as they would Get Sticky to Extract. As Sabotloader Said, If Knight were to try and Correct this, EVERYONE would need to Use the Same Brand of Primer, And even then you would likely end up needing to Sort Through them for Best Fit Nature of the Beast, so to speak. If you take the Time to Follow the Above, It DEFINITELY Works. I got ZERO Blowback, I shot as many as 20-22 Shots on a Few Different Outings, and i use Swiss Real Blackpowder to Boot. My Spent Primers from a Few outings   The Breech of my Rifle after Shooting, 100% CLEAN  |
As always you got me on that one, I should have known better myself that Primers are all different but I wasn't thinking. A Good Fix and Nice Video's on explaining the process.
|
Originally Posted by Breechplug
(Post 4369741)
As always you got me on that one, I should have known better myself that Primers are all different but I wasn't thinking. A Good Fix and Nice Video's on explaining the process.
With the Primer Variances, You can see how difficult it would be for Knight to Try and Tighten the Tolerance, It would end up being nightmare for them. Its better for the Owner to Choose what primers he Wants to use? And Shim the Breech Plug accordingly. It would Sure be NICE if they Sent a Shim kit to Do the Job Though, instead of the New Owner of the Rifle having to Purchase them Separately :) |
Its not a Knight issue either. The same problem plagues CVA, Traditions and T/C. Ive seen pictures of CVAs that looked they had not been cleaned in a year from just 10-12 shots. Westerns solution was to include o-rings with their plugs. You cant really use those very well on a bolt gun.
|
Originally Posted by Gm54-120
(Post 4369813)
Its not a Knight issue either. The same problem plagues CVA, Traditions and T/C. Ive seen pictures of CVAs that looked they had not been cleaned in a year from just 10-12 shots. Westerns solution was to include o-rings with their plugs. You cant really use those very well on a bolt gun.
I have NOTHING but good to Say about Knight Rifles, I had Great Luck with my Knight Mountaineer, The few times i called the Knight Company, they Answered the Phone, were Kind/Courteous in Answering any Questions i had? I HIGHLY advise their Rifles to ANYONE looking for a Nice Production Inline Rifle. I have helped sell MANY of them!! |
My post should have said
Its not just a Knight issue either |
Originally Posted by Gm54-120
(Post 4369859)
My post should have said
Rifles that are new out of the box clean shooting are rare by comparison. T/C's Omega was one of the few you could tighten the falling block assembly and possibly tighten the head space a little. Knights and other bolt actions you are stuck shimming or having a custom plug made if you want to use a 209 primer. A few get lucky and a Win209 works fine. The Lehigh Plug is a MUST, VERY High Quality Breech Plug, The Plug itself Should Last the Life of the Rifle If Properly Cared for. The Lehigh Vent Liners seem to LAST N LAST Which is AWESOME! After all of the Shooting i did with my Mountaineer, BIG HEAVY Lead, and Reasonably Stout Charges of Swiss Real Blackpowder (Recipe For Eroding Flash Channels) My Vent Liner flash channel showed ZERO wear, it was Literally like Brand New the Last time i Shot it. I can’t speak Highly enough of the Lehigh Plug, and Their Vent Liners, They are TOP SHELF!! When Properly Headspaced in a Knight Mountaineer, Or an Ultra Light, As Good as it gets in my Opinion for Factory, Current Production inline Rifles Headspacing these Plugs is NOT a Big Deal, in fact it is Extremely Simple to do, Hopefully Threads like this Help educate Folks on Doing it, the importance of it, and how easy it actually is to do. |
Mine was too tight if i used an Elite bolt. Crush (.007+) was too tight with a Win209. Using a Mountaineer bare primer bolt its not bad with the Lehigh plug. A tiny bit sticky with a few primers until i polished the primer pocket for a minute. I do that to all plugs though. I dont think its going to need a shim atm. Maybe a .003 at most if it does. Primers fired without powder come out clean. Even the Feds came out pretty clean but im betting they will stick a little with powder. Not stick in the plug but stick in the bolt if head space is a little off. I ran into that with the Super DISC 45. Not all the time but often enough it was very annoying.
My Bestill plug with a .006 crush on a Win209 seems to work ok with a Fed209A also. I asked him to make it just a little tight for a Win209. Then i can use both as long as i sort out the overly long Wins. |
Looking Back, I had this “Over Crush” Sticky Extraction Problem (Due to Various Primer Lengths) in my Knight Mountaineer when i made the 600 Yard Gong Video. I didn’t realize what was happening right then? I thought it was Dirty? But it wasn’t, it was due to a Larger .300-.301 Primer. As stated above, My Win 209 Primers Varied in Length from the Same Boxes, .296 to .301, The .300 and .301s Would Get Sticky Extracting
after the 1st, or 2nd Shot you hear me Say Something about “Sticky Extraction” here in the Video, and i wasn’t sure if I would be able to Carry on and Shoot anymore? It was after THIS Shoot that i measured, and Sorted ALL of my Primers. |
My plan is to setup the "tight plug/bolt" combination for a Rem STS primer. I just need to either find mine or go get more and buy another Lehigh plug to modify. Only place that has the Rem STS though is a drive so im waiting till they get some Speers 260s in stock. The Rem STS primer is as hot as a Win209 but its MUCH shorter. Its also more consitent in length from what some people claim. I got some im sure but ive just been too lazy to dig them out. I prefer the Lehigh NFPJ adapter over the bare primer bolt for hunting. Its easier to load without any tool.
  |
| All times are GMT -8. The time now is 04:52 PM. |
Copyright © 2026 MH Sub I, LLC dba Internet Brands. All rights reserved. Use of this site indicates your consent to the Terms of Use.