


Polishing the Forcing Cone
 01-25-2011, 03:45 PM
#1
Typical Buck
Thread Starter
Join Date: Feb 2010
Location: Indiana
Posts: 655
I just got a new choke tube (Rhino .680) - exactly what I wanted!!!) Hubby surprised me yesterday - - - Yay!!! 
In doing some reading on their website - they talk about "polishing the forcing cone". They say this reduces your shot deformation.
Anyone here know anything about this? I've heard it mentioned with some buddies of mine - but not sure what you all know about it. (I'm clueless!) Any helpful advice would be awesome!
Kim
 01-25-2011, 05:00 PM
#2
Fork Horn
Join Date: Nov 2010
Posts: 161
If your shooting lead loads only, I would say that is very much true and will help your patterns. If your shooting Heiv-13 loads, I don't know for sure if it would help you much at all. Hevi-Shot is harder than regular lead shot and shoots extremely well in most barrels with good turkey chokes like Indian Creek.
01-26-2011, 07:56 AM
#4
Nontypical Buck
Join Date: Feb 2003
Location: NewLowell ,Ontario ,Canada
Posts: 2,765
Polishing Turkey Guns
Polishing Barrels mean a little work and cleaning them with a bore snake is NOT going to cut it. A barrel of a gun should be worked on for some time. First to gather the tools you need.
1/ Oil or WD-40
2/ A brass brush
3/ Cleaning swabs
4/ A cleaning rod that will fit into a power drill
5/ The power drill � is best
6/ Steal wool grades 00 and 000 and 0000
7/ Scotchbrite in different colours
Scotchbrite can most times be bought in dollar stores and hardware stores. When I take the gun back to the cleaning room I will spend a good 1/2 to an hour
First place your barrel in a vise with wooden or rubber on each jaw between the vise jaws and barrel so you do not mark your barrel as you work. Take out your turkey choke and only use a IC choke to polish with. (Polishing with a turkey choke could change the way your choke works.)
Starting with a wrap of 00# steel wool on a cleaning brush, on the rod and run it up and down the barrel a few times. Mark your rod with small pieces of tape so you know where the brush is in the barrel when your polishing so you don’t run it out the end or slip it out when you bring it towards yourself. This helps save time and your material your working with. Once I have used the 00 steal wool and worked the rough areas of the barrel over well, I will change and run a white cleaning patch to collect the crud and clean up the inside, and look to see how it did and what I have left for rough spots. Sometimes you will need to work an area in the barrel a number of times to get that glass finish look. I then drop down to 000# steel wool do the same once again only few times. Once I finish with the 000# steel wool, I will run the 0000 a few times.
Some barrels will not need a lot of work and some you will not need to use all the steel wool steps. Your after a smooth glass finish look inside that barrel when you look through it up at light.
I then go to scotchbrite and start with Dark Grey and work the barrel up and down a number of times and then clean it with a white cleaning cloth. Always use a little spray of WD-40 on the first piece and then do it again a couple times dry. As I work each colour a couple times with blue, green and repeat the process until I end up using white for the last of the cleaning until I can run it up and down the barrel and it comes out White with no dark or black fowl at all on it. You will use a lot of white, so stock up on it. These stepped instructions are is not something you need to do every time you clean your gun, However I do clean mine with the white
scotchbrite after a dozen or so shots throughout the year. Once you have polished your barrel you will never have to re work it again as it is a lot easier to get that Glass look with only 15 minutes of cleaning.
White is the finest and will polish the barrel to a Glass shine finish from one end to the other. The forcing cone area will be the hardest to clean down to a shine, but it can be done and not in 10 minutes of work either, spend a little time at this.
In my opinion here will say I have tested turkey guns in 12 and 20 and have seen what is working and what does not do so well. Sizing is the most important part of the choke for what you intend to use for shells. If you are using the 12 gauge and want to start out in the right step, start with spending a little bit more money in a choke and get something that is going to produce what you’re after in the first place. Next make sure you read the information on the choke and get what you plan on shooting as in hevi shot or copper/lead loads. A little tip is that you can shoot copper with a hevi shot choke, but you are not to shoot hevi shot with a lead only choke the difference is in the metal used in the choke. Sizing that I have found the best in both 12 and 20 gauge are
12 gauge - .660 for copper loads and .665 -.670 for Hevi shot.
20 gauge -.555 -.570 for Hevi shot and this works for both shell types.
Last edited by Adrian J Hare; 01-26-2011 at 08:06 AM.
01-26-2011, 10:55 AM
#5
Fork Horn
Join Date: Nov 2010
Posts: 161
Here's the method I used pretty much. My barrels are slicker than a baby's butt.
I did polish both of my chambers even though some say not too. It don't hurt a thing as long as you use that method above. All it does is help your action cycle shells in and out of your chamber more smoothly is all. Your not removing steel your just polishing.
http://oldgobbler.com/TheForum/index...c,30351.0.html
Last edited by Brad C.; 01-26-2011 at 10:59 AM.
01-29-2011, 05:14 PM
#7
Typical Buck
Thread Starter
Join Date: Feb 2010
Location: Indiana
Posts: 655
Yes! Thank you guys - this was really helpful!!! I'm anxious to try it out. Hubby worked p/t helping a gunsmith and he remembers a lot of turkey hunters bringing their shotguns in to have this done...
Kim
Kim
03-13-2011, 06:03 AM
#8
Super Moderator
Join Date: Feb 2003
Location: Seagrove N.C. USA
Posts: 7,281
Just have a gunsmith lengthen the forcing cone.
When shotgun shells were first made, they used paper wadding.
And for the wad to seal they made a forcing cone for the wad to seal to prevent burning gas from escaping.
Then came the plastic wads in shotgun shells, but shotgun makers kept making barrels with the old style forcing cone.
When the shotgun fires the plastic wad seals as soon as the gun is fired.
So the need for short forcing cones isn't necessary.
Lengthening the forcing cone does two things,
First it reduces felt recoil by about 10 %,
And decreases the pattern about 10 %
With the old style, after firing the some of the shot would flatten out hitting the forcing cone, and as it passed the choke the flattened shot would just fly wildly and get lost.
With the forcing cone larger, the shot doesn�t get deformed, and keeps going in a straight line.
Between the left, and right arrow is where the crimped part of the shell goes after firing.
The highest point of the forcing cone is where the shell and wad seal the gases to drive the wad, and shot forward.
Before with paper wads it had to be sealed quickly, to keep the gasses from escaping, but with plastic, it seals as soon as the shell is fired, keeping the gases from escaping.
Forcing cone before.

Forcing cone after it has been lengthened.
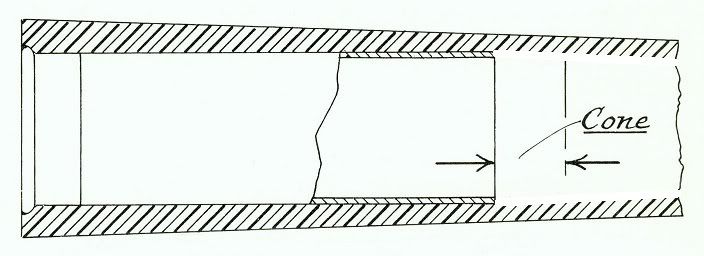
I hope this helps.
jrbsr
<�)))><
When shotgun shells were first made, they used paper wadding.
And for the wad to seal they made a forcing cone for the wad to seal to prevent burning gas from escaping.
Then came the plastic wads in shotgun shells, but shotgun makers kept making barrels with the old style forcing cone.
When the shotgun fires the plastic wad seals as soon as the gun is fired.
So the need for short forcing cones isn't necessary.
Lengthening the forcing cone does two things,
First it reduces felt recoil by about 10 %,
And decreases the pattern about 10 %
With the old style, after firing the some of the shot would flatten out hitting the forcing cone, and as it passed the choke the flattened shot would just fly wildly and get lost.
With the forcing cone larger, the shot doesn�t get deformed, and keeps going in a straight line.
Between the left, and right arrow is where the crimped part of the shell goes after firing.
The highest point of the forcing cone is where the shell and wad seal the gases to drive the wad, and shot forward.
Before with paper wads it had to be sealed quickly, to keep the gasses from escaping, but with plastic, it seals as soon as the shell is fired, keeping the gases from escaping.
Forcing cone before.
Forcing cone after it has been lengthened.
I hope this helps.
jrbsr
<�)))><
03-13-2011, 08:21 AM
#10
Nontypical Buck
Join Date: Feb 2003
Location: west central wi USA
Posts: 2,242
I think lengthening and/or polishing the forcing cone has shown to improve patterns where the the barrel is the standard 12 ga. diameter. It's not as much a factor where the barrel is overbored such as Mossberg and Browning. The forcing cones are much less pronounced with those configurations.